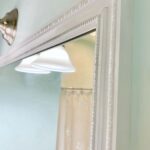
DIY Bathroom Mirror Frame
Elevate your builder grade frameless bathroom mirror in a few easy steps!
Equipment
- 1 Cordless finish nailing gun or a Brad nailer (or hammer and finish nails)
- 1 Philips Screwdriver
- 1 Miter saw or hand saw
- 1 Table saw
- 1 Tape measure
- 1 Paintbrush
- 1 Caulk gun
- 1 Stud sensor optional
Materials
- 2 8 ft Decorative Trim (this may vary according to the size of your mirror)
- 1 tube Wood glue (or liquid nails/construction adhesive)
- 1 box Nails - 6D finishnails (2" finish nails)
- 1 can Paint (latex, chalk, or spray paint)
- 1 piece Paintbrush
- 1 piece Sandpaper
- 1 can Painters putty
- 1 tube Caulk
- 1 piece Drop cloth ornewspapers
Instructions
- Prep Day:Cutting the Trim: Start by cutting the 8-foot trim pieces into 2 pieces measuring 50 inches each, leaving 2 pieces at 46 inches, creating a total of 4 boards.
- Cutting the Trim: Start by cutting the 8-foot trim pieces into 2 pieces measuring 50 inches each, leaving 2 pieces at 46 inches, creating a total of 4 boards.
- 45 Degree Angle Cuts (Corner Cuts): Use a miter saw to cut each corner at a 45-degree angle. Ensure a perfect fit for installation.
- Painting the Trim: Sand any rough edges, then paint the trim. Paint the top part of the groove and the top and sides of the trim with two coats.
- Installation DayRemoving the Mirror: Unscrew the mirror clips and lift the mirror off the vanity top.
- Cleaning Up the Vanity Countertop: Remove any clear silicone from the countertop using a screwdriver, preparing it for the new frame.
- Gluing the Prepainted and Precut Boards: Starting with the bottom piece, add wood glue and place it on the wall right on the vanity counter.
- Nailing the Trim: Use a nail gun to attach the trim to the outside thick part of the frame, avoiding the edge of the mirror. Repeat for the left side.
- Sliding the Mirror in Place: Slide the mirror along the precut grooves.
- Installing the Remaining Boards: Add the right side trim and top trim using the same process.
- Installing the Remaining Boards: Add the right side trim and top trim using the same process.
- Applying Caulk: Caulk around the edges and seams for a finished look. Wipe off excess caulk with a wet towel.
- Touch up Paint: Complete the frame by applying touch-up paint to the DIY bathroom mirror frame.