How to Hang and Style Christmas Garland on a Mantel
To hang and style Christmas garland on a mantel, start by placing small adhesive hooks or cord bundlers along the top or underside of the mantel to anchor the garland securely. Layer two garlands together to add fullness and texture, such as mixing pine and cedar styles. Attach one end at the corner of the mantel, let the garland naturally drape across, and allow the opposite end to rest at the other side or drop down the front. Adjust the branches to create a soft, natural shape. Weave in battery operated twinkle lights and hide the battery pack behind decor on top of the mantel. Keep decorations simple by adding one intentional focal point such as a bow or ornament cluster rather than decorating the entire length of the garland.

Content may contain affiliate links. When you shop the links, we receive a small commission at no cost to you. Thanks for supporting my small business.
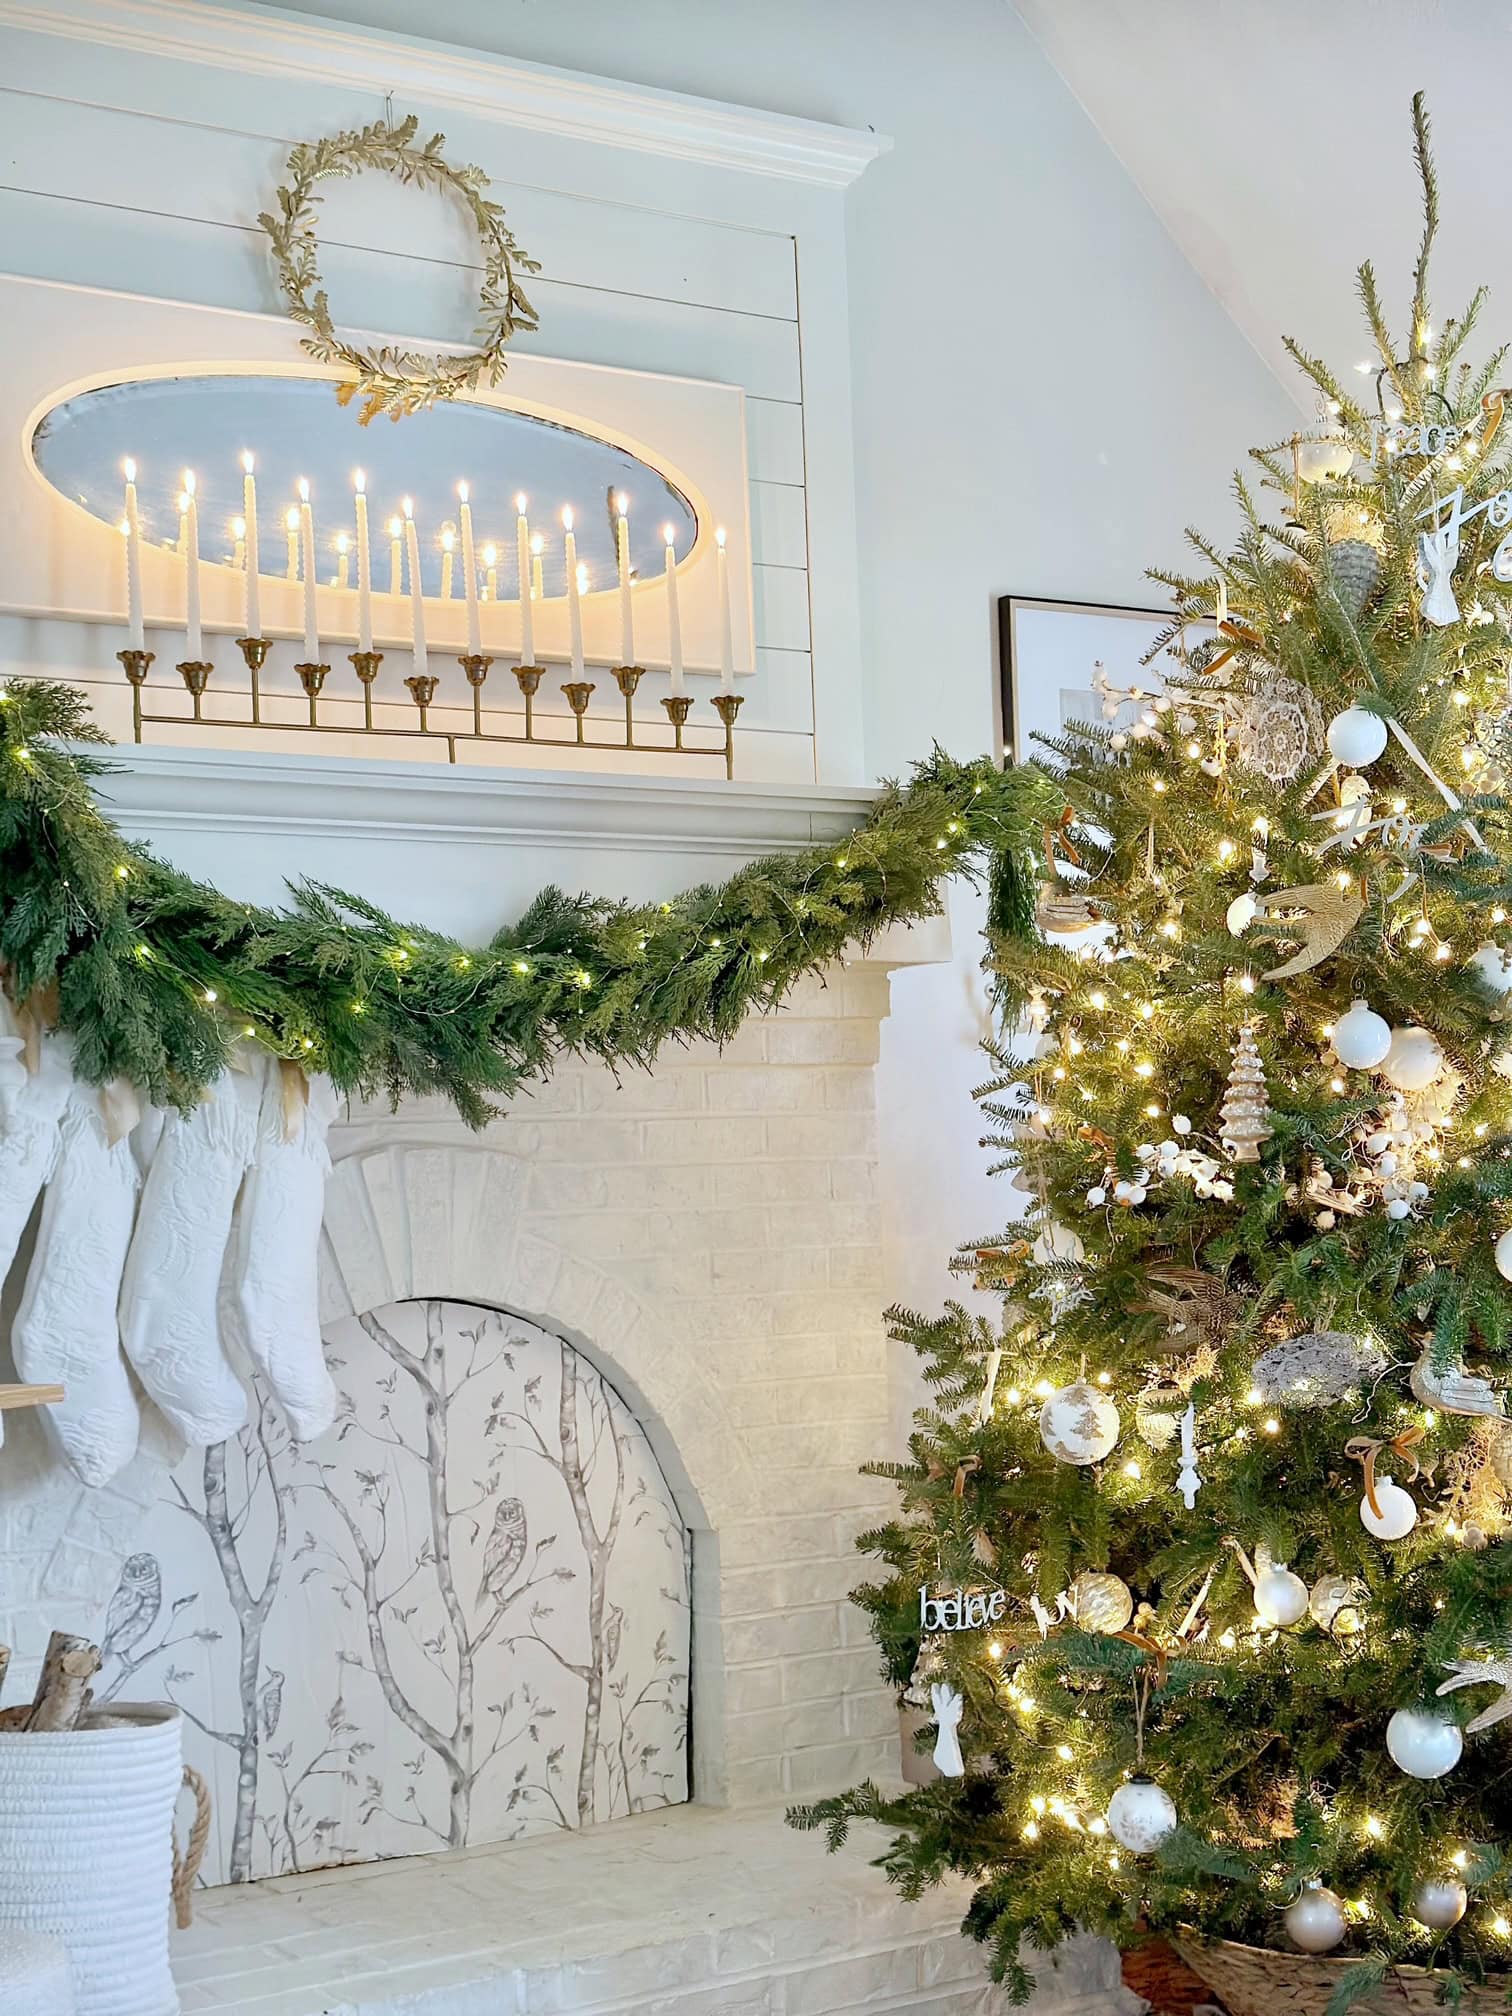
A mantel is often the focal point of holiday decorating, and the garland is what brings it to life. The challenge is getting the garland to look full, natural, and gracefully draped instead of thin or stiff. Over the years, I have found that a few simple techniques make all the difference.
I like to use two different artificial garlands layered together so there is variation in texture and color. This creates a fuller, more natural look without needing to add a lot of decorations. I also prefer to keep the styling simple. One intentional focal point, warm twinkle lights, and a clean drape across the mantel create a look that feels elegant and collected rather than busy.
Below I am sharing exactly how I hang and style the garland on my mantel, step by step, along with the garlands and tools I use to get this look.
Jump to:
Choose garland that looks real
The most important part of styling an artificial garland is choosing one that looks as close to real greens as possible. Color is the first thing I pay attention to. Real evergreens have natural depth and variation in their greens. If a garland is a bright lime green or has a shiny finish, it will be harder to style in a way that feels natural.
Material matters too. A good garland should bend softly and drape rather than stay stiff or spring back when you try to shape it. Many garlands are now labeled Real Touch, and that is usually a good sign. Real Touch garlands tend to have a softer feel and a more realistic texture that hangs nicely instead of looking plastic.
When you are browsing, look for garlands that mimic specific greenery varieties like pine, cedar, balsam, or Norfolk pine. These tend to look more authentic than general evergreen styles. The more natural the color and texture, the easier it will be to create a garland that feels collected and effortless instead of artificial or forced.

Why I always use two garlands
Even when you find a garland you love, most are not quite full enough on their own for a mantel. This is true for inexpensive garlands and even many higher quality ones. To create that lush, full look, I always layer two garlands together.
You can mix two different varieties, like a full pine garland as the base and a softer cedar garland layered on top. The variation adds movement and depth, and it keeps the garland from looking flat. If you prefer a classic, matching look, you can also use two of the same garland. Doubling up simply gives you the fullness needed to drape across the mantel and still have enough length to fall gracefully on one side.
Using two garlands gives you that natural, gathered look, even if everything is faux.
Shop garlands

Measure your mantel before you begin
I'll be the first to admit I am not a big measurer. I tend to "eye it" and adjust as I go. But when it comes to garland on a mantel, a quick measurement does help. It makes sure the garland will drape the way you want it to, without ending up too short or too long.
Here is the easiest way to do it, no fancy tools required:
- Measure the length of your mantel from end to end.
- Then decide how far down you want the garland to fall on one side. Mine drops about 18 inches.
- Add those two numbers together. That total is the length your garland needs to comfortably cover.
For example, if your mantel is five feet long and you want an 18 inch drop, you will want at least six and a half feet of garland. Most garlands come in six or nine foot lengths, which is one of the reasons I layer two garlands together. It gives me the length and the fullness needed to shape a gentle drape.
If measuring isn't your strong suit, here's a simple visual cue:
Once the garland is in place, the lowest point of the drape across the mantel should sit about 10 to 12 inches below the top surface. This creates that soft, natural sweep that looks effortless and collected.
A quick measurement and a gentle drape are all you need for the garland to look intentional rather than forced.
Tip: It is always easier to trim a garland than to try to add length to one that is too short. If you are deciding between sizes, go longer. You can tuck or trim any excess, but a garland that's too short will be difficult to style and won't drape the way you want it to.
What you'll need to hang the garland
- Scissors or snips for trimming length if needed
- Two artificial garlands (one fuller base garland, one softer or cedar-style layering garland)
- Command hooks or Command cord Bundlers (for on the mantel)
- Green floral wire (or green pipe cleaners, or green twine)
An artificial garland may come with lights already attached. Most of these garlands are powered by a battery pack. If you would prefer to plug in lights you could simply buy the lights separately just be sure an outlet is nearby.
How to hang garland on a mantel (Step-by-step)
- Place your hooks
Add small Command hooks or cord bundlers to the underside of your mantel. Place one at the corner where the drop will begin and one or two spaced along the mantel to support the sweep.
- Weave the two garlands together
If your garlands are layered, weave and nestle them into each other lightly. They do not need to match. The natural variation in texture is what creates a collected look.
- Secure the starting point
Gather both garlands together at one end and wrap them with green floral wire to create a small loop. This loop can go over a Command hook or a nail, whichever you prefer. Starting with a loop keeps the garland secure and makes the drape much easier to shape.
- Create the drop
Once attached, let the garland fall naturally down the side of the mantel. I usually let it drop about 18 inches. Do not shape or force it. The natural fall gives it softness.
- Shape the Swoop
Let the garland create one soft swoop across the front. The lowest part of the curve should sit about 10 to 12 inches below the top of the mantel. Do not pull the garland tight. The relaxed drop is what makes the swoop look graceful instead of stiff.
- Secure the opposite corner
At the opposite corner, bring the garland back up to meet the top edge of the mantel and secure it with another small loop of floral wire. This finishes the shape and holds the curve in place.
- Fluff for fullness
Gently lift individual branches forward rather than pushing downward. This adds depth and movement without changing the overall shape.
How I style my mantel garland once it's hung
Once the garland is hung and the swoop is shaped, the styling comes together with just a few thoughtful touches. My goal is always to highlight the greenery itself and add small details that feel intentional, not busy.
What I used to style my garland
- 2 Warm white fairy lights with a timer
- Ribbon for a bow (I use a muted gold double-satin ribbon)
- Coordinating thinner ribbon(to hang ornaments)
- A few ornaments or decorative accents to hang from the drop
- Optional: a vintage-style bird or two
- Green floral wire (or green pipe cleaners) to attach pieces discreetly
How I put it all together
Step 1: Add the lights
Use warm white fairy lights with a timer so they turn on automatically each evening. I weave the lights into the garland loosely, tucking the thin wire slightly into the greenery instead of wrapping it tightly around. This keeps the look soft and natural. Place the battery pack somewhere discreet on the top of the mantel where it can be reached but not seen.
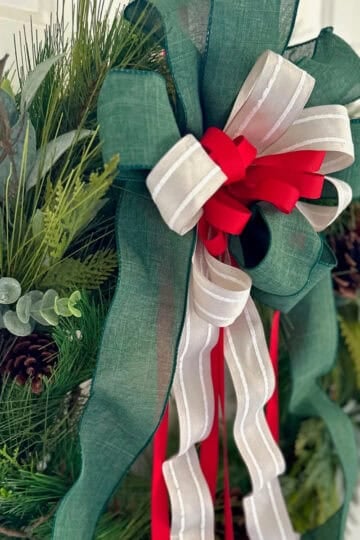
Step 2: Create your focal point at the drop
I keep all of the decorative elements concentrated at the point where the garland begins its downward drop. Tie your ribbon bow here first. Let the tails hang gracefully alongside the drop to emphasize the shape. This creates a focal moment that feels elegant and intentional.
Step 3: Layer in a few ornaments
with coordinating thinner ribbon, attach ornaments just below the bow, letting them hang at slightly different heights. I use ornaments that are white with subtle gold detailing so they blend softly with the greenery rather than competing for attention. Attach ornaments with thin green floral wire so the attachments stay hidden.
Step 4: Add one or two special accents
This is where I add my vintage-style birds. They sit just above or below the bow, as if they naturally belong there. I secure them gently with floral wire. These little details add personality and a story without overwhelming the garland.
Step 5: Leave the rest simple
I do not add picks or decorations throughout the length of the garland. The greenery and the swoop are the stars. A single focal point feels timeless and calm, and it allows the eye to rest. The garland glows softly at night and looks elegant during the day without appearing crowded.

Frequently asked questions
Yes, you absolutely can hang a garland without nails. Use Command hooks or Command cord bundlers along the underside of the mantel. Create a small loop with green floral wire at the end of your garland and hook that loop onto the Command hook. This gives you a secure hold without damaging the surface, and the wire stays hidden within the greenery.
The key is to start with enough length and to avoid pulling the garland tight. Let the garland fall naturally into one soft swoop. The lowest point of the swoop will usually sit around 10 to 12 inches below the top of the mantel. A relaxed shape looks more natural than a tight curve.
Yes. Most garlands look best when at least two are layered together. This adds depth, dimension, and the fullness needed for a soft drape. You can mix greenery varieties or use two of the same style depending on the look you prefer.
Measure the length of your mantel and add the length of your drop. For example, if your mantel is five feet long and your drop is 18 inches, aim for around six and a half feet of garland. This is another reason two garlands work well: they give you enough length to shape the swoop.
No. I focus all of my decorative elements at the starting corner where the garland begins its drop. A single focal point feels calm and elegant. The greenery and the drape are the main event, so keeping the rest simple allows the garland to look collected and natural.
The garlands I use in my home often come from a mix of places. Amazon is a great source for realistic greenery, especially if you look for "real touch" styles. I also find beautiful garlands at Hobby Lobby, TJ Maxx, Marshalls, and Michaels. The key is to look for natural color and soft, flexible branches that drape well.
More helpful holiday decorating guides


If you love a handcrafted look, try layering your greenery with a DIY dried fruit garland or a pinecone garland. Both add beautiful texture and a soft, natural feel to your holiday decorating.
When the season winds down, I pack up my garlands using one of the affordable storage options I share in my Christmas storage bins post. It makes decorating next year a little easier and keeps everything in good shape.
Thank you for spending some time here with me today. I hope these tips help you feel confident as you hang and style your own garland this season. Your mantel doesn't need to be complicated to feel beautiful. A little greenery, a soft swoop, and a few thoughtful touches go a long way. If you try this look, I would truly love to see it.
Happy decorating, friends!