Fall Centerpiece with Candles: A Playful Layered Table Idea on a Budget
Craving a fall centerpiece with candles on a budget? Look no further than your own home! I'm sharing a simple, no-fuss approach that anyone can master - no design skills required! Promise! This freestyle table centerpiece not only takes just minutes to put together but also lets you "shop your home" for materials, saving both time and money.
In this no-container, no-flower fall centerpiece idea featuring candles, I'll guide you through "building" a layered, neutral fall table runner centerpiece using items you likely already have. The result? A versatile, stunning focal point for both indoor and outdoor autumn gatherings that will have your guests swooning - all without opening your wallet!

Content may contain affiliate links which are paid links. When you shop the links, we receive a small commission at no cost to you. Thanks for supporting my small business.
Jump to:
- Break tradition, not the bank: A fresh approach to a fall centerpiece with candles
- Versatile design for any space: Adapt and save
- Helpful supplies and tips for this fall centerpiece with candles
- Adding clay pots
- Using fillers in this design
- White pumpkins for the win
- Supplies
- Frequently asked questions
- Step-by-step instructions
- Fall Centerpiece with Candles: A Playful Layered Table Idea on a Budget
- 10 creative fall centerpiece ideas on a budget
- More creative ways to style with white pumpkins
Break tradition, not the bank: A fresh approach to a fall centerpiece with candles
This budget-friendly centerpiece stands out from the crowd by breaking two common (and often expensive) traditions: it doesn't use a container or vase, and it skips flowers entirely! Instead, we're creating a simple, layered design that starts with a table runner you probably already own. From there, we'll add natural elements and items you can easily find around your home or backyard. This approach not only saves money but also allows for endless creativity as you "shop" your own space for unique additions. The result is a stunning, personalized centerpiece that looks anything but budget-conscious!
Versatile design for any space: Adapt and save
I first created this budget-friendly centerpiece on our outdoor dining table, but don't let that limit your imagination! The beauty of this design lies in its versatility and adaptability to any space or season. Whether you have an indoor dining table, kitchen island, buffet, console table, or even a coffee table, this centerpiece concept works everywhere.

Helpful supplies and tips for this fall centerpiece with candles
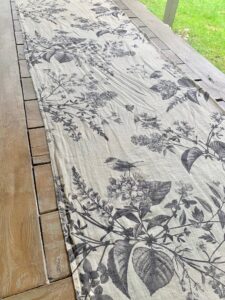
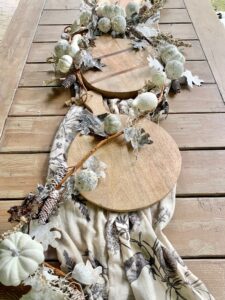
Start this centerpiece with a table runner, a throw blanket, or a folded curtain panel (which is what I used) this step will help define the space. Once this is laid down you will build the additional items on top of the runner. Next, use some sort of riser to help lift some of the elements used in this design. I used 3 cutting boards that were placed on top of the runner. While they seemed to get buried under all the white pumpkins, clay pots, garland, and filler they were helpful in making sure your centerpiece does not look like a lineup of fall items. Lastly, to cut corners and make this centerpiece extra easy, consider using premade garlands. I added 2 matching garlands in an "S" shape down the center of the table. This is not necessary but super helpful in filling the space.
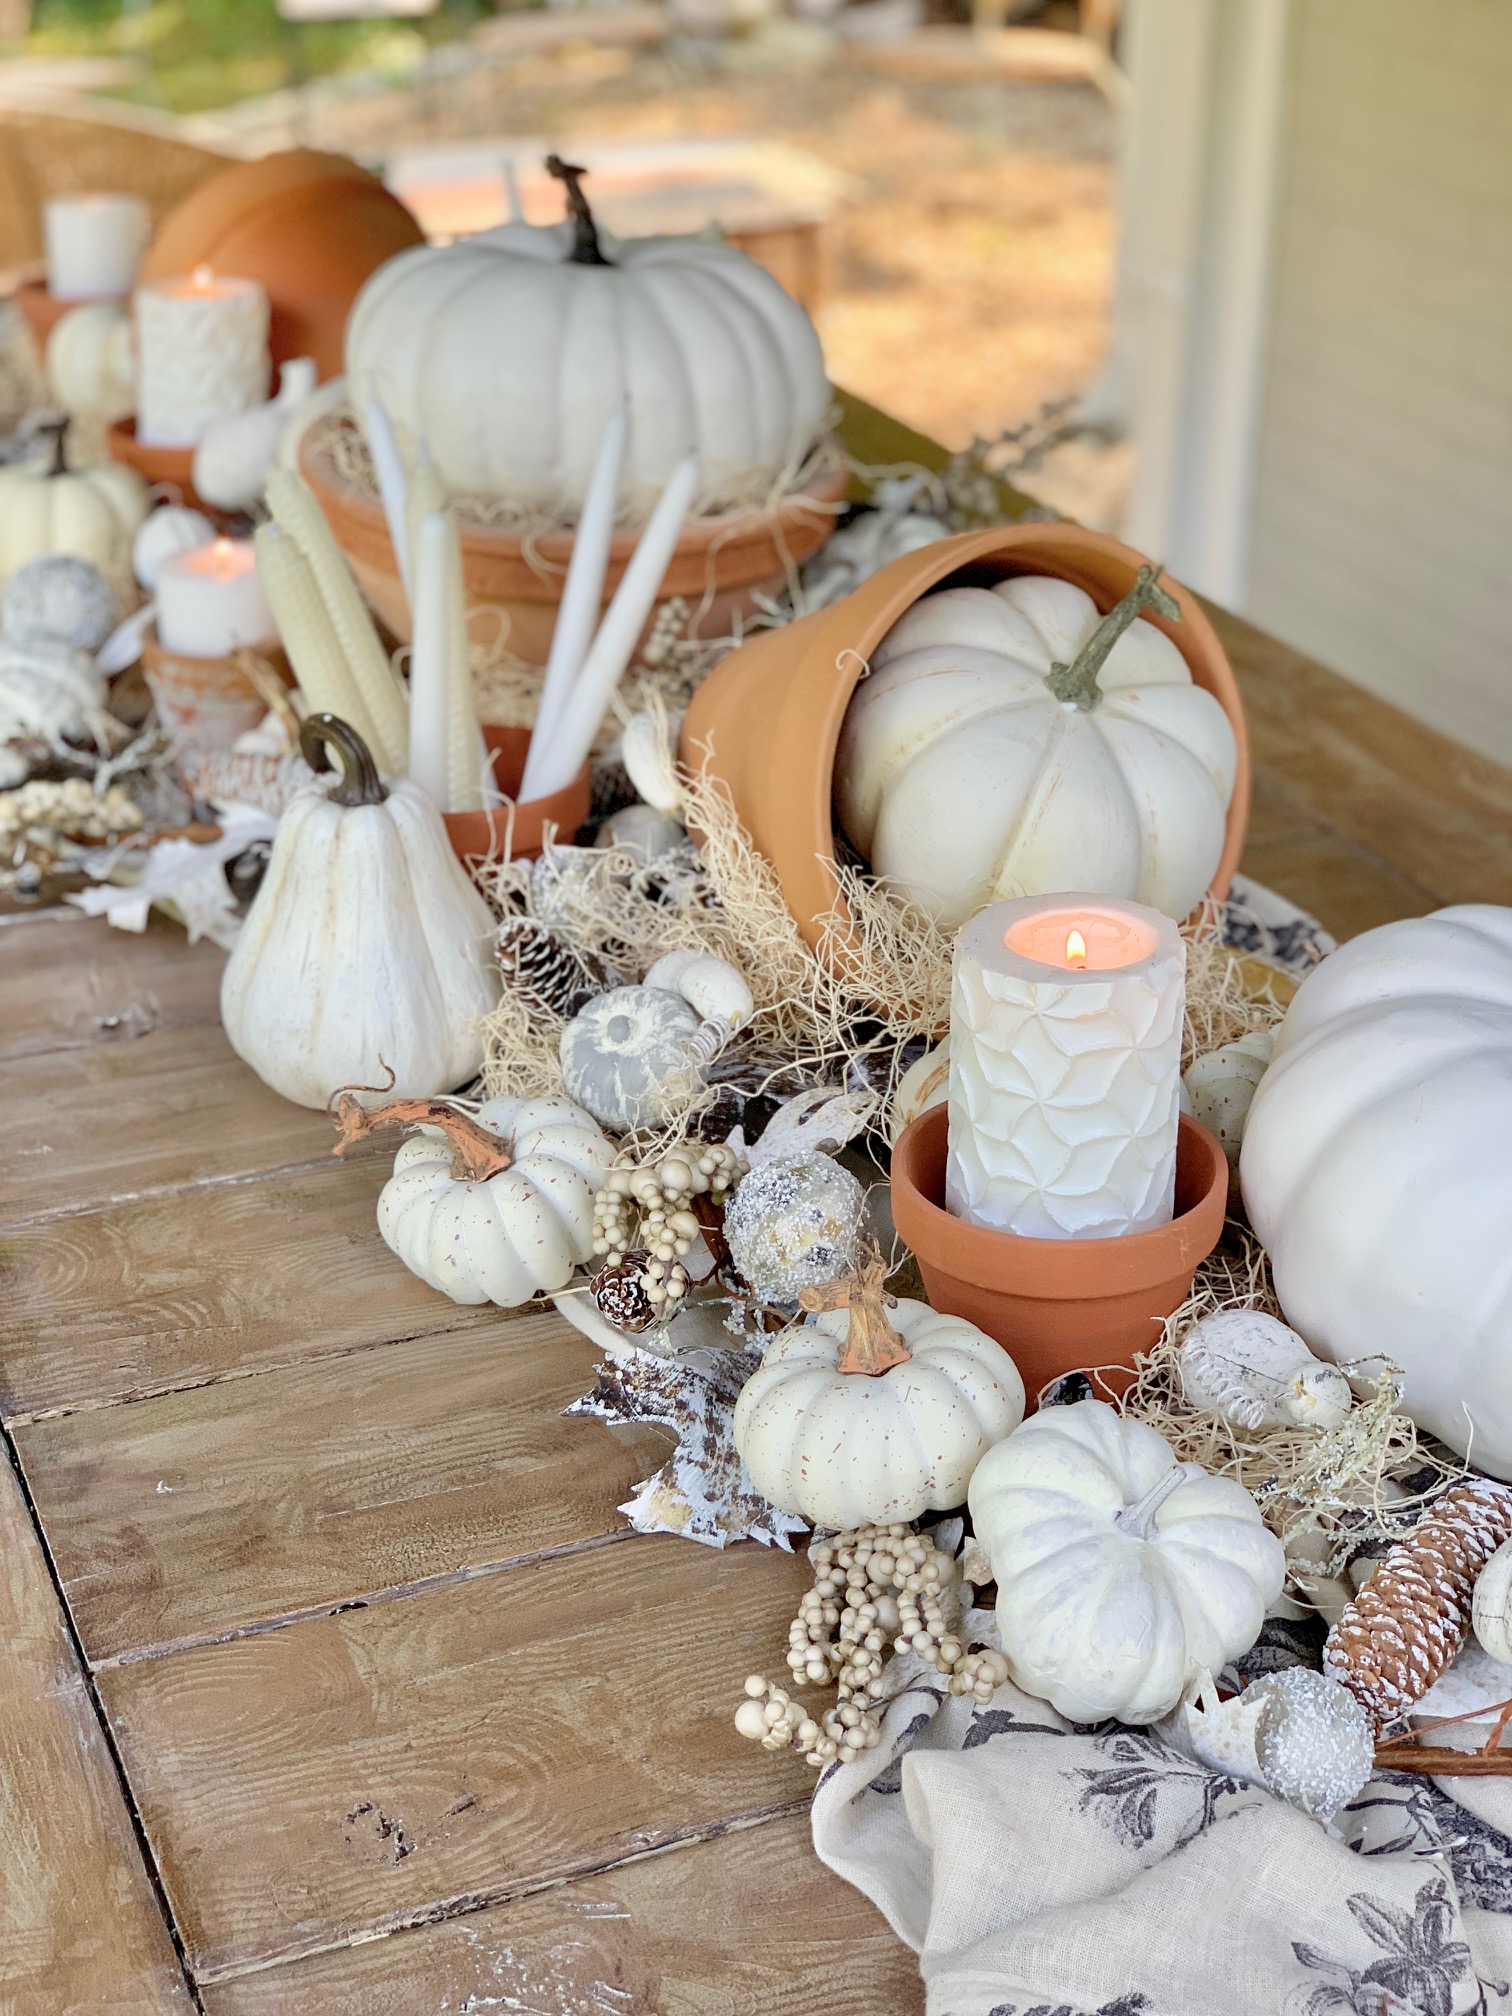
Adding clay pots
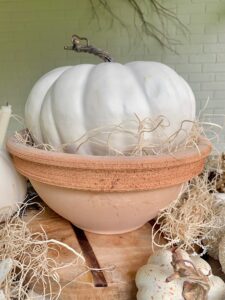
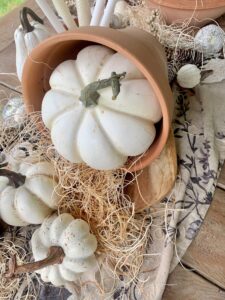
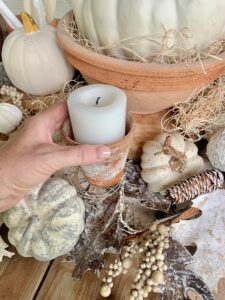
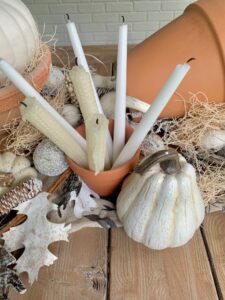
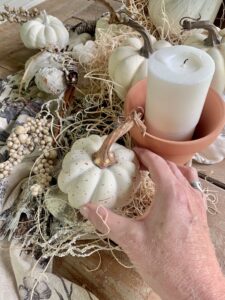
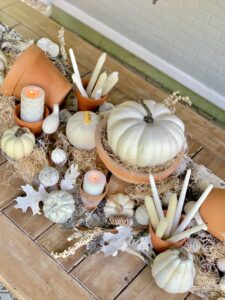
I knew the clay pots would work well with my faux wood grain table top and gave a nod to fall with its orangey tone. In the center, I added a larger round pot and placed some excelsior and a large white pumpkin in it. On either side of the center pot, I laid 2 larger pots on their side to give the appearance the pumpkins were falling out. To continue with the touches of clay I filled smaller clay pots with candles and sprinkled those throughout the design.

Using fillers in this design
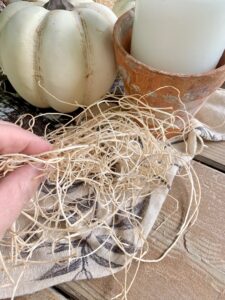
As you know I'm a fan of natural fillers and often incorporate excelsior, raffia, various mosses, or even shredded paper into my designs. The purpose of using these fillers is twofold, one is to add an interesting texture to a design the second is to well...fill the space up! In this design, after everything was in place, I used natural excelsior to fill in blank spots.
White pumpkins for the win
I love white pumpkins and use them freely in my home decor during the fall season. Over the years I've collected quite a few faux ones and I often mix them with real pumpkins. Either real pumpkins or faux will work for this design. You can find Faux white pumpkins at your local craft supply store, Joann's, Michael's or Hobby Lobby. I've linked some from Amazon below.
Want cozy, stylish fall decor? These 7 pumpkin decorating ideas are easy, elegant, and gorgeous - no carving required.

Supplies
- Table runner (I linked the curtain panel I used, any table runner would work)
- 3 - breadboards
- 2 - premade fall garland (this is one of my favorites from Amazon)
- 2 - large white pumpkins (either faux or real)
- 10 - small white pumpkins and gourds
- 1 - large package of excelsior
- 1 - 9" Clay bowl (avail at garden centers)
- 2 - 8" standard clay pot (avail at garden centers)
- 6 - small clay pots (3" to 4") (avail at garden centers)
- 4 - Pillar candles
- 10 - Taper candles

Frequently asked questions
The sky is the limit, I used a curtain panel folded in ½. You can use a fabric table runner, a natural table runner (ie. seagrass or hemp) or even a paper runner (kraft paper works well).
If your dining room table is a round table, no worries! You can still drape a runner and then create a circle design with the remaining design elements for a beautiful centerpiece. You may need to adjust the size of the elements as well as how many.
The basics of this design can be carried over for a seasonal centerpiece. Choose a runner for the season, choose risers (breadboard, books, trays, and tiered cake holder are all great options) then a larger element for your focal point with smaller items to fill in. Lastly, plan your filler.
For example: to create this centerpiece for the Christmas season you may use small table Christmas trees or poinsettias, pine cones, tree ornaments, and raffia or ribbon. With a few swaps you can give this DIY Centerpiece a whole new look!
I do not because being placed in a pot with the candles hanging over could be a fire hazard. I love the look of a collection of tapers in a container so I leave them as is for looks.
Mason jars with fresh flowers, votive candles, other candle holders, potted plants, faux flowers, brass accessories, seasonal flowers, mosses or other organic elements or other fall decorative items.
Step-by-step instructions
Fall Centerpiece with Candles: A Playful Layered Table Idea on a Budget
Materials
- 1 piece Table runner of your choice
- 3 pieces Round wooden breadboards
- 2 pieces Premade fall garland
- 1 Piece 9" round clay bowl
- 2 pieces 8" standard clay pots
- 1 bag Excelsior
- 2 pieces Large white pumpkins
- 10 pieces Small white mini pumpkins or gourds
- 6 pieces Small clay pots
- 4 pieces Pillar candles ( sizes ranging between 4"- 6")
- 10 pieces Taper candles (8, 10 or 12 inch ones)
Instructions
- The first step of this centerpiece is laying a cloth or paper runner down the center of the table. You may use a fabric runner, a natural runner (ie. seagrass, hemp) or a paper runner. I used a curtain panel and folded it in ½.

- If using fabric, with your hands scrunch or gather at various points of the runner. This adds interest and ensures you have adequate space for your place settings.
- Lay 3 wooden breadboards in the middle of the table on the runner.
- Next lay 2 premade fall garlands in and around the breadboards.
- Place a large round clay pot on the center breadboard and fill it with excelsior. Then add a larger white pumpkin.
- Placing on their sides, lay 2 medium size clay pots on the other 2 breadboards. Add excesior and a medium size pumpkin inside with 2 smaller pumpkins on the outside.
- Fill smaller clay pots with pillars candles and place those around (I used 4)
- Fill 2 small clay pots with a collection of taper candles and place those around the centerpiece.
- Fill in the design with extra white pumpkins and gourds.
- Once everything is in place, grab a bunch of excelsior and pull it apart into small handfuls and fill in some of the gaps.
- When its time for your dinner party, light the pillar candles.Note: I would be hesitant to light the taper candles since the wax will drip on the table or the centerpiece. If you feel. more comfortable using battery operated candles, please do.


Notes
10 creative fall centerpiece ideas on a budget
Fall is the perfect time to refresh your home decor, but you don't need to spend a lot of money to create stunning centerpieces. Here are ten budget-friendly ways to bring the warmth and beauty of autumn into your living spaces:
- Thrift Store Treasures
Explore vintage and thrift stores for unique vases, wooden trays, or glass containers. These affordable finds can serve as the perfect base for your fall centerpieces. - Nature's Bounty
Take a stroll through your own yard or nearby parks to collect fall foliage, acorns, and pinecones. These natural materials make for beautiful, free decor. - Pumpkin Perfection
Combine real and faux pumpkins in different shapes and sizes. For a cohesive look, paint them in neutral colors or your preferred color scheme using affordable acrylic paint. - Grocery Store Glam
Pick up budget-friendly fall flowers or white hydrangeas from your local grocery store or Trader Joe's to add a pop of color to your arrangements. - DIY Fall Decorations
Create your own decor with simple steps. Try painting mason jars or repurposing items you already have at home for a personalized touch. - Dollar Store Deals
Visit your local dollar store for budget-friendly items like candles, artificial leaves, and small decorative elements to enhance your centerpieces. - Seasonal Swap
Give last year's fall wreath a new life by adding fresh elements for a different look. This is one of our favorite ways to refresh seasonal decor without buying everything new. - Natural Elegance
Fill glass vases or a tall vase with tree branches, wheat stalks, or dried grasses. This simple idea creates an elegant centerpiece that brings the outdoors in. - Cozy Textures
Incorporate warm colors and textures into your tablescape with linen napkins, burlap runners, or knit accessories. These additions can transform a simple centerpiece into a cozy fall setting. - Unexpected Containers
Get creative with your containers! Use a hollowed-out pumpkin, stack vintage books, or even a window box for a unique and eye-catching centerpiece base.
Remember, creating beautiful fall table decor doesn't require much money or a high skill level. With a little creativity, you can design stunning centerpieces for your dining table, buffet table, or even your fireplace mantel. These ideas work great throughout the entire holiday season, from late summer through Thanksgiving, allowing you to enjoy the warm colors and inviting atmosphere of fall in your own home.
More creative ways to style with white pumpkins


These autumn decorating guides will help you incorporate the timeless elegance of white pumpkins throughout your home while creating sophisticated seasonal displays that complement any decor style.
Making a simple centerpiece like the one in this simple fall DIY dining table centerpiece idea post - be it for special occasions or everyday use is a great, easy way to bring the autumn season to your home. A fall centerpiece like this one will last a lot longer than a fresh floral arrangement so you will be able to enjoy it for the whole season. If you're having trouble starting your fall decorating I say the perfect place to start is with your dining space...or maybe a new wreath with a fabulous bow for your front door!
Thank you so much for visiting the blog today for this fall centerpiece ideas on a budget post. I'd love to hear from you! Please let me know what you think of this design, did you try it? Do you have any questions? Please just drop them in the comments below.
Keep creating friends!