

Easy, Budget-friendly DIY Farmhouse Chandelier From Embroidery Hoops
Oh, I absolutely love when a fantastic idea springs to life, and this DIY farmhouse chandelier project combines two of my absolute favorite things: breathing new life into something and exploring inventive uses for everyday materials. The goal was to keep our existing chandelier but I felt it looked too small in our dining room - plus it was time for a little makeover.
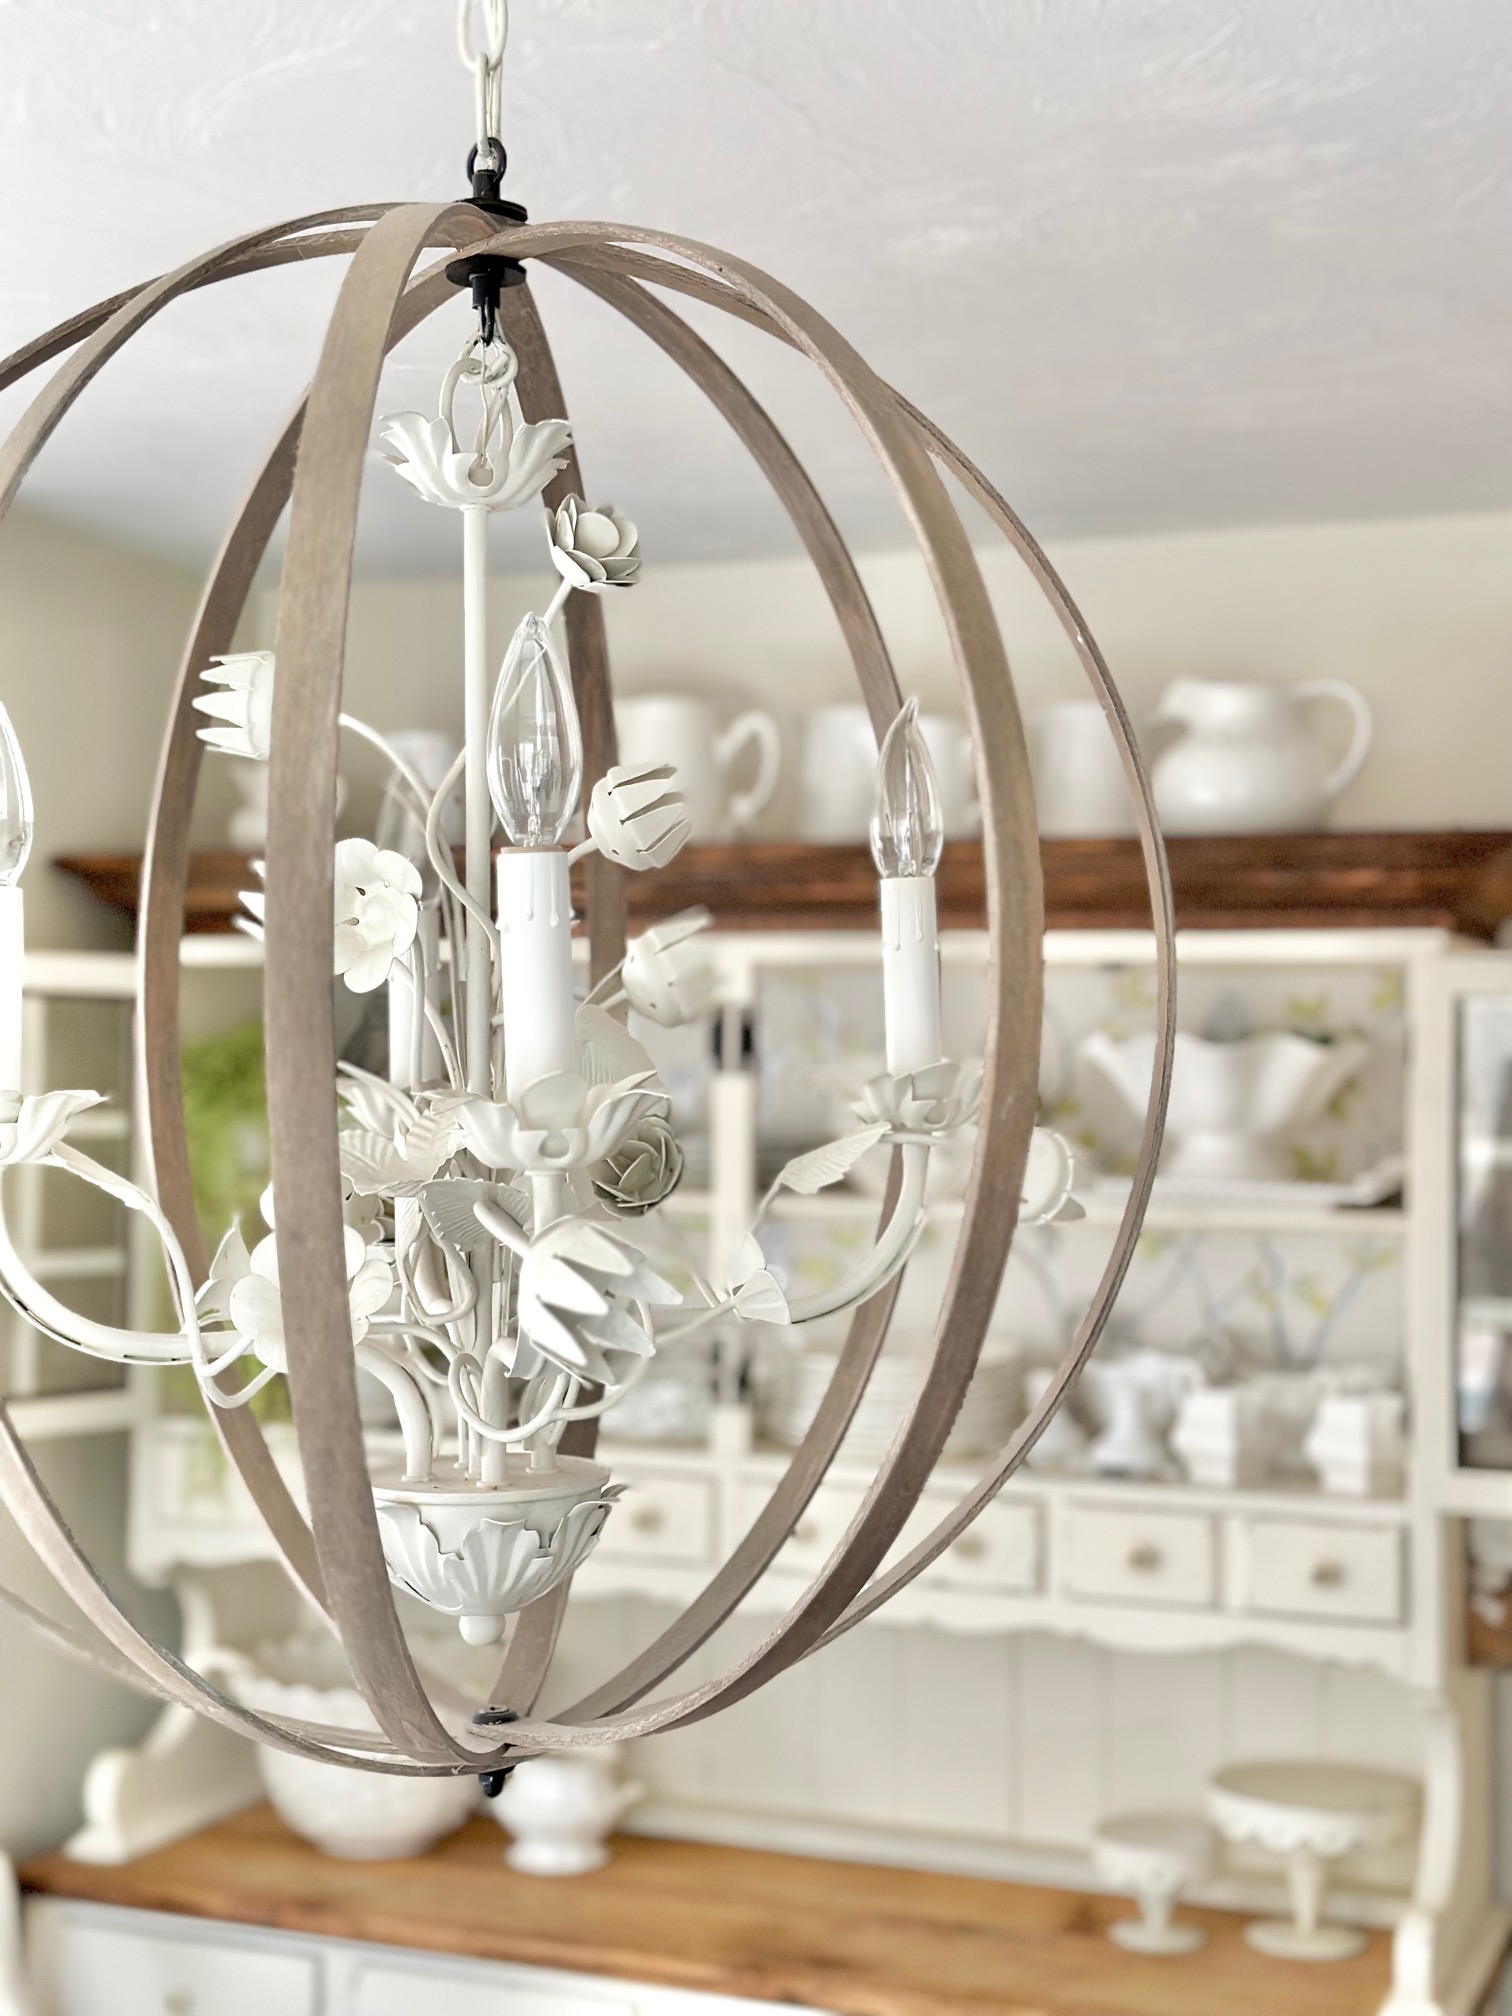
I came up with this fun idea to upcycle our light fixture using embroidery hoops. The result is a beautiful updated orb-style DIY farmhouse chandelier! In this post, Easy, Budget-friendly DIY Farmhouse Chandelier From Embroidery Hoops I will take you through the steps for creating this DIY farmhouse chandelier, share resources as well as other ways to upcycle your old chandeliers - farmhouse style!
*This post contains affiliate links, for more information on affiliate links and all legal disclaimers visit here
Jump to:
- My inspiration
- Ordering the embroidery hoops
- My DIY partner
- Supplies and tools required for this project
- A makeover for the existing chandelier
- Embroidery hoops assembly
- Attaching Embroidery Hoops to the Fixture
- Step by step instructions
- Safety Notes
- The cost of this DIY chandelier:
- Holiday decorating
- Embroidery hoop finish ideas
- Other farmhouse-inspired ways to enhance a small light fixture
My inspiration
I have always loved the look of orb light fixtures and knew by adding to our existing fixture the lighting would be more in-scale with our dining room space. We also have a large square dining room table that seats 8 which is another reason the fixture looked too small. Below are some farmhouse chandeliers that were my inspiration for this DIY light fixture.

Ordering the embroidery hoops
Once I had the idea, I needed to figure out how big I could get embroidery hoops. The existing light fixture measures 24" wide X 28" tall, so I know I needed to work with those measurements in mind. A little google search brought me over to Amazon where I found 23" Quilting Hoops which are just larger embroidery hoops. I ordered 4 and crossed my fingers that they would be big enough to fit around our existing light fixture! They came quickly and I was relieved to see they were going to work perfectly!
Tip: If you are updating pendant lighting fixtures over your kitchen island, smaller quilting hoops or embroidery hoops are available. This DIY would be a fun inexpensive way to update light fixtures and make them the focal point of your kitchen!

My DIY partner
After the hoops arrived AND I knew they were going to work, I pulled my husband in on my plan (I do this a lot, lol). I'm the creative brain, I have an idea and I know how I want it to look but I don't always know how to get there. This is where my husband shines. The conversation always starts with, "I have an idea - and I already bought the stuff... but I need your help" I share my vision while I consult with him.
We threw some ideas around and headed to Lowes to find the right hardware. At the hardware store we disagree and argue a little, then disagree more and argue a little more, and then we eventually make it to the register with hardware in hand and a somewhat agreeable plan in place. Ahhhhh marriage, does this all sound familiar?

Supplies and tools required for this project
Supplies:
- 4 - 23" Quilting Hoops (the inside hoop only)
- White paint of your choice (I used Fusion Mineral paint in Raw Silk)
- Stain of your choice (I used Minwax Stain in Provincial)
- White wax(I used Miss Mustard Seed White Wax)
- Flat black paint of your choice (for hardware)
- 1 pk - Polished Brass Female Lighting Loops
- 1 pk (2 pcs) - Hillman 2 Count 0.250-in x 1.25-in Rubber Standard (SAE) Flat Washer
- 1 nut - Hillman 3-Count ¼-in Stainless Steel Standard (SAE) Cap Nuts
- 1 screw - Hillman #14-20 x 1-in Phillips-Drive Machine Screws (6-Count)
- 1 washer - Hillman 10-Count #14 Stainless Steel Standard (SAE) Finishing Washers
Tools:
- Pencil
- Dropcloth
- 1" Paintbrush (Painting the Chandelier)
- Small paintbrush ( Painting Hardware)
- Foam paint brush (Stain on hoops)
- Drill
- Drill bit
- Screwdriver
- Needle-nose pliers
- Electrical pliers
- Channel locks
- Safety goggles

A makeover for the existing chandelier
Prepping and Painting
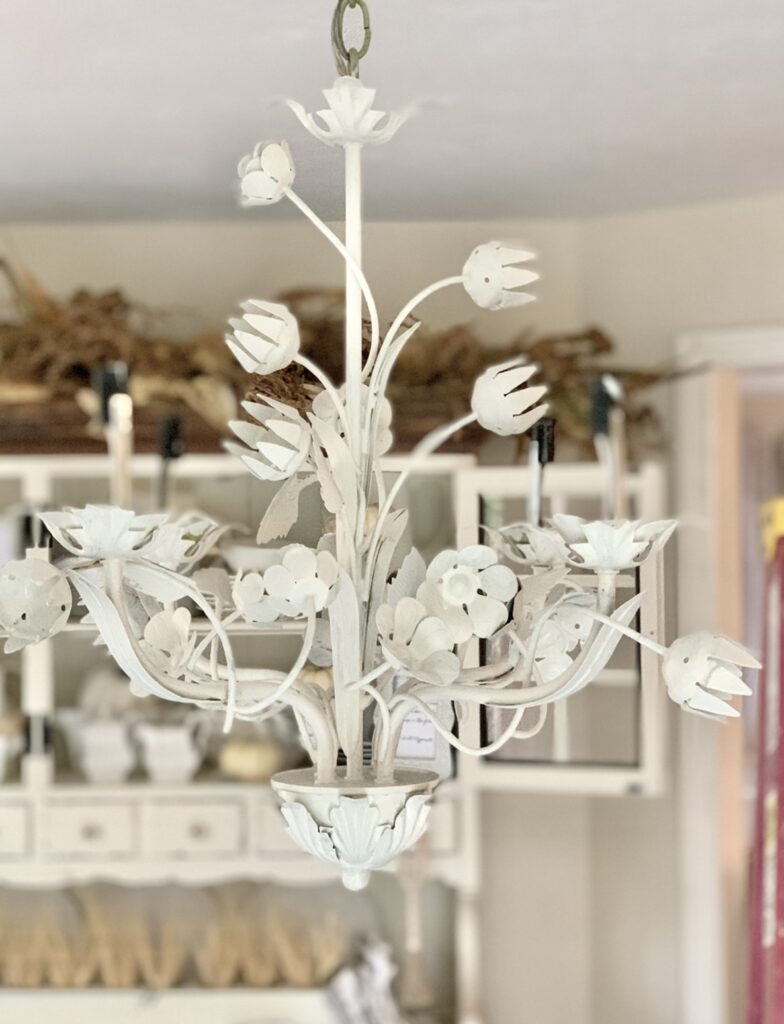
Before we go over how to use the embroidery hoops, let's turn to the little light fixture that was in desperate need of a makeover! I love this vintage-inspired Frech tole flower chandelier. We had hung it in our dining room when we first moved in to our home. I knew I did not want to necessarily replace it - so I decided to paint it. First gave it a good cleaning and then I used Fusion Mineral paint in Raw Silk to give it a brighter updated look.

I painted the fixture, the chain, and the canopy kit in this beautiful cool creamy white. This painting was done without removing the light fixture, one of the benefits of upcycling an old light fixture. Here is a photo of the before fixture and the painted light fixture.

Replacing the Socket Covers
Did you know you can buy new socket covers on Amazon? I had no idea! The original covers were plastic and had yellowed and cracked over time. I had planned to paint them as well but the found these paper socket covers and love the way they look!

Embroidery hoops assembly
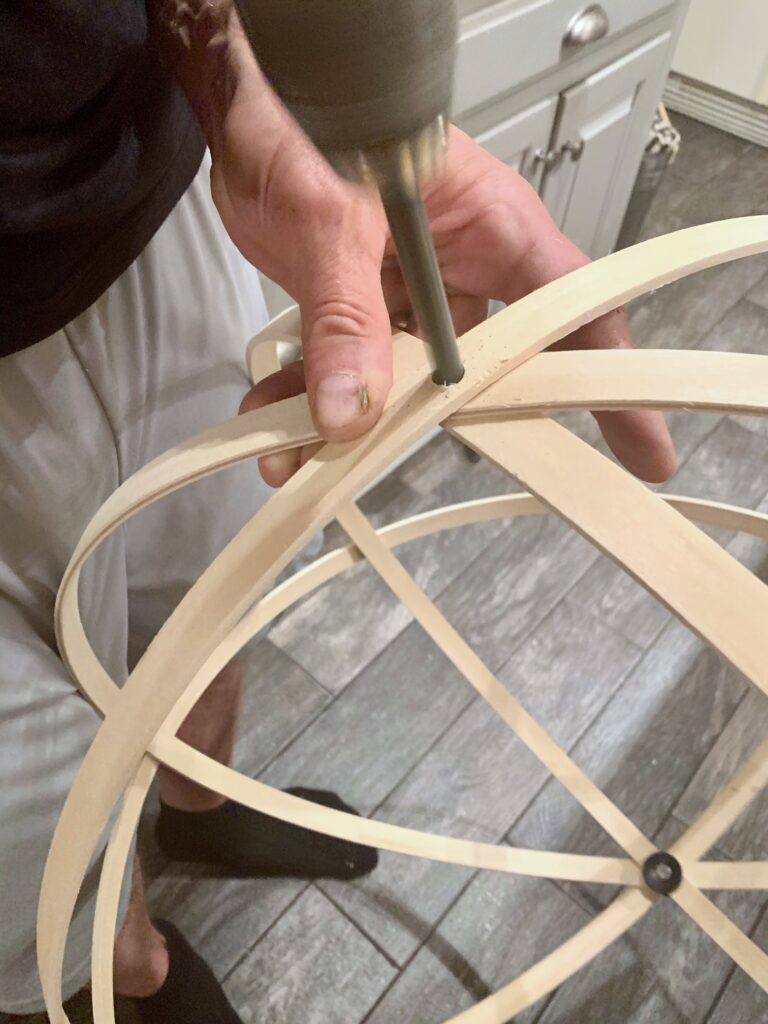
Marking and Drilling Holes
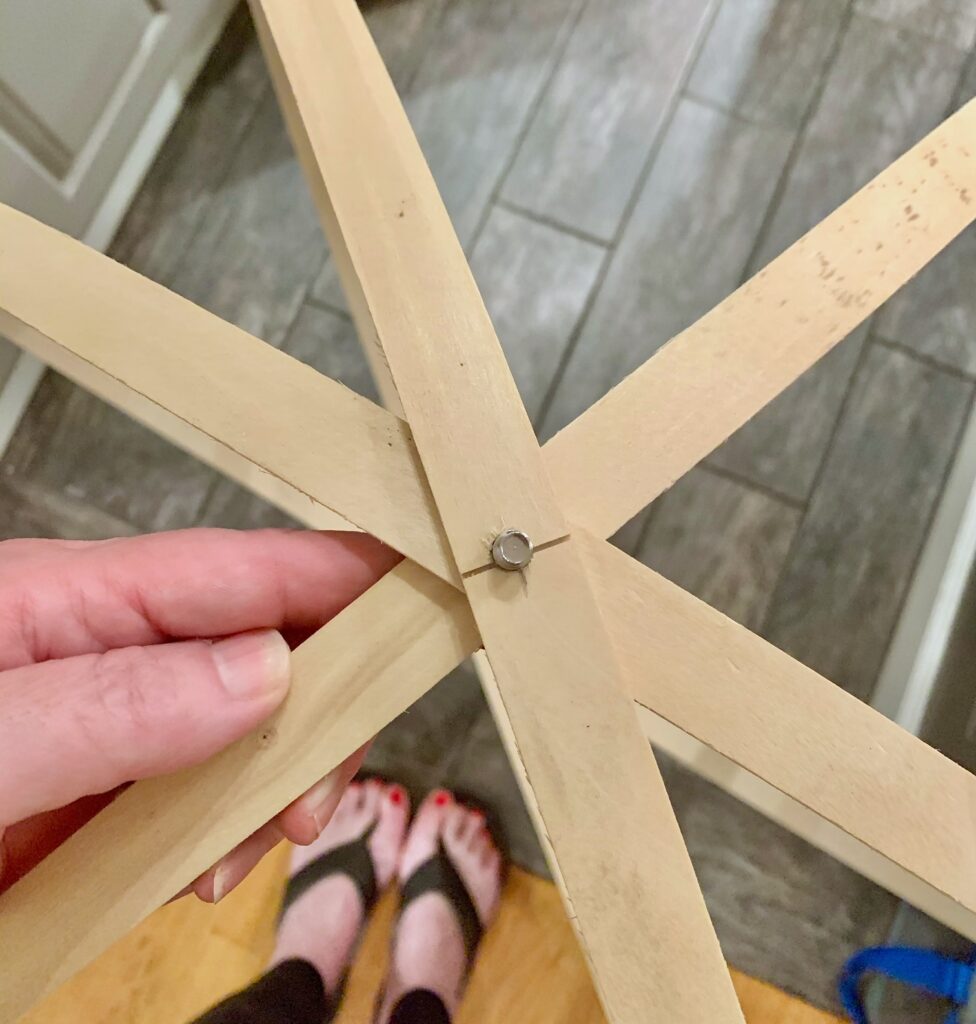
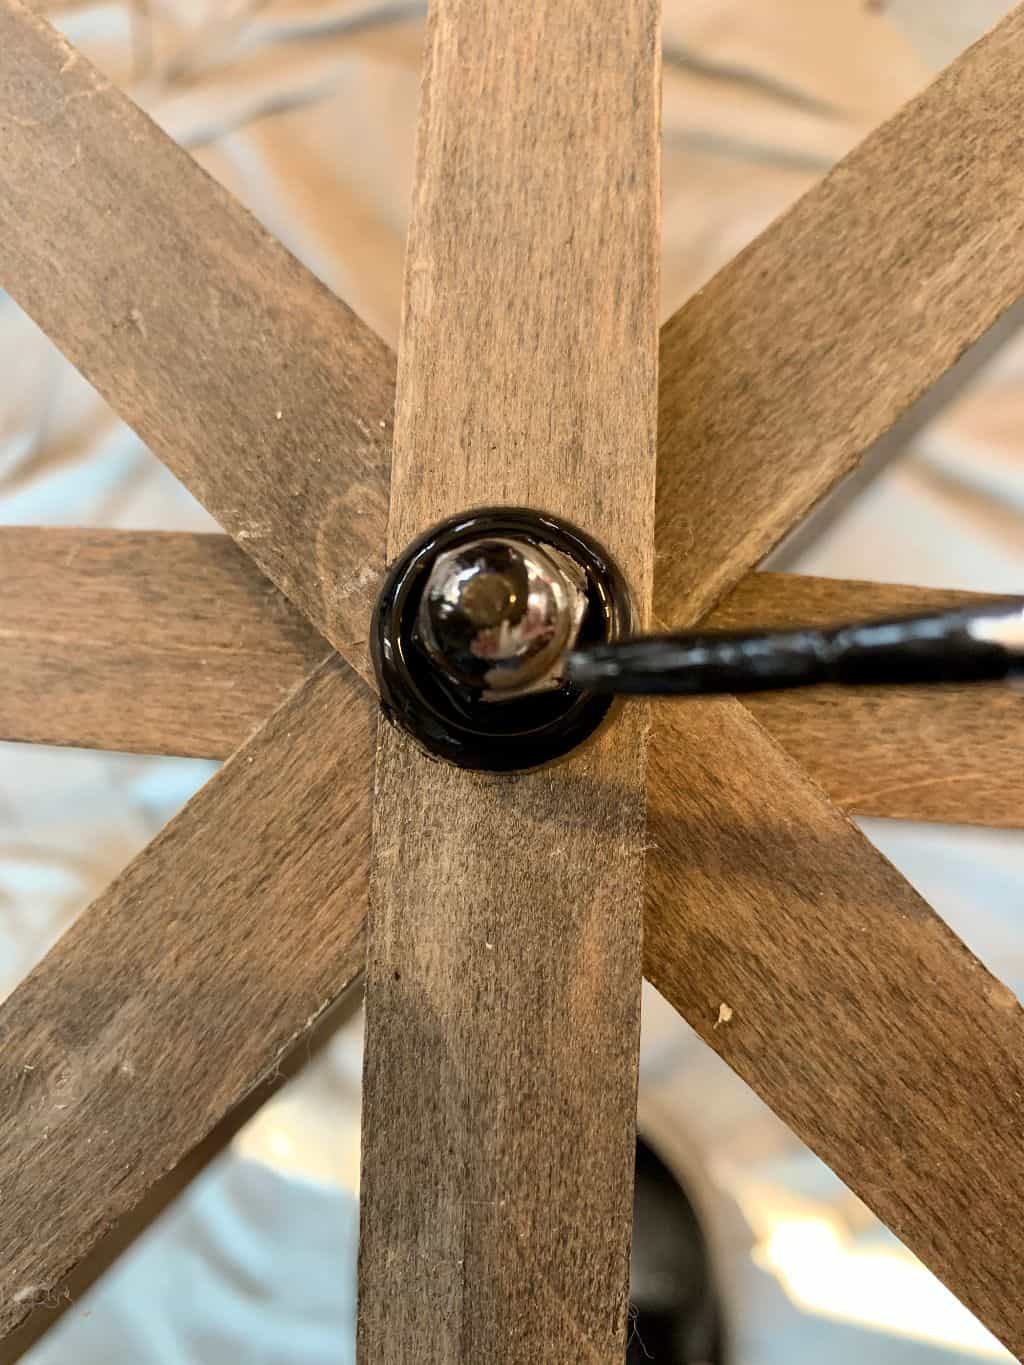
We only used the inside ring of the embroidery hoops. The outside ring has a screw fitting that would not work for this fixture. We fit the inner hoops (rings) into an orb and then with a pencil marked where they were to be joined at the top and the bottom.
Next, we drilled holes on those marks, being mindful to use a drill bit that was the size of the screw we were planning to use.


Staining the Hoops
After the holes were drilled, but before we screwed them together, I stained the hoops a beautiful farmhouse wood tone. To do this I used 1 coat of Minwax Stain in Provincial and then followed up with a white wax wash using Miss Mustard Seed White Wax. I simply applied the wax with a dry paper towel and rubbed the ring to get a whitewash weathered look. Below I'm sharing a list of other creative ideas for your embroidery hoops.

Screwing the Hoops into an Orb
We assembled the orb by using a screw/washer/acorn nut on the bottom and a Female Lighting loop on the top. Then I painted this hardware with this black paint.
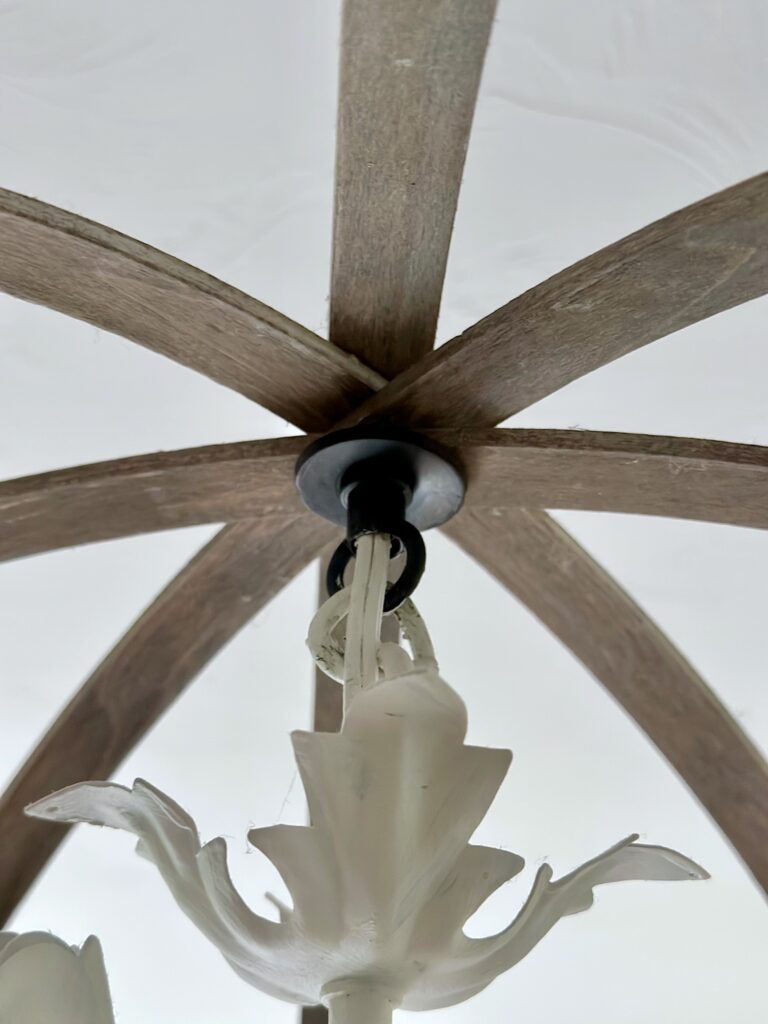

Attaching Embroidery Hoops to the Fixture
Next came the assembly of the light fixture. My husband disconnected the wire connections on the light fixture from the ceiling so we could run the wires through the Portfolio Polished Brass Female Lighting Loops. We also had to disconnect 2 of the chandelier links and relocate them under the female light loop to center the old light fixture in the orb. This took a little finagling because of our specific chandelier, yours may be different.
Once assembled we re-hung (is that a word??) the chandelier back in the same space using the same wires and wire nuts.

Step by step instructions
- Prepare the Embroidery Hoops
Remove the outer rings from the embroidery hoops, keeping only the inner rings. ( The outer rings have metal clasps which do not work for this project.
- Mark and Drill Holes
Arrange the inner hoops into an orb shape.
Use a pencil to mark where the hoops will join at the top and bottom.
Drill holes at these marks using a drill bit that matches your screw size.
Wear safety goggles during drilling. - Stain the Hoops
Apply one coat of wood stain to each hoop using a foam paintbrush.
Let dry according to manufacturer's instructions.
Apply white wax with a dry paper towel, rubbing to achieve a whitewashed, weathered look.
Let dry completely. - Assemble the Orb
Use screws, washers, and cap nuts to join the hoops at the bottom.
Attach Female Lighting Loops at the top connections.
Paint all hardware with flat black paint using a small paintbrush. - Prepare the Existing Chandelier
IMPORTANT: Turn off power to the chandelier at the circuit breaker.
Disconnect the chandelier from the ceiling, noting wire connections.
Remove two chandelier links to allow for centering within the orb. - Combine Orb and Chandelier
Thread the chandelier wires through the Female Lighting Loops on the orb.
Reposition the removed chandelier links under the Female Lighting Loops.
Adjust as needed to center the chandelier within the orb. - Rehang the Chandelier
Reconnect the chandelier to the ceiling using the existing wires and wire nuts.
Ensure all connections are secure.
Turn the power back on at the circuit breaker. - Final Touches
Touch up any paint or stain as needed.
Clean any fingerprints or smudges from the hoops and chandelier.
Safety Notes
- Always turn off power at the circuit breaker before working on electrical fixtures.
- Use proper safety equipment, including safety goggles when drilling.
- If unsure about electrical work, consult a licensed electrician.
The cost of this DIY chandelier:
We were pleasantly surprised at how affordable it was to transform our light fixture using simple materials we already had on hand. With just under $95 spent (total cost) on paint, paint supplies, and the necessary tools, we were able to create the perfect addition to our space. The entire piece came together beautifully, and we couldn't be happier with the result!

Holiday decorating
Get ready to bring some Christmas magic to your light fixture! Every holiday season, I love adding these adorable mini wreaths or candle rings to create a festive and cozy atmosphere. It's like giving your rustic chandelier a joyful holiday makeover that spreads Christmas cheer and makes your home feel extra special.

Embroidery hoop finish ideas
Have some fun while putting your personal touch and your own style on your farmhouse orb light! Explore these creative finish ideas for the embroidery hoops, from delightful whitewashed looks to cozy jute-wrapped textures and timeless distressed styles.
- Distressed Antique: Distress the hoops with sandpaper or paint techniques to achieve an antique, weathered appearance that adds character and rustic charm.
- White Washed: Apply a white wash finish to the hoops for a light, airy look that enhances the farmhouse aesthetic.
- Black Elegance: Paint the hoops in a sleek black color for a touch of sophistication and a contrasting look against light-colored surroundings.
- Jute Wrapped: Cover the hoops with jute string or twine for a textured and earthy farmhouse vibe. Secure the ends with glue for a neat finish.
- Gray Weathered: Create a weathered gray finish on the hoops using gray stain or paint, giving them a worn, reclaimed wood appearance.
- Chalk Painted: Apply chalk paint to the hoops for a matte, velvety finish that exudes farmhouse elegance. Consider distressed edges for added character.
- Copper Accents: Paint the hoops with copper metallic paint for a warm and trendy farmhouse look. The metallic sheen adds a touch of glam. You can even use copper or dark bronze spray paint!
- Vintage Floral: Decoupage floral or botanical prints onto the hoops for a charming vintage farmhouse style. Seal with a clear coat for durability.
- Natural Wood Tone: Instead of staining, leave the hoops in their natural wood tone for a simple, understated farmhouse look that highlights the beauty of the wood grain.
Remember to experiment and choose a finish that aligns with your personal farmhouse style and complements the
Other farmhouse-inspired ways to enhance a small light fixture
Looking for more creative ideas to enhance a small light fixture with a farmhouse touch? This post provides just one creative method for upcycling, but the possibilities of creating a beautiful chandelier are endless. Here are some other ideas.
- Wooden Bead Garland: Add a farmhouse touch by draping a wooden bead garland around the existing light fixture. This adds visual interest and gives the dining room chandelier a more substantial presence.
- Metal Orb Accents: Attach metal orbs or spheres around the light fixture to create a rustic farmhouse look. These can be hung at different heights or clustered together for added impact.
- Rustic Rope Wrapping: Wrap natural jute or rope around the base or arms of the light fixture to give it a farmhouse-inspired textured look. This adds warmth to your rustic light fixture.
- Distressed Paint Finish: Paint the existing light fixture with a distressed finish to give it a weathered and aged farmhouse appearance. This technique adds character and blends well with farmhouse-style décor.
- Mason Jar Shades: Replace or add shades using mason jars to the light fixture to give it a charming farmhouse feel. The clear glass jars can showcase vintage-style Edison bulbs for an authentic touch.
- Burlap or Linen Shades: Install burlap or linen shades over the light bulbs to diffuse the light and create a cozy farmhouse ambiance. Light shades with these natural textures enhance the rustic farmhouse aesthetic.
- Wooden Accents: Attach wooden elements, such as decorative brackets, wooden appliques, or even reclaimed wood panels, to the light fixture to incorporate farmhouse-inspired warmth and character.
- Woven Rattan Wrapping: Wrap the light fixture arms or base with woven rattan or wicker material to infuse it with a farmhouse flair. This adds texture and a natural, earthy touch to diy light fixtures.
- Inverted Basket: Achieve a charming Pottery Barn-inspired look by adding an inverted basket over your old light fixture. This simple and creative update brings a touch of rustic elegance to your space, instantly transforming your light into a statement piece that exudes timeless farmhouse charm.
Thanks for visiting the blog today for this, Easy, Budget-friendly DIY Farmhouse Chandelier From Embroidery Hoops blog post. Get ready to bring farmhouse elegance to your living room or dining room with your own chandelier creations! I'm truly excited to see the amazing updates you make to your light fixtures. Let your creativity shine as you infuse your own home with the perfect blend of style and coziness. Happy crafting and enjoy the farmhouse-inspired transformation! Visit my DIY projects page for more inspiration. Be sure to visit my top 5 favorite DIY's post for more inspiration.
Keep creating friends!


Steph, I love your chandelier. Truly came out beautiful. Great work and love to up cycle vintage lighting. Nice job!
Thank you so much Eileen!