

IKEA Hacks for Built-In Washer and Dryer Cabinets: Design Secrets
Let's embark on a journey into the world of built-in washer and dryer cabinets, where we're not just talking about aesthetics, but about the nuts and bolts of making it work - literally.
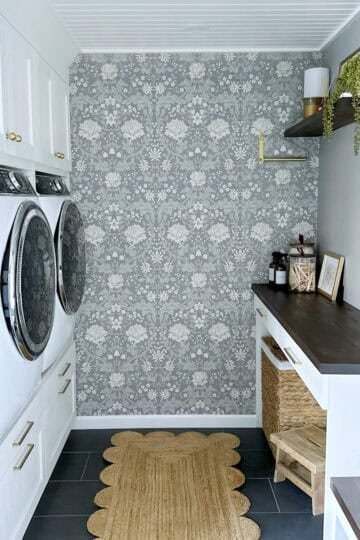
Imagine a laundry space where your washer and dryer are seamlessly integrated into sleek cabinets, not just for looks but for functionality too. That's what we're diving into today.
We're starting with the core element: adding supports to hold your washer and dryer securely in place. We'll walk you through the process step by step, ensuring your appliances stay stable and safe while giving your laundry room a major upgrade.

Content may contain affiliate links. When you shop the links, we receive a small commission at no cost to you. Thanks for supporting my small business.
This post, IKEA Hacks for Built-In Washer and Dryer Cabinets: Design Secrets is all about the practical side of creating a built-in washer and dryer setup that stands the test of time. Ready to roll up your sleeves and get hands-on? Let's do this!
Visit my IKEA Laundry Room Makeover post to see this entire Laundry room remodel.
Kindly be aware: Modifying these cabinets voids the warranty provided by IKEA.
Jump to:
- Benefits of built-in washer and dryer cabinets
- Components of the built-in washer and dryer cabinet
- Strategic cabinet placement and custom platform support
- Adding extra supports for heavy appliances
- Materials needed for adding extra shelf supports
- Step-by-step instructions
- Maximizing functionality with drawers and storage
- Maintenance and care tips
- Frequently asked questions
Benefits of built-in washer and dryer cabinets
Alright, let's talk about why built-in washer and dryer cabinets are the ultimate solution for maximizing space, enhancing aesthetics, and ensuring the stability and safety of your appliances for the long haul.
Space-saving solution: Picture this - instead of bulky appliances taking up valuable floor space, your washer and dryer snugly fit into custom cabinets, freeing up precious room for other activities. It's like a magic trick for maximizing your space.
Enhanced aesthetic appeal: Say goodbye to the eyesore of exposed appliances. With built-in cabinets, your laundry area transforms from blah to beautiful. It's all about that clean, streamlined look that makes you want to spend more time in the laundry room (well, almost).
Increased functionality with added features: We're not stopping at just looking good. Nope, these cabinets come with bells and whistles. Think drawers underneath for stashing detergent and other essentials, plus handy pull-out trays that make laundry day a little less painful. It's all about making life easier, one load at a time.

Components of the built-in washer and dryer cabinet
IKEA kitchen cabinets used
In our pursuit of budget-friendly yet attractive options for housing our washer and dryer, we turned to IKEA. After exploring various possibilities, we stumbled upon the white SEKTION oven cabinet, which showed promise. This unit, measuring 30″ x 24″ x 90″, boasted adjustable sizing, doors for upper storage, a narrow drawer, and an open space initially intended for a wall oven. Recognizing its potential, we envisioned customizing the space for our laundry appliances, with the slim drawer below serving as a pull-out tray for our laundry baskets during chore time. Thus, our affordable laundry dream design was born!
Added supports for raising the washer and dryer
Recognizing the weight and movement of washers and dryers, we understood the need to reinforce the shelves holding our appliances. To achieve this, we incorporated heavy-duty aluminum brackets on the inside of each cabinet side, where the shelf would be placed. Additionally, two steel tubes were installed - one across the front and the other across the middle - providing extra support. A platform was constructed at the back of the cabinets to accommodate further reinforcement and ensure ample space for washer and dryer hookups.
Drawers under the units and their purposes
Each cabinet tower designated for the washer and dryer featured a slim drawer below the open space for additional functionality. This drawer served as a convenient pull-out tray for resting laundry baskets during loading and unloading, enhancing the efficiency of our laundry routine.
Additional storage above the washer and dryer
To optimize space and organization, we integrated ENKOPING-style doors from IKEA onto the upper cabinets, creating delineated storage for items such as dryer sheets and laundry detergent. Alongside, a third recessed cabinet efficiently housed laundry baskets and household essentials, contributing to a tidy and functional laundry area by our backdoor.

Strategic cabinet placement and custom platform support
In our laundry room setup, we strategically positioned the cabinets 10 inches away from the wall to allow ample space for the installation of a platform behind the washer and dryer units. This platform serves as a sturdy foundation, supporting the back of the machines while creating an open area above for hoses, vents, and plugs. Due to the depth of the front-loading washer and dryer, this overhang space is crucial for accommodating their dimensions.
The platforms themselves are constructed using sturdy boards, with the tops seamlessly integrated with pieces of white cabinet boards to maintain a cohesive appearance throughout the space and allow for easy sliding of the appliances. These platforms, alongside the steel rods integrated into the support system, ensure stability and functionality for our laundry appliances while maintaining a sleek and unified aesthetic in our laundry room.
The platform also secures the unit to the wall. Once the supports were in place and the machines were properly hooked up, we positioned the third cabinet to cover the remaining space. Access to the backs of the appliances is available through the backs of the upper portion of the cabinets or by sliding the washer and dryer out from the cabinet.
(Photos below illustrate the space between the wall and the cabinet unit, followed by the platform, and finally, the third cabinet closing it in.)


Adding extra supports for heavy appliances
We reviewed the specifications of our washer and dryer to determine our weight requirements. With this information in hand, we conducted research to identify brackets and tubing that met the necessary weight ratings, ensuring they could easily support the weight of the washer and dryer units.
Two brackets are installed under the appliance shelf, with the tubing running across the middle and the front of the shelf, resting securely on the brackets. Here is an image of the setup with pre-drilled holes prior to installation:

Here is the placement of the front tubing under the appliance shelf of the washing machine:

Materials needed for adding extra shelf supports
- 2 - 4 foot Heavy-duty Aluminum Brackets
- 4 - 3 foot Square Steel Tubing
- Screws ( 1 ⅜" and ⅝" ) and washers
- Drill
- Sawzall or hack saw
- Tape measure
- E-Z Hold Clips (optional)
- Safety Goggles
- Sharpie


Step-by-step instructions
Step 1 - Measuring and marking brackets for cabinet installation
Begin by measuring the bracket's length by positioning it from the back to the front within the cabinet. Use a sharpie to mark the bracket's length accurately. Additionally, mark the locations where you'll need to drill the 5 holes to secure the bracket inside the cabinet. This step ensures proper sizing and placement of the bracket, allowing for secure installation and support for your washer and dryer units.


Step 2 - Measuring and marking tubing
Take all four tubes and lay them across the cabinet to ensure they fit properly. Use a sharpie to mark the desired length on each tube, ensuring they align correctly with the cabinet's dimensions. Additionally, mark the spots on the tubes where you will need to drill holes for installation into the cabinet. This step ensures accurate sizing and placement of the tubes, facilitating a secure and stable support structure for your washer and dryer units.


Step 3 - Preparing brackets and tubing
Begin by making the necessary cuts to size for both the brackets and tubing according to your measurements. Once cut, pre-drill holes in both the brackets and tubing to facilitate easier installation and to prevent splitting or cracking of the materials during assembly. This step ensures precise alignment and stability when attaching the supports to the cabinet structure. Take care to align the holes accurately to ensure a secure and durable support system for your washer and dryer units.


Reminder: Before screwing the brackets and rods in place, take into account the length of the screws and the thickness of the cabinet to ensure you choose the correct size.


Step 4 - Installing the support brackets
Begin by placing the tubing on the brackets, ensuring a secure fit, and then use the EZ clamps to support the tubing in place. Next, position the heavy-duty aluminum brackets on the inside of each side of the cabinet where the shelf will support the appliances. Utilize a drill to firmly secure the brackets in place, ensuring they are level and evenly spaced to provide sufficient support for the appliances.


The drawer slides seamlessly under the brackets and tubing.
Step 5 - Securing the washer and dryer on the raised platform
Drill screws from under the shelf into both the front and middle tubes in two places each. These tubes play a crucial role in distributing the weight of the washer and dryer evenly. After securely placing the tubes, lift the appliances onto the supported shelf, ensuring they are level and stable. Double-check all connections and brackets to confirm that everything is securely fastened.

With these steps completed, your washer and dryer will be safely supported, allowing you to enjoy the convenience and functionality of your built-in cabinet setup worry-free. For an even more polished, custom built-in look, consider adding trim and crown molding around the cabinets and painting it to match - this simple finishing touch will make your IKEA cabinets look like expensive custom millwork!
Maximizing functionality with drawers and storage
Utilizing the pull-out tray for easy loading and unloading: The pull-out tray beneath the washer and dryer isn't just for show - it's a game-changer for your laundry routine. Use it as a stable surface for loading and unloading laundry baskets with ease. No more awkward balancing acts or spilled detergent bottles. Keep the tray clear and ready for action whenever laundry day rolls around.

Organizing items in the drawers under the washer and dryer: Don't underestimate the power of those drawers under the washer and dryer. They're like hidden treasure chests for your laundry essentials. Invest in dividers or organizers to keep detergent, dryer sheets, and other supplies neatly sorted. Stack items smartly to maximize every inch of space and keep clutter at bay.

Creative ways to optimize the storage space above the units: The storage space above the washer and dryer holds additional laundry and cleaning supplies, making it a valuable resource for maintaining a well-organized laundry area. Consider installing shelves or bins to corral smaller items like fabric softeners, stain removers, and lint rollers.
You can also utilize this space to store household cleaning supplies such as multi-purpose cleaners, disinfectant wipes, and brushes. By maximizing the storage potential above the units, you can streamline your laundry routine and keep essential items easily accessible when needed.

Maintenance and care tips
Regular cleaning and maintenance of the cabinets and appliances: Make it a habit to clean your cabinets and appliances regularly to keep them looking their best. Wipe down the surfaces with a gentle cleaner and a soft cloth to remove dust, dirt, and grime. Pay special attention to handles, knobs, and hinges. Check for any spills or leaks around the appliances and clean them up promptly to prevent damage.
Checking for any signs of wear and tear on the added supports: Keep an eye out for any signs of wear and tear on the added supports for your washer and dryer. Inspect the brackets, steel tubes, and platform regularly for signs of rust, corrosion, or damage. Tighten any loose screws or bolts and replace any damaged components as needed. Ensuring the stability and strength of the supports is essential for the safety of your appliances.
Keeping the area around the washer and dryer clutter-free: Clutter around your washer and dryer can not only be unsightly but also pose a safety hazard. Keep the area around the appliances clear of clutter, laundry baskets, and other items. This helps prevent tripping hazards and allows for proper ventilation around the appliances. Designate a specific spot for laundry baskets and other accessories to keep the area neat and organized.
By following these maintenance and care tips, you can keep your built-in washer and dryer cabinets in top condition for years to come, ensuring they continue to serve you efficiently and safely.

Frequently asked questions
We allocated just over $2,000 for the laundry room cabinets, which encompassed the purchase of 3 tall cabinets, 4 drawers/drawer fronts, 6 doors, shelves, hinges, and side panels.
In a small laundry room, consider utilizing open cabinets, wall cabinets, and tall cabinets to maximize vertical storage space. Opt for functional solutions like pull-out trays and easy access shelving to make the most of every inch.
During our laundry room renovation, Using both licensed plumber and electrician we strategically placed electrical outlets and water hookups on the back wall behind the washer and dryer units. We did not fully secure the backs of the upper cabinets, this will allow quick access for repairs and everyday use while maintaining a clean and organized look in the space.

Opting for a front-load washer and dryer set in a dedicated laundry room proved to be a great option for our home. With enough space to accommodate major appliances and functional storage cabinets, we transformed the entire room into a bright and functional space.
From the initial round of designs to the installation of white cabinets and shelves, every decision was made with care to create a clean and organized laundry area. With easy access to hook ups and clever storage options, including a tall cabinet for extra space, we turned an outdated basement into a laundry oasis.
The new lighting fixtures, DIY bead board ceiling and Espresso butcherblock countertops added to the clean color palette. Whether it's the side units or the top of the machines, every inch was utilized efficiently, proving that even in a tight space, smart design choices can make a world of difference.
Happy laundering friends!


Wondering about your thoughts of using 1 of the base cabinets and adjusting to do stacked with one cabinet space on top... we don't have room for 2 but do have space for 1 + a narrow cabinet.
Hi Jessica! Thanks for your question. Absolutely, that setup can work — with a couple of important notes.
Yes, you can use a single 30" base cabinet to create a stacked washer/dryer configuration, as long as your machines aren’t wider than 30 inches. You have two main layout options:
Option 1: Stack Washer Over Dryer
If you already have a stacking kit or your machines are designed to stack, you can simply place the washer and dryer directly on top of each other next to or in the 30" cabinet. This gives you a clean vertical layout with no need for shelf reinforcement.
Option 2: Shelf Between Units
If you prefer to have the washer on the bottom of the cabinet and the dryer elevated above the washer (not sitting directly on the dryer), you can follow the shelf reinforcement instructions in the blog post. This method gives the dryer a sturdy, built-in “stage” to sit on, making it more ergonomic without requiring two cabinets.
The key is ensuring:
Your washer/dryer units are not wider than the cabinet frame (30")
You reinforce the shelf properly to support the dryer's weight and vibrations
You mentioned having room for one cabinet plus a narrow one — that sounds like a great use of your space! You’ll still get storage while keeping things streamlined. Please let me know if you have any other questions - we're here to help!
Hi there. This is a great, cost effective idea! Did you use the door face size for the top section that comes with this IKEA unit you linked? Or did you have to order a different size based on your measurements? I have the same washer and dryer set so it will be the same measurements for me.
Hi Shannon, I recently added a downloadable shopping list and plan for this IKEA laundry room which will give you the exact supplies we used. You can access it by visit this post again. Please let me know if you have any other questions!
This is exactly what I would like my laundry room to look like! It's functional, has plenty of storage and it's so pretty! Would you please tell me where did you find the gold hanger for hangers that you put on the wallpapered wall?
Hi Laura! Im so glad you're inspired! I have everything linked here: https://www.shopltk.com/explore/Celebratednest/posts/a0325da4-c9ea-11ee-bc16-0242ac110003?_branch_match_id=1424763747350179582&_branch_referrer=H4sIAAAAAAAAA8soKSkottLXzynJ1kssKNDLyczL1g9KSvc1jCpxs3BPsq8rSk1LLSrKzEuPTyrKLy9OLbJ1zijKz00FAKQBo1Y6AAAA including the clothes hanger. Alternatively search Hiendure folding clothes hanger on Amazon. Thanks for visiting the blog!
Great job and thanks for the post. My wife and are pretty much stealing the plan. I do have a logistics question. Our washer will go next to the wall and I see no easy way of lifting it only having access to the front and one side. Is the platform and cabinet not attached to the floor and/or wall? That way you slid it out put the washer/dryer on then slid it back in? Fingers cross everything is level as well because I see no way of doing that once it is installed.
Steal away!! The platform and cabinet were both fastened to the wall and floor and were 100% level. I hope this helps! If not let me know!
Your laundry room is beautiful! Where is the pantry style cabinet to the left of the washer/dryer built-ins from?
Hi Bailey, the entire unit including the pantry to the left of the washer and dryer are from IKEA. Hope this helps! Thank you for visiting the blog!