

Painted Brick Fireplace Before and After: Our 8-Year Update
A painted brick fireplace can give a room a brighter, cleaner, and more updated look while covering dark or dated brick. Popular painted brick fireplace ideas include white, gray, greige, black, and soft neutral finishes, depending on your style. With proper cleaning, prep, and quality paint, a painted brick fireplace can be durable, low-maintenance, and a beautiful focal point for years.

Content may contain affiliate links. When you shop the links, we receive a small commission at no cost to you. Thanks for supporting my small business.
If you've been thinking about updating a painted brick fireplace or wondering if painting your brick is the right move, you're not alone. It's a big decision, especially since the fireplace is often the focal point of the room and can completely influence your overall living room style, especially in a softer, neutral space like a white living room. Once brick is painted, there's usually no going back, so it makes sense to weigh the pros and cons before getting started.
That was exactly our experience. We spent months debating whether to paint our dark, dated brick fireplace, saving inspiration photos, comparing paint colors, and considering different finishes, including German schmear, which is a look many homeowners explore. In the end, we decided against it and chose a cleaner painted finish that felt brighter and better suited to our space. We also wondered if we'd regret changing the original brick or if it would feel too modern or too trendy.
In the end, taking the risk was one of the best updates we made to our space. This painted brick fireplace before and after makeover completely changed the room, and now, 8 years later, I'm sharing how it has held up, what I'd do again, and the best paint colors and tips if you're considering painting your own fireplace, along with how we finished the look with a simple overmantel and a DIY fireplace cover board.
At a Glance: Painted Brick Fireplace
_______________________
Best painted brick fireplace colors: white, greige, gray, black, and soft neutral tones Most popular style: white painted brick fireplace for a bright, updated look
Before painting: clean the brick, inspect mortar, and repair any damage
Paint options: full coverage paint, whitewash, limewash, or German schmear
Long-term durability: painted brick can last for years with proper prep and quality paint Best for: outdated red brick fireplaces, dark rooms, and modern fireplace makeovers What to know first: once brick is painted, returning to natural brick can be difficult
Summarize and Save this content on:
Jump to:
- At a Glance: Painted Brick Fireplace
- The decision to paint our brick fireplace
- Our original brick fireplace
- Best paint colors for brick fireplaces (2026)
- Preparing to paint the brick
- Before you paint: Assessing your brick fireplace
- Supplies needed
- Painting the brick
- 8 Year Update
- How to paint the inside of a working fireplace
- Maintaining your painted brick fireplace
- Frequently asked questions
- More home improvement ideas to explore
The decision to paint our brick fireplace
Once we started updating our living room, it became clear that the fireplace was the one feature holding the whole space back. It was large, dark, and immediately drew your eye, but not in a way that added to the room. Because it was such a focal point, we knew that whatever we decided to do there would have the biggest impact.
We considered leaving the brick as is, trying a German schmear finish, or updating it with paint. After looking at inspiration photos and thinking through the style we wanted, a painted brick fireplace felt like the best fit. We wanted something brighter, cleaner, and more timeless that would work with the rest of our decor.
In the end, choosing paint gave us the biggest transformation for the least amount of cost and effort. It was a bold decision at the time, but it completely changed the room and ended up being one of the best updates we made to our home.
Our original brick fireplace
Our house was built during the 1980s with standard stock everything, I mean everything and the red brick fireplace was a lot like the rest of our house - a bit lackluster. The fireplace sits on the outside wall of our living room and is very much the focal point of the space. The hearth is high leading the mantel to sit unusually high at eye level. This was done to scale the fireplace to our tall cathedral ceiling. The bricks on the fireplace surround were nothing special and the overall design was relatively simple. I have always loved the arched fireplace opening but otherwise, the brick was dark and dated and the mantel lacked interest. All was in great shape just unimaginative and uninspiring. Can you tell I didn't like it?

Best paint colors for brick fireplaces (2026)
Choosing the perfect paint color for your brick fireplace can feel overwhelming - after all, it's a decision you'll live with for years to come! While we chose Benjamin Moore's Chantilly Lace for our fireplace makeover, there are several other stunning options worth considering. Here are some of the most popular and versatile brick fireplace paint colors that can transform your space:
Crisp Whites
- Chantilly Lace (OC-65): Our personal choice! A clean, pure white without undertones that creates a bright, modern look. Perfect for contemporary spaces or when you want your fireplace to feel fresh and airy.
- Simply White (OC-117): A softer white with subtle warmth that works beautifully in traditional homes. It feels less stark than Chantilly Lace while still maintaining that classic white brick look.
- White Dove (OC-17): The most popular white for fireplaces, this color has a gentle warmth that makes it incredibly versatile. It's particularly stunning in rooms with warm wood tones or vintage elements.
Sophisticated Neutrals
- Revere Pewter (HC-172): A warm gray that's become a modern classic. This color creates a subtle statement while maintaining neutrality, perfect for transitional-style homes.
- Edgecomb Gray (HC-173): A light greige (gray-beige) that adds warmth without feeling too heavy. This color works wonderfully if you're trying to bridge traditional brick with more modern decor.
- Pale Oak (OC-20): A soft, warm neutral that's lighter than Revere Pewter but deeper than white. It's particularly beautiful in rooms with lots of natural light.

Pro Tip: Before committing to a color, remember that paint will look different depending on your room's lighting and surrounding decor. Consider buying samples of your top choices and painting large pieces of poster board. Move these around your fireplace at different times of day to see how the light affects the color.
Coordinating Wall Colors: When selecting a fireplace paint color, consider how it will work with your wall color. As a general rule:
- White fireplaces look stunning against any wall color
- Gray fireplaces work well with warm whites or cooler wall colors
- Navy or black fireplaces pop beautifully against light neutral walls
Remember, while these colors are currently trending in 2026, the best choice is one that complements your home's style and makes you happy every time you look at it!
Preparing to paint the brick
Before diving into the painting process, it's crucial to assess the condition of your brick fireplace. We've added a new section below on "Before You Paint: Assessing Your Brick Fireplace" that walks you through this important step. We highly recommend following those guidelines to ensure your fireplace is in good condition and ready for its makeover.
In our case, after completing the assessment and finishing the mantel, we moved on to prepare the brick fireplace surround. Luckily, our fireplace was in great shape as brick surfaces go, and no repair was needed - just a thorough clean-up. If your fireplace requires repairs based on your assessment, make sure to address those issues before proceeding to the cleaning and painting steps.
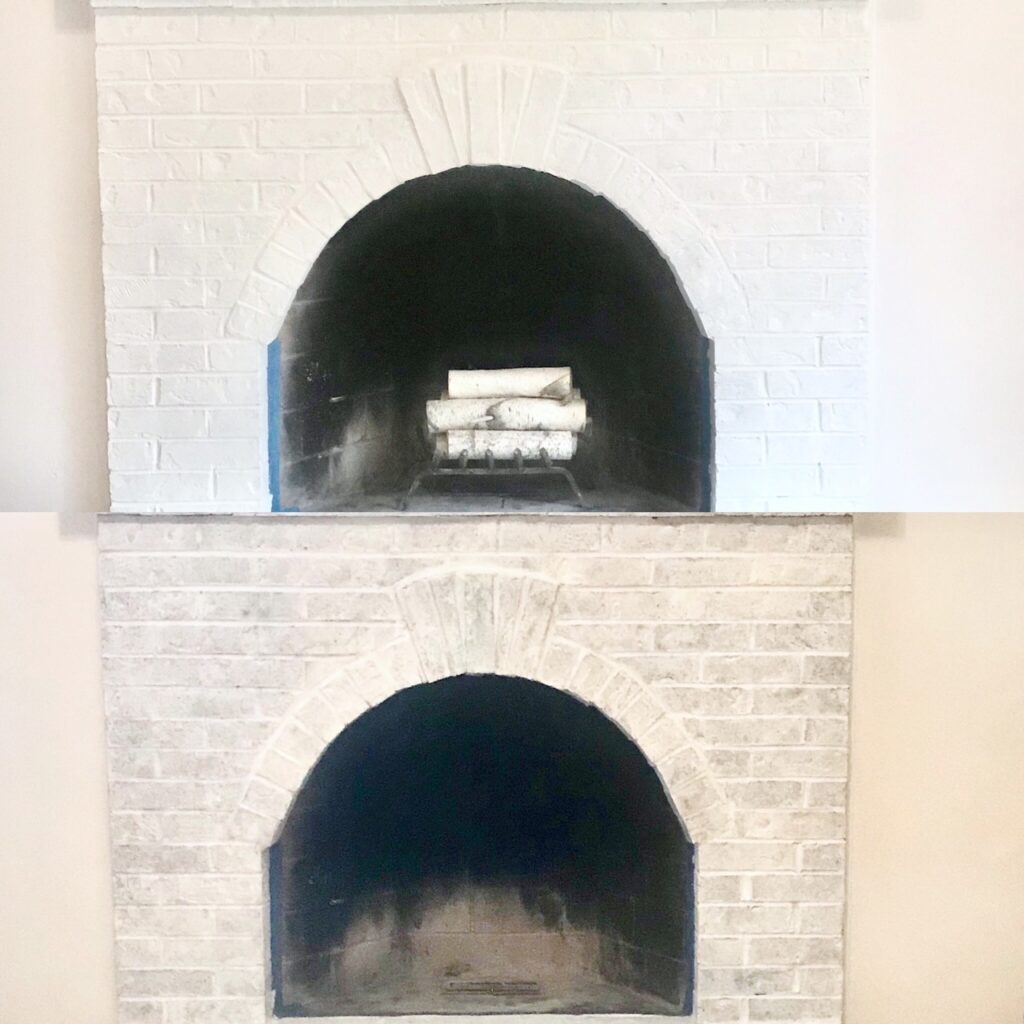
With our fireplace deemed ready, the first thing we did was use a wire brush and vacuum to remove soot, cobwebs, and any loose debris to have a clean surface to paint on. This step is crucial regardless of your fireplace's condition, as it ensures the paint will adhere properly.
We then put down a drop cloth to protect the floor and decided to use painter's tape inside of the firebox to delineate what was being painted and what was being left. We chose not to paint the firebox itself and leave it, charred brick and all. I felt the darkness in the firebox would be striking against the newly painted brick and add some contrast and character.

Before you paint: Assessing your brick fireplace
Before you grab that paintbrush, it's crucial to take a close look at the condition of your brick fireplace. A thorough assessment can prevent future issues and ensure your paint job lasts for years to come. Here's what you need to check:
1. Inspect the brick surface
- Look for cracks: Small hairline cracks are usually cosmetic, but larger cracks might indicate structural issues.
- Check for chips or spalling: This is when the face of the brick flakes off, which can lead to more serious damage if not addressed.
- Feel for loose bricks: Gently press on each brick to ensure they're firmly in place.
2. Examine the mortar
- Look for crumbling or missing mortar: This is called "repointing" and should be fixed before painting.
- Check for discoloration: Dark spots could indicate water damage or mold growth.
3. Test for moisture
- Use a moisture meter: High readings could indicate a more serious problem that needs addressing before painting.
- Look for efflorescence: White, powdery deposits on the brick surface are a sign of excess moisture.
4. Necessary repairs
Based on your assessment, you might need to:
- Repoint the mortar: Replace crumbling or missing mortar to ensure structural integrity.
- Replace damaged bricks: Severely cracked or spalling bricks should be replaced.
- Address moisture issues: This might involve waterproofing or fixing leaks in your chimney.
- Clean thoroughly: Use a wire brush and appropriate cleaner to remove soot, dirt, and efflorescence.
Remember, painting over damaged brick or mortar can hide underlying issues and lead to more serious problems down the line. Taking the time to properly assess and repair your fireplace before painting will ensure a beautiful, long-lasting result.
Supplies needed
- Quart of paint ( we used Benjamin Moore - Chantilly Lace in Eggshell)
- Paint can opener
- Painters bucket tray
- Paint brush
- Painter's tape
- Drop cloth
- Wire brush
- Vacuum
Painting the brick
Once everything was prepared we took a very simple 4" flat paint brush and began painting the brick and mortar. We found that using a brush was easier than a paint roller so we could get into the textured rough surfaces of the natural brick. I had envisioned a German schmere/white-washed look and so I wanted our first coat to be light allowing the brick to show through.
Actual German schmeer requires a mortar wash and is a thick medium that is strategically placed on the brick to allow exposed areas. Think of thickly covered areas of white mortar with a very thin layer showing the red brick. I wanted something a bit more uniform so we decided to paint using a basic interior latex paint from Benjamin Moore and went with the same color in a semi-gloss finish as the woodwork in our living room where this fireplace is. We did a light coat and then wiped the bricks with a damp rag resulting in a white-washed appearance. Here's where we were after the first coat.
Note: Unlike many other DIYers, we chose not to water down the paint or use a primer. We have complete confidence in Benjamin Moore Paints' coverage, and they delivered exceptional results for this project! The paint went on beautifully just as it was.

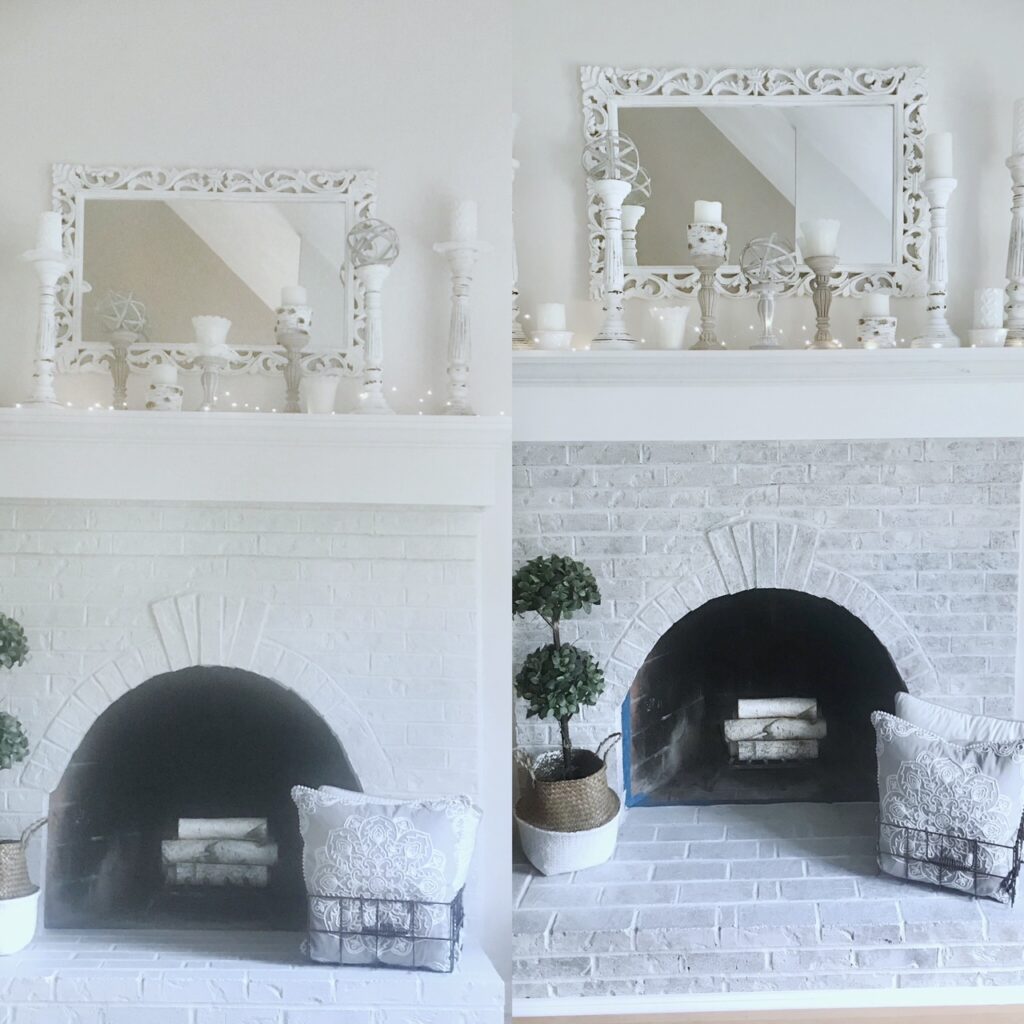
We left the one coat on for a few days before I decided I wanted fuller coverage of paint. The washed look showed too much brick for my liking and gave off a strange "muddy" look that I wasn't happy with. It was also a bit too busy so we decided to go in with a second coat for a more full-coverage uniform finish. Below you can see the difference between one coat and two coats.
8 Year Update
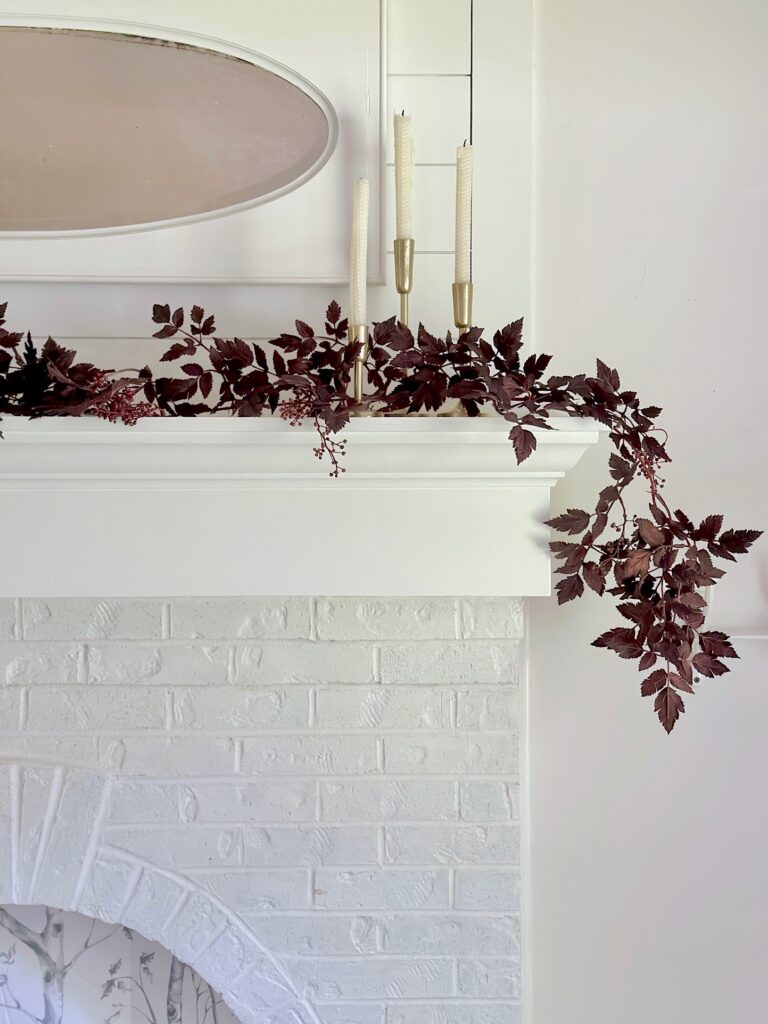
We painted this fireplace in 2018. After 8 years it still looks like the day we painted it. It doesn't require much cleaning just the hearth needs to be wiped down (because the dogs are on there a lot!) and of course, the top of the mantel gets dusty!! We do use the fireplace and there has been no discoloration of the white bricks.
How to paint the inside of a working fireplace
We did not paint the inside of our fireplace since most of the time it is covered with my DIY fireplace cover. However, painting the inside of your fireplace, also known as the firebox, can rejuvenate its appearance and enhance your overall fireplace makeover. Here's how to paint your firebox in three easy steps:
- First, Purchase Some High Temperature Paint: High temperature paint is specifically formulated to withstand temperatures up to 1200 degrees Fahrenheit. You can choose between brush-on or spray types depending on your preference. Brush-on paint offers more control during application, while spray-on paint can be quicker. Ensure proper ventilation as these paints often have a strong odor until they dry. Selecting black paint is a common choice due to its neutral tone and ability to hide soot. However, colors like beige, off-white, or almond can create a bright, fresh look, especially if you don't burn real wood or use your fireplace frequently.
- Next, Clean and Prep Your Firebox: Lay down a drop cloth or old sheet to protect your flooring. Remove any remaining wood, soot, and ashes using a shop vac or sturdy broom and dustpan. Make sure all embers are extinguished and cool before disposal. Take out metal log holders to ensure the firebox is empty and ready for cleaning. Use soap, water, and a suitable firebox cleaner to remove creosote and soot buildup from the walls and sides. A scrub brush or long-handled sponge can assist in this process.
- Finally, Apply the High Temperature Paint: Once the firebox is clean and dry, brush or spray on the high temperature paint to cover the walls, sides, and floor of the firebox. Ensure proper ventilation by opening windows and doors until the paint dries completely. After drying, there should be no lingering odor.
Maintaining your painted brick fireplace
A painted brick fireplace can be a stunning focal point in your home, but like any painted surface, it requires some care to keep it looking its best. Here are some tips for maintaining your painted brick fireplace:
Regular cleaning
- Dust regularly: Use a soft, dry cloth or a feather duster to remove dust and cobwebs weekly.
- Gentle washing: Every few months, or as needed, clean the surface with a soft sponge or cloth dampened with warm water and a mild, pH-neutral soap. Avoid harsh chemicals or abrasive cleaners.
- Avoid excessive moisture: Don't oversaturate the brick. Too much water can lead to paint damage or mold growth.
- Vacuum the hearth: Use a soft brush attachment to remove ash and debris from the hearth area.
Touch-up techniques
- Keep extra paint: Store leftover paint from your initial project for touch-ups.
- Spot cleaning: For small marks or scuffs, try using a Magic Eraser or similar melamine foam cleaner before resorting to paint.
- Touch-up painting: For chips or scratches:
- Clean the area thoroughly and let it dry.
- Use a small brush to apply paint only to the damaged area.
- Blend the edges of the touch-up with the surrounding paint while it's still wet.
- Larger areas: If a significant area needs repainting, you may need to repaint the entire surface for a uniform look.
Preventive measures
- Use a fireplace screen: This helps prevent ash and embers from discoloring the paint.
- Address moisture issues promptly: If you notice any signs of dampness or water stains, investigate and fix the source immediately to prevent paint damage.
- Inspect annually: Check for any signs of wear, chipping, or peeling, especially before and after the heavy-use season.
- Avoid hanging heavy items: If hanging decor on the painted brick, use appropriate anchors and avoid overloading, which could damage the paint or brick.
Long-term care
- Repaint as needed: Depending on use and care, you might need to repaint every 3-5 years to keep it looking fresh.
- Consider a clear sealer: A breathable masonry sealer can help protect the paint and make cleaning easier, but ensure it's compatible with your paint type.
By following these maintenance tips, your painted brick fireplace will continue to be a beautiful and inviting feature in your home for years to come.
Frequently asked questions
You can choose to use regular latex paint on the outside of your brick fireplace if it doesn't generate excessive heat. However, for fireplaces with high heat output or frequent use, heat-resistant paint is recommended to ensure long-term durability and maintain the paint job's appearance. Proper surface preparation and application techniques are important for achieving satisfactory results with either type of paint.
Such a personal decision! I do love the look of German Scmeer and just about anything that is whitewashed which is why I went that route first. After a few days, I knew ours needed more coats of paint to have a consistent clean look. You may want to start by using less paint and then reevaluating. You can always add more as we did.
You can use Chalk paint on the outside of your brick fireplace. Chalk paint is not heat resistant so I would not recommend using it in the firebox. Chalk paint is matte paint and can be subject to heavy absorption. You may need more paint than regular latex paint for this reason.
With some extra preparation, you can use a paint sprayer for painting a brick fireplace. You will want to include plastic sheeting to keep the spray from getting on the walls and floor. You also may want to paint the edges using a small paint brush first then go in with the paint sprayer.
As you know, when it comes to paint color the sky is the limit. Choose a color that works for your space. Gray is a popular color for fireplaces or you could go with a darker color like black or navy.
This depends on how many coats of paint you decide to use. Brick is a porous surface so the paint will dry quickly. Plan a minimum of 30 minutes between coats. Let the paint dry for 24 - 48 hours before using the fireplace.
For an average size fireplace, a quart of paint should be enough. For several coats, you may need a gallon. Another option is to use a quart of primer and then a quart of paint instead of two coats of paint.

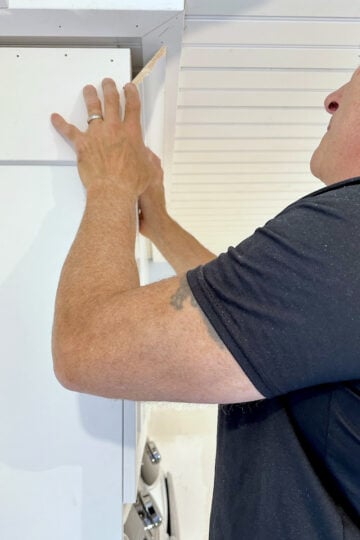
After the mantel and brick paint job was done we then moved on to the overmantel where we built a shiplap panel. Then I made a simple fireplace cover using peel-and-stick wallpaper to finish this fireplace makeover.


The difficult part of painting your brick fireplace is deciding to do it! Once the decision has been made and the process starts it's really a very simple DIY project. I have yet to meet someone who regretted this decision and most, like me wished they had painted their brick fireplace years ago. A simple fresh coat of white paint on a dark and dingy old brick fireplace can give a room a whole new look! Not to mention it will feel like you have a brand new fireplace!
I hope you enjoyed today's post, DIY Painted Brick Fireplace Before and After, and found it to be helpful. I also (secretly) hope I talked you into pulling the trigger on your brick fireplace makeover! Please ask any questions you may have in comments - we're happy to help!
Keep creating friends!


Your fireplace looks amazing! How has it held up? Also, what color are your walls? I like the subtle contrast with chantilly lace. Thanks.
Hi Lulu, It's held up very well, there's been no need to repaint of even touch it up. The wall color is Cloud White by Benjamin Moore. Thanks for visiting the blog!
I love how this turned out! So you used Semi-gloss on the brick, not just on your trim? And no watering down your paint?
I hope you will see this and be able to respond to my question.
I'm excited to try this!
Thank you Laura
Hi Laura,
So sorry for the delay! I didn't realize I wasn't receiving comment notifications. You are correct semi gloss in Chantilly Lace by Benjamin Moore. I wanted full coverage instead of a washed look so we did not water it down. Thank you for visiting the blog!