

Create a Fall Dough Bowl Centerpiece with Cozy Candles
Want to decorate for fall without overthinking it? This dough bowl centerpiece is a simple way to bring that cozy, candlelit feeling into your space. With layered textures, soft light, and natural touches, it sets the mood for everything from casual dinners to quiet mornings with coffee. Just grab a few candles and let's pull it together.

Content may contain affiliate links which are paid links. When you shop the links, we receive a small commission at no cost to you. Thanks for supporting my small business.
Jump to:
Why This Design Works
This centerpiece brings together everything that makes fall feel special. The mix of candles, wheat, raffia, moss, gourds, and florals gives it warmth, texture, and that layered, cozy feel that makes a space feel instantly inviting.
The clay pot candles add a soft glow and a bit of structure. Raffia and moss fill in the gaps with earthy texture. Then there's the trailing faux amaranth, which adds movement and makes the whole design feel full and dynamic without being stiff.
And that polka dot burlap bow? It keeps things lighthearted. The whole arrangement feels organic, layered, and just a little bit playful. It's that sweet spot between rustic and refined, perfect for fall decorating without looking like it tried too hard.

Supplies You'll Need
Here's what I used to create this cozy fall dough bowl centerpiece with candles:
- Large wooden dough bowl (mine is about 24 inches long)
- Three small clay pots (about 4 inches tall)
- White pillar candles (battery-operated or real, depending on preference)
- Dry floral foam (to lift the pots and secure elements)
- Raffia (for texture and to fill gaps)
- Faux amaranth stems (in deep rusty orange for movement and color)
- Small wheat bundles (natural or faux work well)
- Green faux gourds
- Cream-colored faux flowers (I used two types for variety)
- Green moss (Spanish or sheet moss, to tuck around candles)
- Tan burlap ribbon with white polka dots
- Scissors or garden snips (for trimming stems)
- Hot glue gun (optional, for securing foam or tricky pieces)
You can swap in similar items depending on what you have on hand, but these basics create the layered, full, and cozy look of this centerpiece.
Florals and Supplies:

Dough bowl options:
How to Make a Fall Dough Bowl Centerpiece with Candles
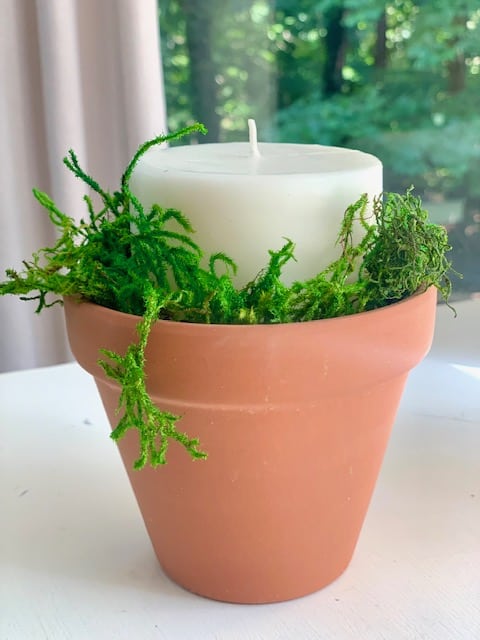
- Create the Clay Pot Candles
Fill each 4-inch clay pot halfway with small stones. This gives your candle some height.
Place a 3"x3" white pillar candle on top of the stones, making sure it sits straight.
Tuck moss loosely around the candle to help center it and soften the look.
Make three of these for a large dough bowl. For smaller bowls, you can stick with one or two.
Note: Because the moss sits close to the flame, I recommend using flameless candles for safety.
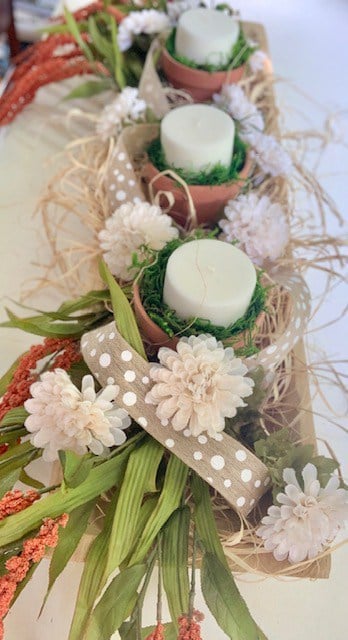
- Prep Your Dough Bowl
Start with an empty dough bowl. The one I used is 35 inches long.
Cut slices of dry floral foam, about ¾" thick, and place them along the bowl.
Set each clay pot candle on top of a foam riser to lift and center them.
- Start Layering
Loosely weave raffia around and between the clay pots.
Cut the faux amaranth stems from the plug and place them at each end of the bowl so they cascade over the edges. If your centerpiece is only viewed from one side, concentrate the amaranth on the front.
Take the roll of ribbon and weave it throughout the arrangement. Let it twist a bit so both sides show.
- Add Floral Elements
Snip apart the faux chrysanthemums and tuck them near the raffia and ribbon.
Cut a few more pieces of floral foam and place them between the candles to support the faux green gourds.
Layer in maple leaves and small daisy-style flowers to add fullness.
- Finish with Texture and Whimsy
Tuck small clusters of moss around the edges of the bowl (I used five).
Make little bundles of wheat, trim the stems to 3-4 inches, and nestle them throughout the arrangement. I used about eight bundles.
Cut three 8-inch pieces of ribbon, form loops, and gently tuck them in for a playful touch.


How to Style This Dough Bowl in Your Home
This centerpiece is full and festive, so it really shines when given a little room to breathe. Here are a few spots where it works best:
- Dining Room Table: Use it as the star of your fall tablescape. Just add a runner underneath to ground the look, and maybe a few scattered leaves or mini pumpkins around the base if you're setting for guests.
- Kitchen Island: Let it sit front and center as your kitchen island decor for everyday fall vibes. Since it's layered with candles and texture, it makes your whole kitchen feel instantly cozy.
- Console Table or Entryway: If your dough bowl will only be viewed from one side, angle the amaranth and ribbon so they trail toward the front. This makes it feel intentional and lush without needing to fuss with the back.
- Coffee Table or Living Room Vignette: If you've got a neutral color palette in your living space, this centerpiece adds just enough seasonal color without overwhelming it.
Keep in mind, this arrangement has movement, and a little whimsy, so pair it with simple surrounding decor. Think: stacked books, a few amber glass bottles, or a small lantern off to the side. Let it do the talking.
Adapting your dough bowl for different seasons
One of the great joys of decorating with dough bowls is their versatility. With a few simple changes, you can update your centerpiece to reflect the changing seasons. Let's explore some ideas for spring, summer, and winter themes.
Spring: Floral and pastel ideas
Embrace the renewal of spring with these fresh concepts:
- Fill your spring dough bowl with a variety of faux tulips, daffodils, and cherry blossoms in soft pastel shades.
- Incorporate natural elements like moss, small bird's nests, and speckled faux eggs for a touch of whimsy.
- Use light, airy fabrics like linen or cotton as a base layer to brighten up the wood tones.

Summer: Fresh and bright concepts
Capture the vibrancy of summer with these ideas:
- Create a coastal vibe with sand dollars, starfish, and blue sea glass nestled among white pillar candles.
- Arrange bright citrus fruits like lemons and limes with green foliage for a fresh, zesty display.
- Fill the bowl with an assortment of succulents in various sizes for a low-maintenance, modern look.
Winter: Holiday and cozy themes
Bring warmth to the cold months with these cozy concepts:
- Layer pinecones, evergreen branches, and cinnamon sticks for a festive holiday aroma.
- Incorporate battery-operated fairy lights among white ceramic houses for a magical winter village scene.
- Arrange red berry picks, white pillar candles, and silver ornaments for a classic Christmas centerpiece.
Pro tip: The key to a great seasonal dough bowl display is to start with a good base layer, vary the heights of your elements, and don't be afraid to mix textures and materials. With these ideas as a starting point, let your creativity flow to create centerpieces that reflect your personal style throughout the year.

Frequently asked questions
Try natural elements like pinecones or branches, non-floral items such as books or fruits, or unexpected objects like vintage cameras or colorful yarn for unique centerpieces.
Popular locations include dining tables, coffee tables, mantels, and sideboards. Choose based on the bowl's size and your desired focal point.
Use small adhesive furniture pads or a non-slip mat under the bowl to prevent wobbling and protect surfaces.
Incorporate tall elements like branches or candles, or use hidden risers like upturned glasses or floral foam blocks beneath your arrangement.
Yes, but replace it regularly to prevent spoilage. Alternatively, use high-quality faux fruits for a long-lasting arrangement.
Stick to a consistent color scheme or theme, and arrange items in odd-numbered groups for a balanced, natural look.
Keep a neutral base like moss or raffia, then swap out seasonal elements like spring flowers, summer seashells, fall leaves, or winter pinecones.


Creating beautiful dough bowl centerpieces is an art that combines simplicity with creativity. By mastering the basics of layering, using the right materials, and letting your imagination soar, you can craft stunning displays for any season.
Remember, the key is to start with a solid foundation and build up, allowing your unique style to shine through. Whether it's for a cozy fall gathering or a bright summer brunch, your dough bowl centerpiece will surely become a conversation starter.
Happy designing friends!


An amazing help for busy moms who are also working full time and have an esthetic interest in decorating the kitchen. This is the first and the best I have ever come across. Easy to see and reproduce or create your own.
Thank you Stephanie!
Thank you so much!