

How to Install a Beadboard Ceiling Using Individual Boards (Not Panels!)
To install a beadboard ceiling using individual boards, start by attaching strapping perpendicular to your ceiling joists. Measure, cut, and nail each tongue and groove board into place, sliding the groove over the previous board to conceal the nails and create a smooth, continuous surface with no visible seams. Cut carefully around lights and vents, then add trim, fill any gaps, and finish with paint or stain. This guide walks you through each step and explains why real boards offer a more authentic, high-end look than paneling.

Content may contain affiliate links which are paid links. When you shop the links, we receive a small commission at no cost to you. Thanks for supporting my small business.
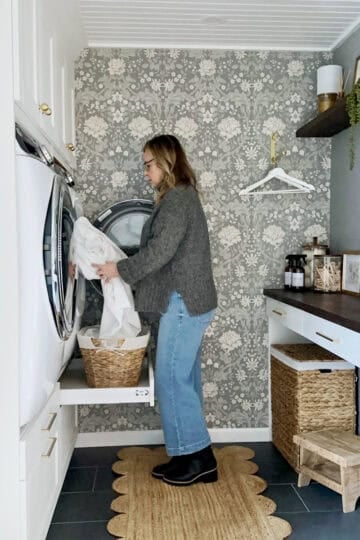
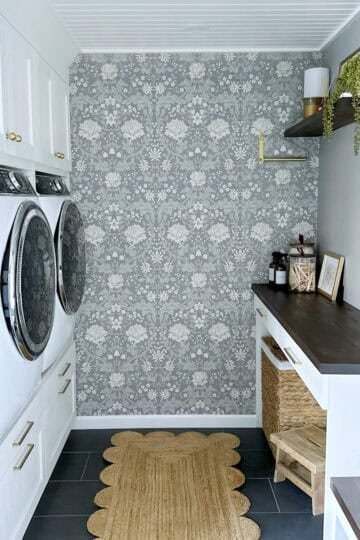
When we remodeled our laundry room, one design feature made the biggest impact: the beadboard ceiling. Instead of using large prefabricated panels, we installed individual tongue and groove boards for a more authentic, high-end finish. The result is a ceiling that feels custom, timeless, and full of character.
In this post, I'll show you exactly how to install a beadboard ceiling using real boards. From prepping the ceiling and adding strapping to cutting around vents and installing trim, this step-by-step guide walks you through the full process so you can create a beautiful ceiling that looks professionally done.
Jump to:
- Boards vs. panels: Understanding the difference
- Why we used real beadboard boards - Not panels
- DIY beadboard ceiling installation process
- How to install a beadboard ceiling using individual boards
- A gallery of images from this beadboard ceiling installation
- Painting the beadboard ceiling
- Installing DIY beadboard on plaster or popcorn ceilings
- Frequently asked questions
- For more Laundry room makeover inspiration
- Shop the look: Explore the paint colors and accessories for our full laundry room makeover
Boards vs. panels: Understanding the difference
When it comes to beadboard, it's important to know the difference between boards and panels. Boards are individual long, narrow pieces used for floors, walls, ceilings, and other applications. Beadboard made from boards consists of tongue-and-groove pieces installed horizontally or vertically, creating a dimensional, custom look.
Panels, on the other hand, are larger, single-piece sections, often 4ft by 8ft. They mimic the look of traditional beadboard but come in sheet form for easier installation. Panels are usually lightweight, made from MDF or HDF, and often primed and ready to paint.
Choosing boards over panels allows for a more authentic, high-end finish and gives you the flexibility to work around obstacles like vents, light fixtures, and ceiling joists. It's this attention to detail that makes a beadboard ceiling truly stand out.

Why we used real beadboard boards - Not panels
When deciding between beadboard boards and paneling for our laundry room ceiling, we considered both appearance and practicality. Traditional beadboard boards are tongue-and-groove pieces, typically ¾" to 1" thick and around 4" wide, with a beaded detail down the center that gives beadboard its classic character and helps conceal joints. Panels, in contrast, come in larger, thinner sheets with less pronounced grooves, which can look flatter and less authentic.
We chose individual boards for several reasons. The thicker boards hang better and are less likely to sag over time. They also allow more control over spacing and placement, making it easier to navigate obstacles like vents and light fixtures. In a small space like our laundry room, handling individual boards was simpler than maneuvering large sheets of paneling.
Note: If panels are a better fit for your project, I recommend you visit Pine and Prospect Home's DIY Beadboard ceiling featuring panels.

DIY beadboard ceiling installation process
A. Preparing the ceiling and gathering materials: First we gathered all the necessary materials, including the beadboard boards, a miter saw, a nail gun, and various other tools and supplies. Before we could start installing our beadboard ceiling, we had to make sure the surface was ready for the new boards. We removed our old drop ceiling tiles and cross tee's and runners which exposed the ceiling joists. Then we installed 1' x 3' strapping to the ceiling joists 16" on center in a 90 degree angle.

Note: The extra pieces of strapping seen on the left side of the room were installed to support the built-in washer and dryer cabinets.
Direction of the boards: We decided to have the boards follow the ceiling joists and did this by adding perpendicular strapping (furring strips). By having the boards run in the direction from the outside of the home to the center wall we were able to use 8' boards which are typically straighter and less expensive than 16' boards.

C. Cutting out the space for the light fixtures: One of the challenges we encountered during the installation process was cutting out the space for our light fixtures (3 recessed lights and two globe lights). We carefully measured the locations of the fixtures and used a jigsaw to create a precise opening in the beadboard. It took a steady hand and a bit of patience, but we managed to get a clean, professional-looking cut that perfectly accommodated our light fixtures.

D. Accommodating the heat/AC vent in the ceiling design: Another obstacle we had to overcome was figuring out how to work around the heat/AC vent in the ceiling. We didn't want to compromise the functionality of the vent, but we also wanted to maintain the seamless look of the beadboard. After some brainstorming, we decided to carefully cut the boards to fit around the fixed vent and use a decorative vent cover to blend it in with the overall design.

E. Adding trim to create a polished look: Once all the beadboard boards were installed, we focused on adding the finishing touches to create a polished, professional look. We used trim pieces to cover any gaps or imperfections around the edges of the ceiling and to create a crisp, clean border. This extra step really helped to elevate the overall appearance of the beadboard ceiling and make it look like a high-end, custom installation.
About the Ceiling Trim: On one side of the room, we had piping that ran over the top front of the door which we encased with a soffit. This soffit abuts our newly installed IKEA cabinets that house our raised washer and dryer. We wanted these cabinets to have a custom built-in appearance, so we added crown molding around the top of them. We first added a 1" x 3" trim piece to the ceiling in front of the cabinets then were able to connected the cabinet tops to the ceiling with crown molding. After installing the crown molding on top of the cabinets and painting them to match the cabinets, we made sure the remaining trim around the ceiling perimeter had a ¾" exposed trim piece, matching the ¾" thickness of the remain trim in the room. This created a cohesive look throughout the entire ceiling.

How to install a beadboard ceiling using individual boards
Materials:
- Beadboard boards (we used ¾" primed white pine planks (boards)
- Finish nails or brad nails
- Trim boards (we used ¾" flat primed trim for this small room)
- Wood filler
- Paintable caulk
- Paint or stain (optional)
Tools:
- Miter saw
- Drill (¾" flat bit for pilot holes)
- Jigsaw
- Nail gun (Finish gun or brad nailer)
- Measuring tape
- Pencil
- Level
- Ladder
- Safety goggles
Step-by-step instructions for your beadboard ceiling project
- Prepare the Ceiling
Prepare the ceiling by removing any existing fixtures, filling in cracks or holes, and ensuring the surface is clean and smooth. Install strapping perpendicular to the ceiling joists, spacing the strapping every 12-16 inches. Use a level to ensure the strapping is straight and even. Secure the strapping to the ceiling joists using 2-inch nails or construction screws..
- Measure and Calculate Materials
Measure the length and width of your ceiling to determine the number of beadboard boards needed, accounting for any necessary cuts around vents, lights, or other obstacles.
- Install the First Board
Begin installing the beadboard boards along one edge of the ceiling, perpendicular to the strapping. You may apply a bead of construction adhesive to the back of each board and press it firmly against the ceiling (optional).
- Nail the First Board
For the first board, nail through the face of the board, approximately ½ inch from the tongue edge. Drive nails straight and slightly below the surface of the wood to create small dimples, placing nails every 12-16 inches along the length of the board.
- Install Subsequent Boards
Continue installing boards across the ceiling, fitting the groove of each subsequent board over the tongue of the previous one. The groove should slide over the tongue and cover the nails from the previous board, hiding them from view. Use a level to ensure the boards remain straight and even for a flat ceiling.

- Nail Subsequent Boards
For each board, nail through the face, about ½ inch from the tongue edge, creating dimples and spacing nails every 12-16 inches. The nails will be concealed by the groove of the next board, creating a seamless appearance. Learn more about installing tongue and groove here.
- Cut Boards Around Obstacles
When you reach an obstacle like a vent or light fixture, carefully measure and mark the outline of the opening on the board. Use a drill to create pilot holes and then a jigsaw to cut out the shape, then install the board around the obstacle.
- Install the Final Board
For the final board, you may need to rip it down to size to fit the remaining space. Nail this board in place through the face, as with the previous boards.
- Add Trim Pieces
Once all the beadboard boards are installed, add trim pieces around the edges of the ceiling to cover any gaps and create a polished, finished look. Miter the corners of the trim for a professional appearance.
- Fill Nail Holes and Gaps
Fill any nail holes with wood filler or gaps with paintable caulk, then sand the surface lightly once the caulk has dried.
- Paint or Stain (Optional)
If desired, paint or stain the beadboard ceiling to match your room's decor. Apply the paint or stain according to the manufacturer's instructions, using a brush or roller designed for textured surfaces.
- Reinstall/Install Fixtures
Install or reinstall any light fixtures, vent covers, or other elements you removed during the installation process.

A gallery of images from this beadboard ceiling installation


Painting the beadboard ceiling
A. Choosing the perfect paint color to complement the room: Selecting the right paint color for our beadboard ceiling was crucial to achieving the overall look and feel we wanted for our laundry room. After much deliberation, we decided on Chantilly Lace by Benjamin Moore, a beautiful, bright white that would help create a fresh, airy atmosphere in the space.
B. Tips and techniques for painting beadboard effectively: Painting a textured surface like beadboard can be a bit tricky, but with the right techniques and tools, it's definitely manageable. We found that using a high-quality brush and a small foam roller designed for textured surfaces helped us achieve even coverage without missing any of the grooves or crevices. It's important to work in small sections and to use a light touch to avoid applying too much paint at once. If available a paint sprayer would work well in getting into the grooved edge of each board!
C. The transformative power of paint in the finished look: One of the most amazing things about paint is its ability to completely transform a space. In the case of our beadboard ceiling, the Chantilly Lace white paint took it from a raw, unfinished look to a polished, cohesive element that tied the entire room together. We also opted for a bit of a sheen in the paint finish, which helped to reflect the minimal amount of light coming from the back door and brighten up the room even more.

See our laundry room wish list to the final plan: Here's what stayed, what was scaled back, and what didn't fit.
Installing DIY beadboard on plaster or popcorn ceilings
We were fortunate that our room had exposed ceiling joists after removing an old drop ceiling. This made installing the beadboard relatively straightforward by adding simple strapping. However, many visitors to the blog today may be looking to cover an existing plaster or popcorn ceiling surface.
For those types of ceilings, the process is a bit more involved but still very doable as a DIY project. The key is creating a solid nailing surface by first installing furring strips (strapping) perpendicular to the direction you plan to run the beadboard planks.
Start by snap chalk lining the ceiling to map out the furring strip locations, typically 16" or 24" apart. Securely screw the furring strips into the ceiling joists using long drywall screws. This provides a level base to nail the beadboard into. A stud finder will come in handy for this job.
If dealing with a popcorn/textured ceiling, thoroughly cleaning the surface and using a drywall primer will help the furring strips better adhere. For plaster ceilings, use masonry screws made for securing into plaster.
Once the furring strips are in place, the beadboard can then be nailed directly into them using finishing nails. The beadboard joints can be caulked and painted for a seamless look when complete.

Frequently asked questions
Beadboard boards are typically attached to the ceiling by first installing strapping (also called furring strips) perpendicular to the ceiling joists. The beadboard boards are then nailed directly into the strapping using a finish nailer or brad nailer. You can also apply construction adhesive to the back of each board for extra hold, but nails are the primary method of attachment.
Yes, beadboard is a great option for ceilings. It adds texture, charm, and architectural interest to a space. You can use either individual tongue and groove boards or large panels, depending on the look you're going for. We used real boards in our laundry room for a more custom, cottage-inspired finish.
Beadboard should be nailed for a secure, long-lasting hold. Glue can be used as a supplement but should not be the only method of attachment, especially on ceilings. Nailing into strapping ensures the boards stay in place and prevents sagging over time.
If you're using tongue and groove boards, the seams naturally fit together, with the groove covering the nails and creating a seamless appearance. For added polish, use trim around the ceiling perimeter to cover any gaps, and fill minor cracks or nail holes with paintable caulk or wood filler before painting.
To replace a drop ceiling with beadboard, first remove all tiles and the grid. Install strapping perpendicular to the joists, then attach the beadboard boards or panels to the strapping using nails and adhesive. Finish by adding trim around the edges and reinstalling any light fixtures or vents.


Shop the look: Explore the paint colors and accessories for our full laundry room makeover
You can shop this makeover on my LTK where you will find links to the wallpaper, hardware, storage solutions, light fixtures, baskets, and more.
Paint Colors:
- Walls: Benjamin Moore - Storm - Eggshell
- Trim and ceiling: Benjamin Moore - Chantilly Lace Semi-Gloss
- Crown molding (to match IKEA cabinets) - Benjamin Moore White Heron - Eggshell
- Backdoor: Benjamin Moore - Wrought Iron - Semi-Gloss
Tile Floor: Concept Gray Porcelain Tile (Grout: Latte)
Cabinets: SEKTION cabinets with ENKOPING doors from IKEA
Butcher block: Espresso Stained Butcher Block

DIY inspiration for your home: Transform your living space with creative DIY home improvement projects! From adding character with board and batten wall treatments to elevating your bedroom with custom upholstery, there are countless ways to personalize your home. Update your kitchen without breaking the bank by learning cabinet painting techniques that don't require sanding, or build an affordable kitchen island for under $500. Even your fireplace can get a stunning makeover with shiplap detailing that can be completed in just one day. These accessible home improvement projects offer both beauty and functionality while allowing you to express your personal style through hands-on creativity.
After all the hard work of installing and painting the beadboard, the big reveal was truly satisfying. The bright, fresh white of Benjamin Moore Chantilly Lace combined with the classic charm of the boards created a stunning focal point that exceeded our expectations.
The ceiling added texture, visual interest, and a timeless look that perfectly complemented the laundry room's color scheme and decor. It transformed the space into a cohesive, intentional design, making even everyday chores feel a little more enjoyable.
DIY projects like this are incredibly rewarding. They allow you to create personalized spaces, save money, and learn new skills. This beadboard ceiling brought character and charm reminiscent of older homes, and I couldn't be happier with the results. If you're considering a similar upgrade, I highly recommend giving it a try. Stay tuned for my next post on our new beadboard wall in the bathroom!
Happy DIY'ing Friends!


We’re about to do this but the plan is to add trim every 2 feet around in attempt to hide the seems. How did you manage to hide the seems to perfectly ?
I'm so glad you're installing a beadboard ceiling! To answer your question, we used beadboard planks rather than paneling. The planks have a tongue and groove system, so there weren't any visible seams - think shiplap, where the boards lock into each other seamlessly.
I have seen other tutorials using beadboard paneling, which we considered, but with paneling you do need to deal with seams. The best approach seems to be adding trim to create a coffered ceiling look. We love that style, but thought our laundry room was too small for that application. Hope this helps!