
How to Build a Kitchen Island from Cabinets (Our Bathroom Vanity Hack)
You can build a kitchen island from cabinets without buying new base units. This project shows how a repurposed bathroom vanity was used as the island base, including real measurements, securing methods, height considerations, and finishing details. It is a practical example of creating a functional island using salvaged materials instead of retail cabinets.
Content may contain affiliate links. When you shop the links, we receive a small commission at no cost to you. Thanks for supporting my small business.
If you are dreaming of adding a kitchen island but do not want to buy new base cabinets or start a full renovation, using repurposed cabinets can be a surprisingly smart solution. A kitchen island from cabinets adds valuable counter space, storage, and function, even in a small or dated kitchen.
That is exactly the challenge we faced in our 1980s kitchen. Instead of purchasing new cabinetry, we used a free bathroom vanity cabinet that was being discarded from a renovation job. With a little planning and a few modifications, that vanity became a fully functional kitchen island and completely changed how our kitchen works.
In this post, I will show you how we built a kitchen island from cabinets, what to consider when using non-standard bases like vanities, and what we learned about sizing, securing, height, and finishes along the way.
Jump to:
- Our kitchen island from cabinets: Repurposing bathroom vanity bases
- Making room for the new kitchen island
- Creating the new island from the vanity cabinet base
- Adding a finished back panel for a built-in look
- Painting the kitchen island
- Choosing the hardware for the kitchen island
- Butcher block island top
- Using the second vanity as extra kitchen storage
- The beauty of repurposed materials
- Countertop options for a kitchen island built from cabinets
- Planning costs when building a kitchen island from repurposed cabinets
- Standard height and spacing for a kitchen island built from cabinets
- Vanities vs. base cabinets for a kitchen island
- Finishing touches that make a repurposed island feel built-in
- Frequently asked questions
- More impactful home improvement projects
Our kitchen island from cabinets: Repurposing bathroom vanity bases
Our old 1980s kitchen was more than ready for an update. We had cracked tile floors, stock cabinets, laminate countertops, and an outdated half wall separating the kitchen from the dining room. The space felt closed off and short on function. A full renovation was not in the cards, but improvement was still very much needed.
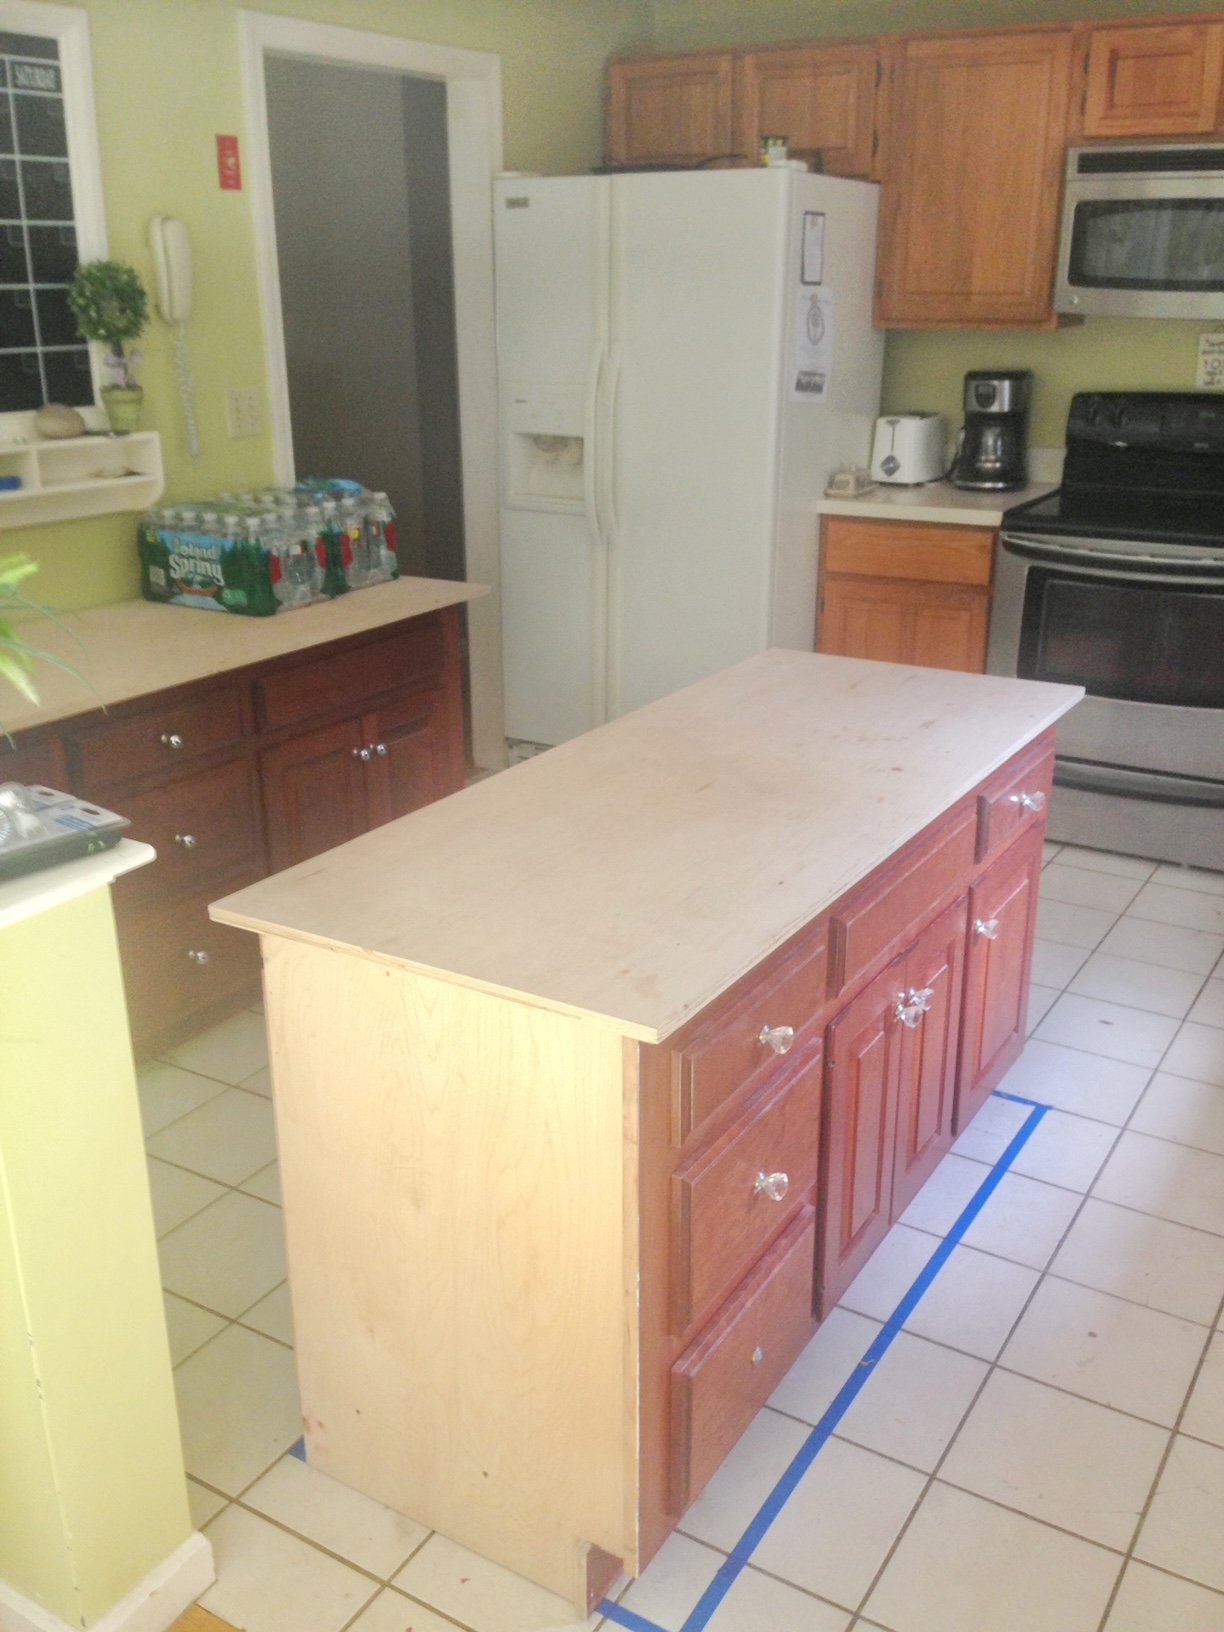
The turning point came when Ray was working on a renovation job where two bathroom vanity base cabinets in perfect condition were being thrown out. That is when our wheels started to turn. What if we used one vanity as the base for a kitchen island and the other for additional counter space along the back wall?
With a little planning, a fresh coat of paint, and a butcher block countertop, that discarded vanity became a fully functional kitchen island. It now provides much-needed prep space, extra storage, and has completely changed how our kitchen works. What started as a simple repurposing idea quickly became the focal point of the room.
Making room for the new kitchen island
Our kitchen is fairly small, measuring just 13 feet by 13 feet. Built in the 1980s, it originally had a half wall separating the kitchen from the dining room. That wall felt outdated and didn't serve a real purpose anymore, so removing it became our first step. Once it was gone, the entire space immediately felt more open and workable, and it gave us the clearance we needed to confidently plan for an island with comfortable walkways around it.
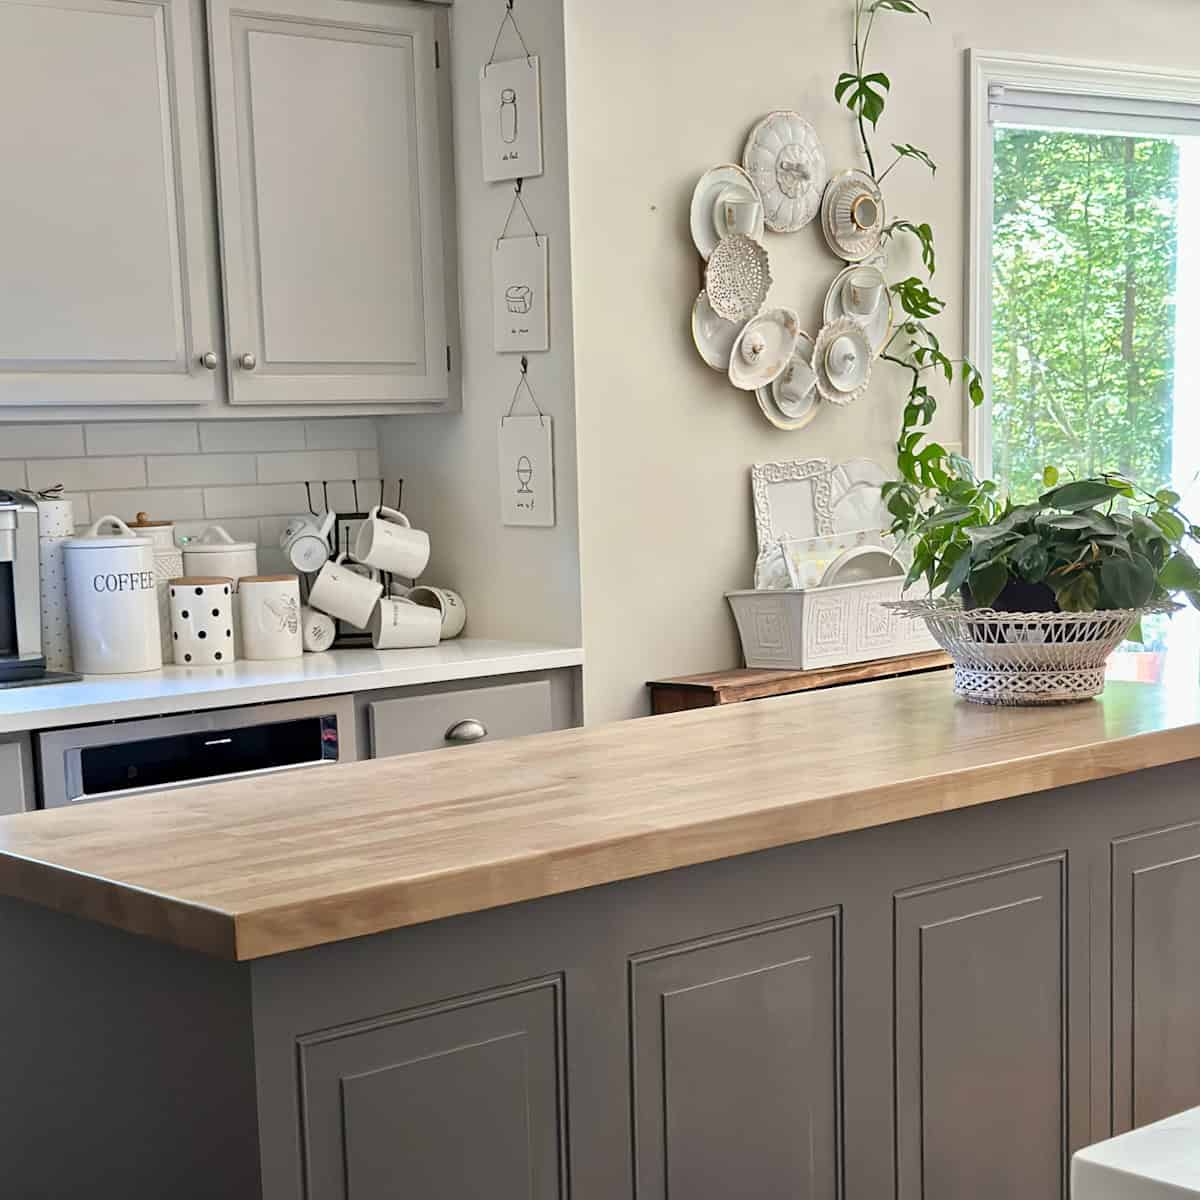
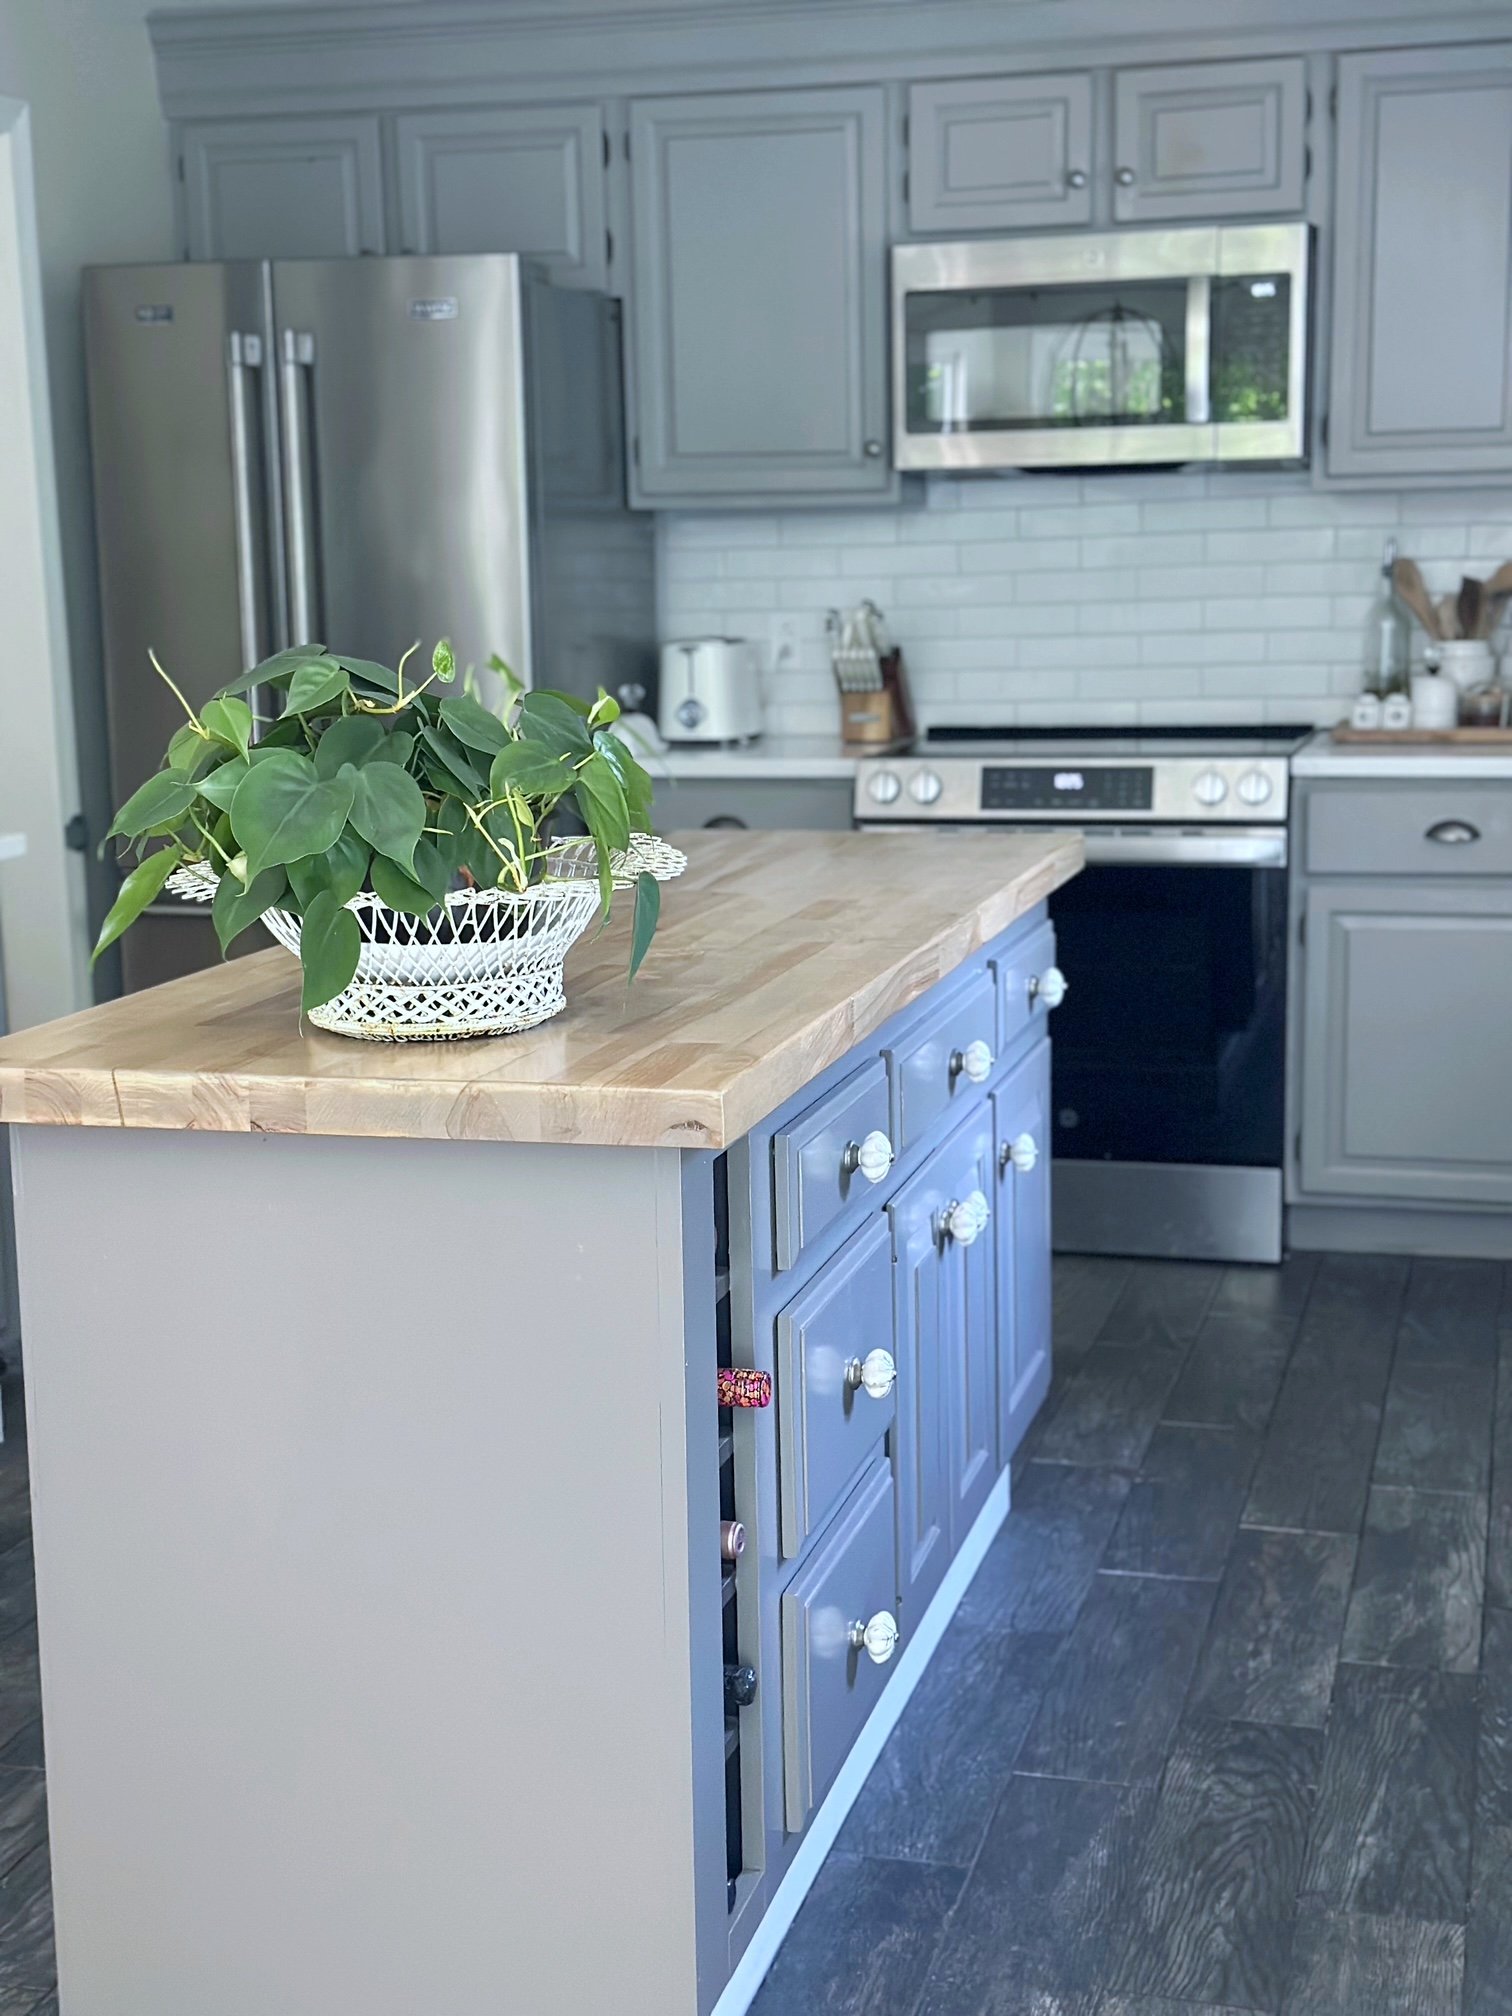
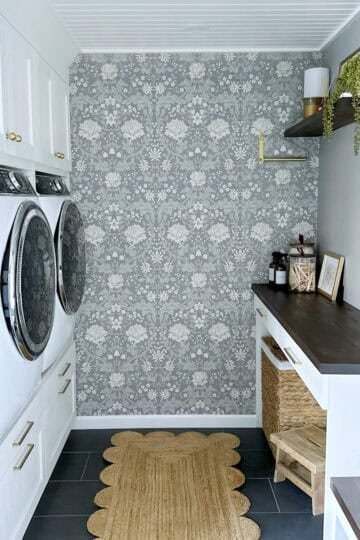
Because we desperately needed more cabinet storage, we decided to use the second bathroom vanity along the back wall of the kitchen rather than extending the island for seating. For that reason, we chose a traditional rectangular island with no overhang. Our finished island measures 25 inches wide by 68 inches long and sits at standard counter height at 36 inches.
Even with its smaller footprint, the island provides valuable additional storage and prep space. It fits the room well, maintains easy flow between the cabinets and counters, and honestly, we're not sure how we functioned without it.

Creating the new island from the vanity cabinet base
The first step in creating our DIY kitchen island from the vanity cabinet base was pulling up the old floor tiles, leveling the subfloor, and preparing it for new tile. Since we were already planning to replace the kitchen flooring, this was the perfect time to install the island properly from the start. It is much easier to secure a built-in island before new flooring goes down.
To anchor the island to the floor, we followed a simple built-in method that uses a basic wood frame secured directly to the subfloor. Ray built that frame first, then screwed the vanity cabinet base directly into it so the island would be completely solid and stable. This approach keeps the island from shifting while still allowing the finished flooring to fit cleanly around it.
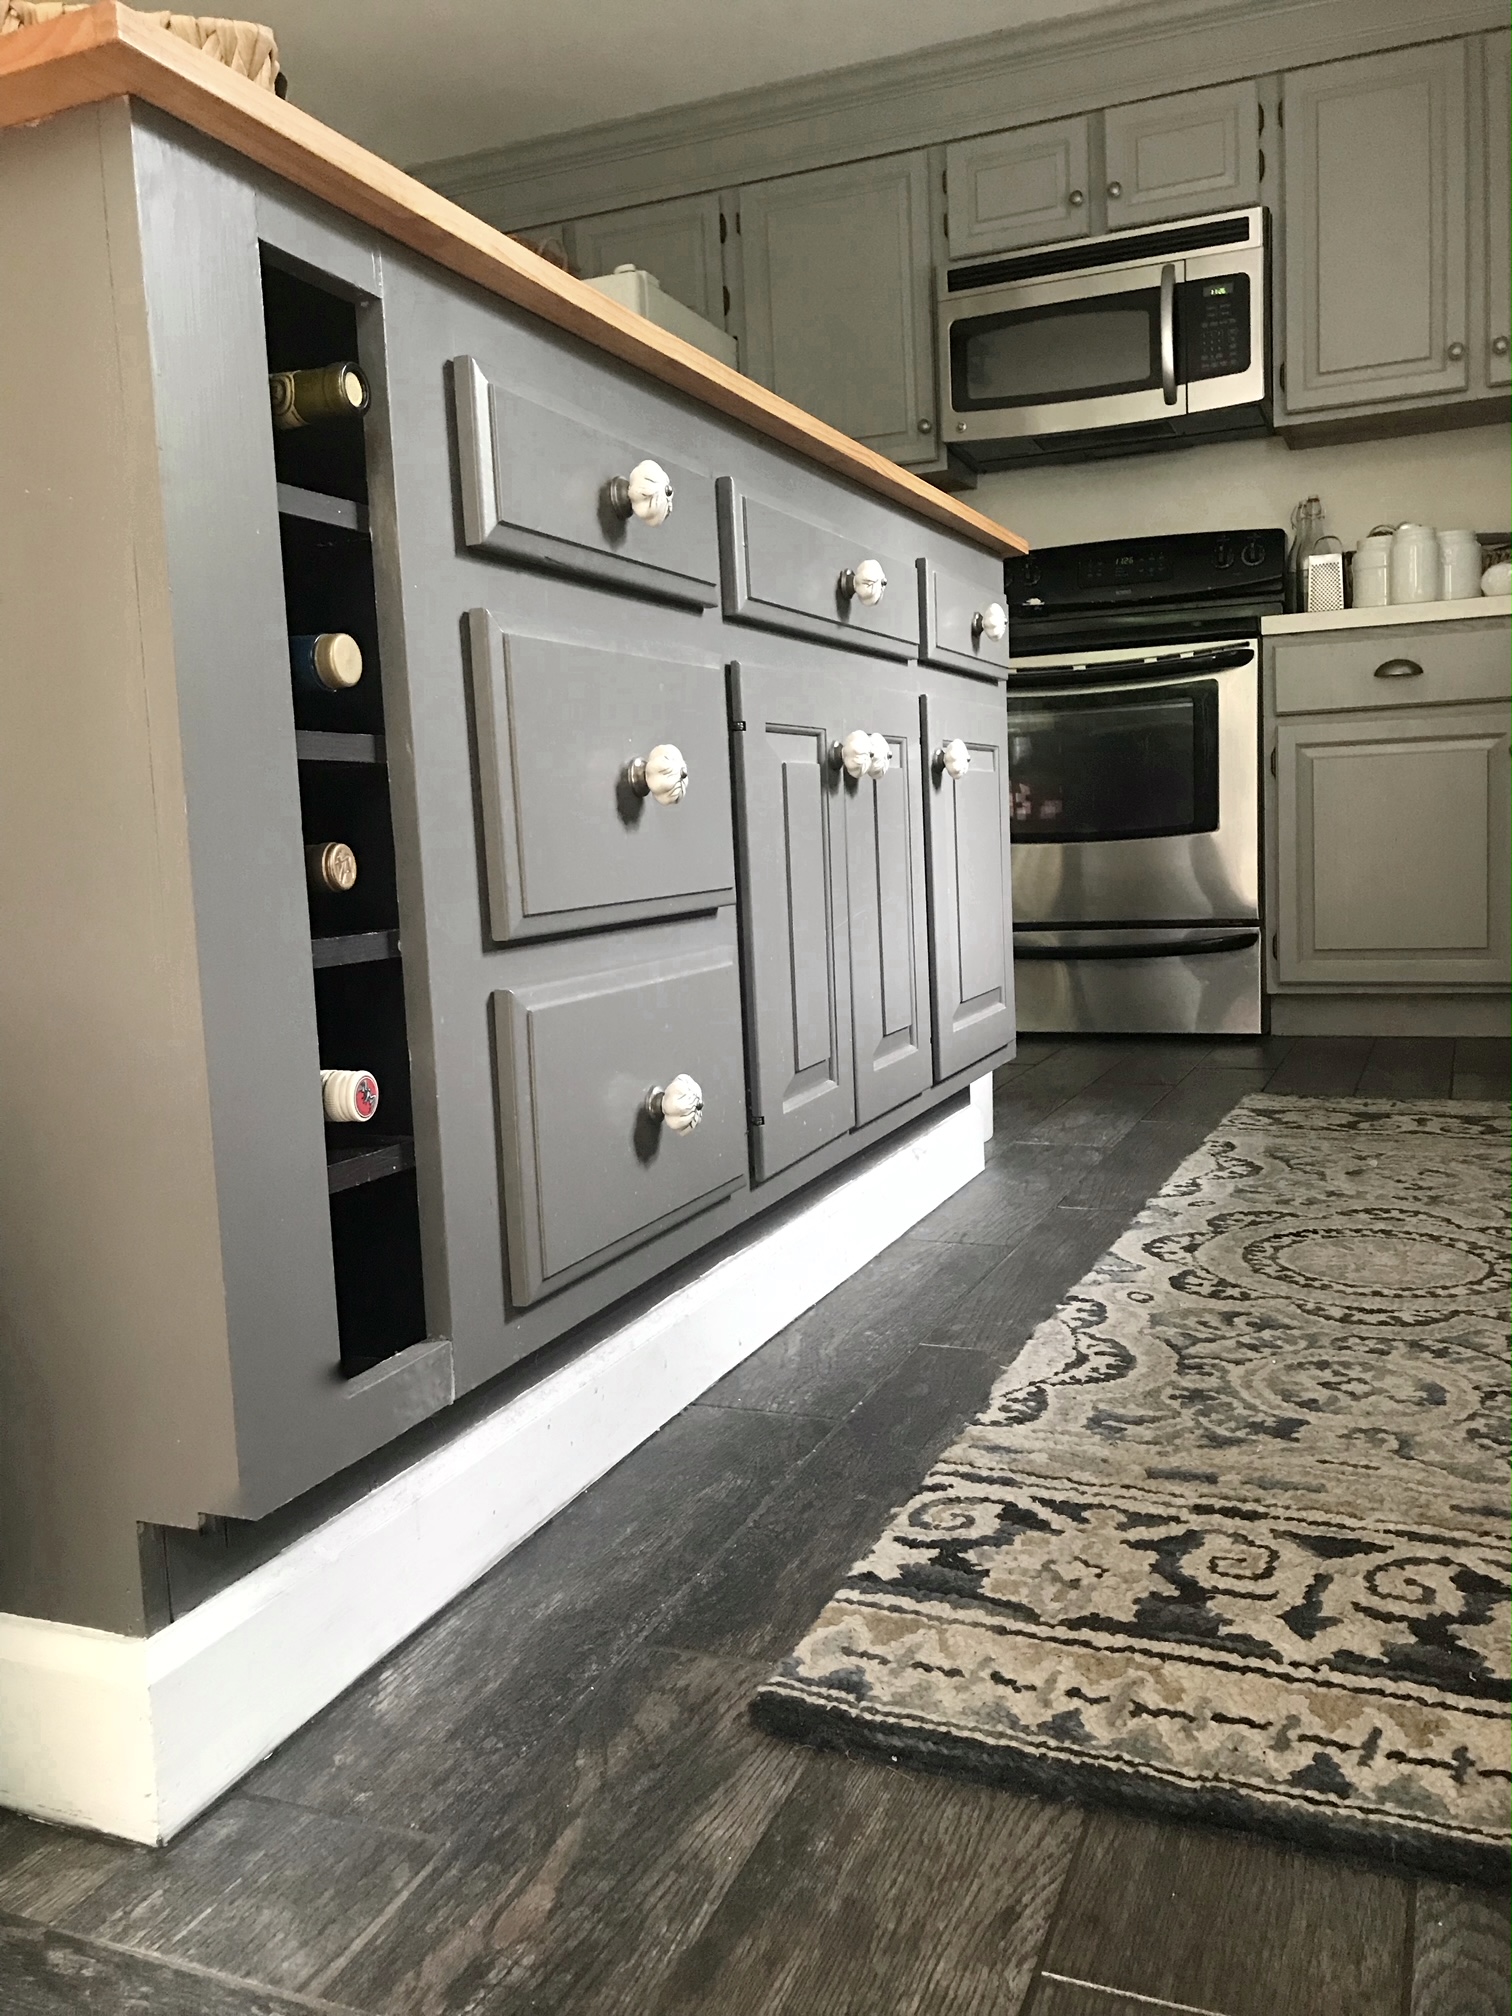
To add more function on the front side of the island, we extended the base slightly and incorporated a small wine rack. That extra detail gave us both storage and visual interest, while still keeping the overall footprint compact for our space.
Tip for Installing a Kitchen Island Over Existing Flooring
If you are installing a kitchen island on top of an existing floor rather than during a flooring replacement, the process is slightly different. Instead of anchoring the base to the subfloor, the island is typically secured directly through the finished flooring and into the subfloor or floor joists below. This usually requires longer fasteners and careful placement to avoid cracking tile or damaging flooring. It is also important to confirm that the flooring material can handle the weight and movement of a permanent island before installation.
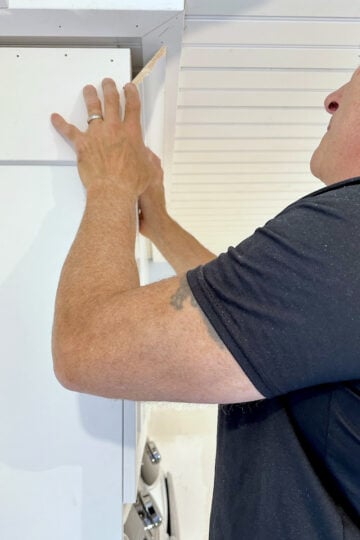
Adding a finished back panel for a built-in look
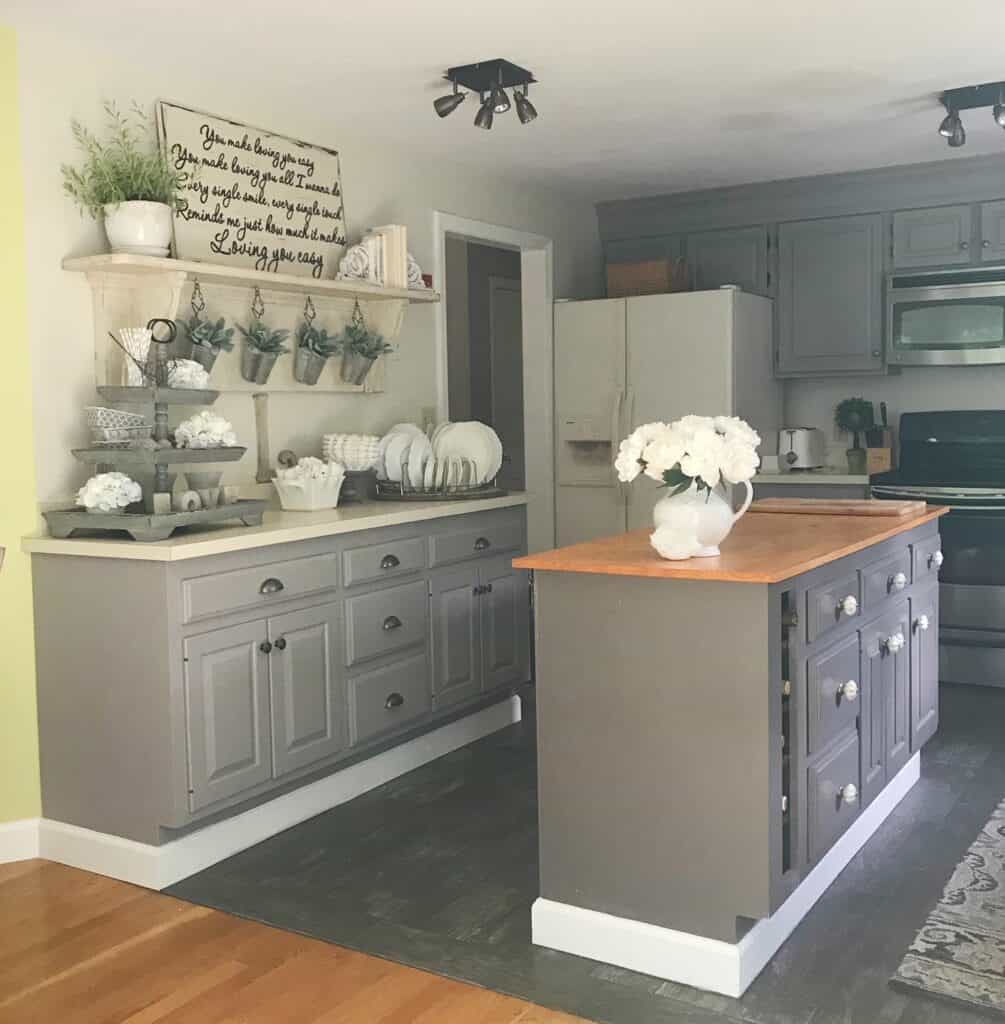
On the opposite side of the island, we added a finished back panel to give it a true built-in look. We chose a raised panel style and secured it in place with a nail gun. Once the panel was attached, we added trim pieces around the entire base to finish it off. These small details made a big difference and helped the island look like a permanent part of the kitchen rather than a repurposed cabinet.

Painting the kitchen island
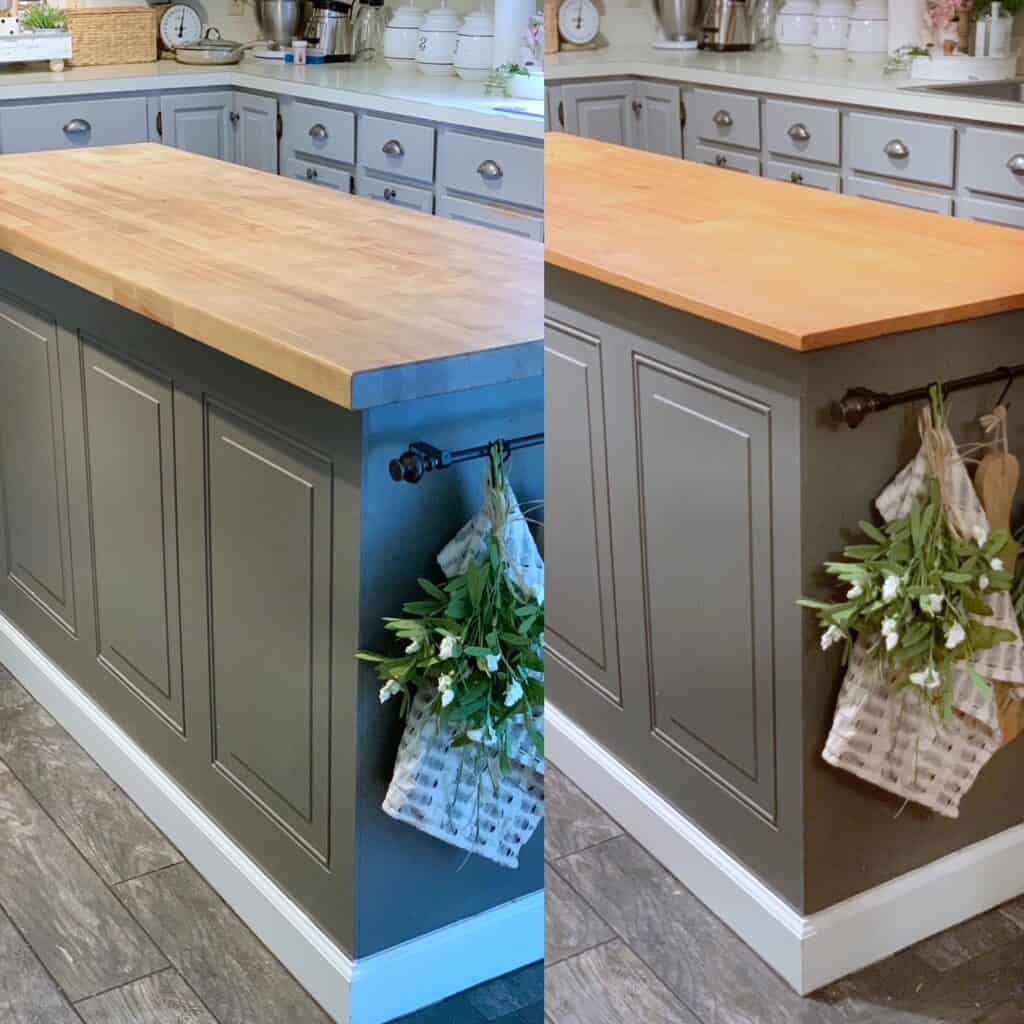
Before adding a fresh coat of paint, I used wood filler to fill in all of the nail holes and then sanded everything smooth. We chose Benjamin Moore Advance for both the kitchen cabinets and the island because it is designed specifically for cabinets, doors, and trim and gives a durable, furniture-like finish. Before painting, we primed with Benjamin Moore Styx primer to ensure good adhesion.
For color, we chose a softer warm gray, Willow Creek, for the upper cabinets and a darker gray, Bear Creek, for the kitchen island. I used Chantilly Lace on the toe kick and trim to keep those areas bright and clean. All of the colors work beautifully together and really helped pull the kitchen into one cohesive space.

Choosing the hardware for the kitchen island
For the main kitchen cabinets, I chose brushed nickel drawer pulls for the doors and coordinating brushed nickel cup pulls for the drawers. For the kitchen island, I wanted something with a little more personality, so I went with cream-colored ceramic pulls with a dark gray design. The mix of finishes adds subtle contrast while still tying the island in with the rest of the kitchen.

Butcher block island top
When we first completed this kitchen refresh, our main countertops were still the original cream-colored laminate. It simply was not in the budget at the time to replace them. Because the island was painted a different color, it naturally began to feel like a stand-alone piece, which gave us the freedom to take a different approach with the surface.
We initially used a stained piece of thin wood as a temporary solution on top of the island until we could upgrade it properly. A few years later, we added a real butcher block countertop as the final finish, and it completely transformed the island. The warmth of the wood adds beautiful contrast against the painted base and has held up wonderfully for everyday use.
We have since updated our perimeter counters to quartz, but we intentionally kept the butcher block on the island. I love the mix of materials, and it continues to make the island feel like a focal point rather than just another run of countertop.
Using the second vanity as extra kitchen storage
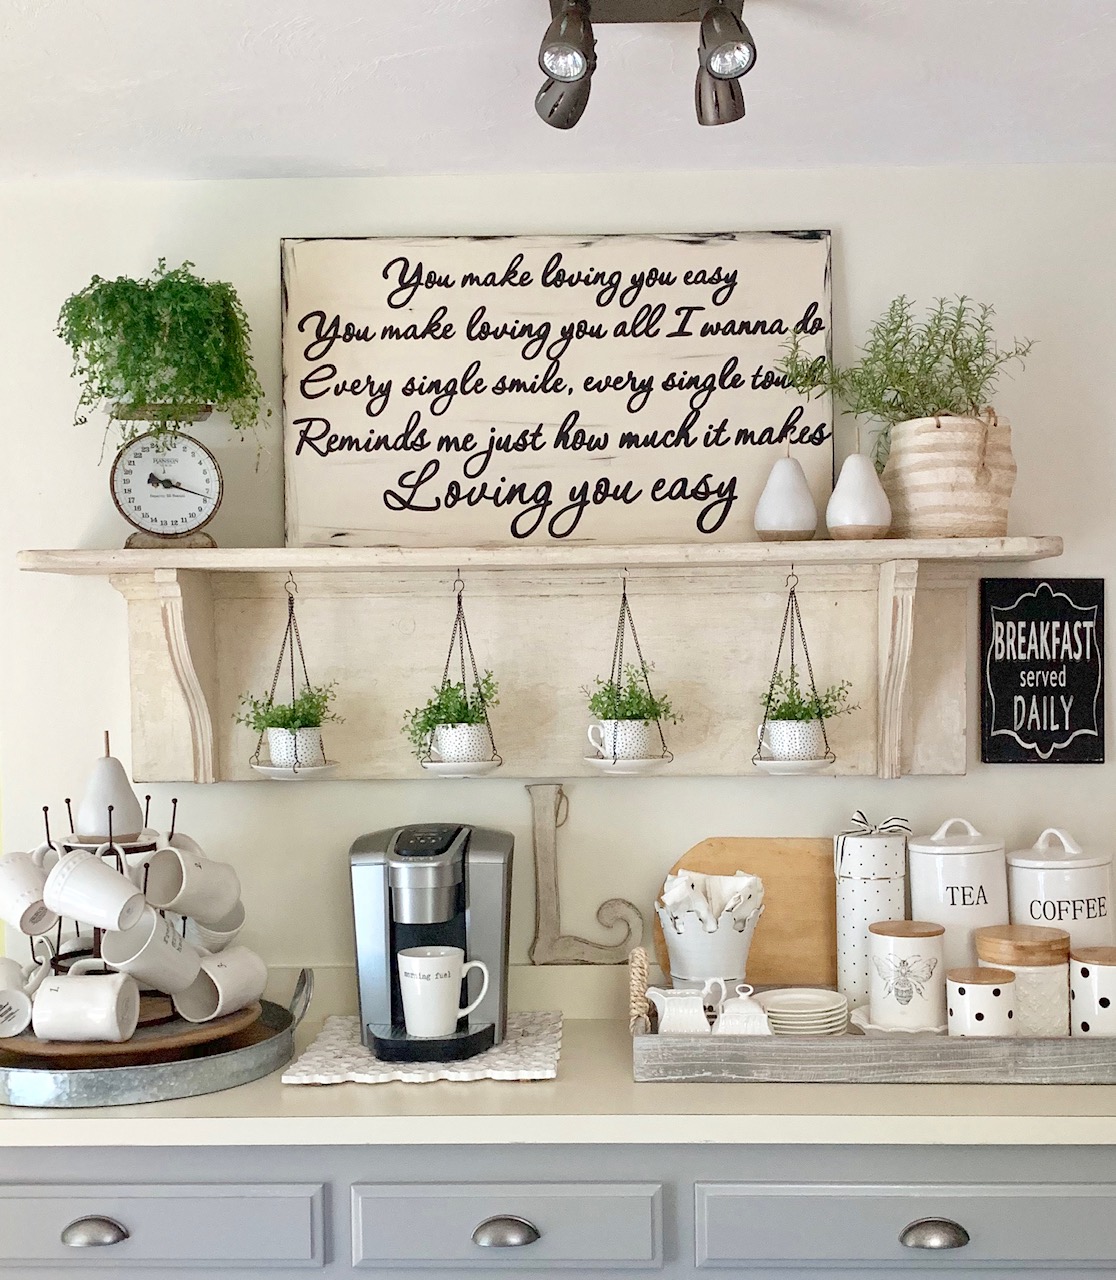
So what about the second vanity? Since we were in such need of additional storage, we placed that vanity along the back wall of the kitchen as a base for extra counter space. To make it feel like it truly belonged in the room, we painted it the same color as the gray kitchen cabinets and even added matching laminate at the time so it blended seamlessly with the existing counters.
It looked like it had always been part of the original kitchen design. I used that space as a large coffee bar for years, and more recently it has become my DIY baking station. It would also work beautifully as a small breakfast bar or serving area. That second vanity ended up being just as useful as the island itself.
The beauty of repurposed materials
One of the biggest advantages of building a kitchen island from cabinets is the ability to use repurposed materials as your base. Upcycling an old cabinet, dresser, or piece of solid furniture can dramatically lower the overall cost of a project while also giving new life to something that might otherwise be discarded. In our case, two bathroom vanity cabinets that were being thrown out after a renovation became the foundation for both our island and additional counter space.
The possibilities for repurposed bases are surprisingly wide. An outdated kitchen cabinet, a sturdy dresser, old desks, or even a solid bookshelf can all be transformed into a functional kitchen island with a little creativity and some hands-on work. Not only does this approach save money, but it also keeps usable materials out of landfills and adds a layer of character that brand-new cabinetry often lacks.
Finding repurposed pieces takes a bit of patience, but the payoff is worth it. Keep an eye out during neighborhood renovations, browse local online classifieds, and check building-supply thrift stores that specialize in reused materials. Antique and vintage markets can also be great places to find solid pieces with good bones that are perfect for a second life in the kitchen.
When it comes to building a kitchen island from cabinets, thinking outside the box is often what leads to the most rewarding results. With a little imagination and effort, an overlooked piece can become the hardest-working feature in your kitchen.

Countertop options for a kitchen island built from cabinets
When you build a kitchen island from repurposed cabinets, your countertop choice often needs to be more flexible than it would be with standard, store-bought bases. Non-standard cabinet depths, mixed materials, and custom footprints all influence what will work best on top. The right surface should balance durability, weight, thickness, and how the island will actually be used day to day.
Butcher block is an excellent option for a cabinet-based island because it can be cut to custom dimensions, adds warmth, and provides a forgiving work surface. This is what we ultimately chose for our island, and it has held up beautifully over time with proper sealing and maintenance.
Laminate is another practical choice, especially for repurposed builds. It is lightweight, budget-friendly, and available in many finishes. Laminate works particularly well when the island base is not perfectly standard in size because it can be fabricated to fit exactly.
Concrete countertops offer a more modern, industrial look and can be fully customized for shape and thickness. They are heavier and require proper support from the cabinet base and subfloor, but they are extremely durable and work well on permanently anchored islands.
Assembled wood planks or salvaged boards can also be used to create a custom top with a rustic or farmhouse feel. This option works best when boards are properly joined, sanded smooth, and sealed for moisture protection.
No matter which material you choose, it is important to think about weight, overhang, sealing, and long-term maintenance when working with repurposed cabinets. Because these bases were not originally designed for kitchen islands, the countertop plays a major role in both the function and the finished look of the project.

Planning costs when building a kitchen island from repurposed cabinets
The cost of building a kitchen island from repurposed cabinets can vary widely depending on what you already have, what you need to purchase, and how customized your finished island will be. One of the biggest advantages of using salvaged cabinets is that the base itself is often free or very low cost, but there are still several materials to budget for along the way.
In our case, the vanity cabinets were free, which made a huge difference in the overall cost of the project. From there, our primary expenses were paint and primer, the butcher block countertop, hardware, trim pieces, and the materials used to anchor the island securely to the floor. Flooring work was already part of our larger kitchen update, but it is something to consider if your island will be permanently installed.
Here are the main cost categories most repurposed cabinet islands require:
- Cabinet base: Free to a few hundred dollars, depending on whether it is salvaged or purchased secondhand
- Countertop: Varies based on material, with laminate, butcher block, wood planks, or concrete all falling in different price ranges
- Paint and prep supplies: Primer, cabinet paint, sandpaper, wood filler, and tools
- Hardware: Knobs, pulls, and any specialty features like wine racks
- Trim and framing materials: Wood for anchoring, panels, and finish trim
Because every repurposed build is different, costs can shift quickly based on the materials you choose and what you already have on hand. The key is to price out the major components early in the planning stage so there are no surprises later. Even with these variables, a cabinet-based island is almost always more affordable than purchasing a fully custom, professionally installed island.

Standard height and spacing for a kitchen island built from cabinets
When building a kitchen island from repurposed cabinets, getting the height and spacing right is just as important as choosing the cabinet base itself. These two details affect comfort, traffic flow, and how well the island functions in everyday use.
A standard counter-height kitchen island is 36 inches tall, which is what we chose for our build. This height aligns with most kitchen countertops and works well for food prep, serving, and casual use. Because we used a bathroom vanity as our base, we had to carefully account for the cabinet height, the framing underneath, and the thickness of the butcher block to make sure the finished height landed where we wanted it.
If you are planning seating at your island, overhang and clearance become even more important. In our case, we did not include an overhang because we prioritized storage and walkway space in a smaller kitchen. For islands that do include seating, planning for enough overhang and legroom is essential for comfort.
Equally important is the space around the island. Comfortable walkways make a kitchen feel functional instead of crowded. You want enough room for people to move easily, open drawers and appliance doors, and work around the island without feeling boxed in. In a repurposed build like ours, careful measuring before installation makes all the difference.
Because repurposed cabinets can vary widely in size and depth, it is always worth taking extra time in the planning stage to confirm your final island height and surrounding clearances before anything is permanently installed. These small decisions have a big impact on how usable the finished island will be.
Vanities vs. base cabinets for a kitchen island
Using a bathroom vanity as the base for a kitchen island is very different from using standard kitchen base cabinets, and it is important to understand those differences before choosing which route to take. Both options can work well, but they function a little differently and suit different situations.
Depth is one of the biggest differences. Bathroom vanities are often shallower than standard kitchen base cabinets. This can actually be an advantage in a smaller kitchen where every inch of floor space matters, but it also affects how much storage you have and what size countertop will fit comfortably.
Height also needs careful planning. Kitchen base cabinets are designed to land at standard counter height once the countertop is added. Vanities are not. When using a vanity, you may need to adjust with framing, shims, or countertop thickness to reach a comfortable finished height for everyday kitchen use.
Door swing and drawer function can also vary. Vanities are built for bathroom layouts, so interior storage may be configured differently than kitchen cabinets. This is not a deal breaker, but it is something to think through when deciding what you plan to store inside your island.
Strength and construction are another consideration. Many vanities are solid enough for island use, especially when they are anchored properly to the floor and paired with a supportive countertop. Ours has held up beautifully to daily kitchen use, but it was essential to secure it correctly during installation.
Standard kitchen base cabinets are often easier to work with if you want a completely predictable build with off-the-shelf dimensions. Vanities, on the other hand, shine when you want to repurpose something unique, save money, or make use of materials already available to you. The best choice depends on your space, your storage needs, and whether flexibility or uniformity matters more in your kitchen.

Finishing touches that make a repurposed island feel built-in
Once the structure of the island is in place, it is the finishing touches that make it look intentional rather than improvised. Small details go a long way in helping a repurposed cabinet blend seamlessly into the kitchen.
Paint is the biggest unifier. Painting the kitchen island the same finish quality as your perimeter cabinets instantly makes it feel like part of the original design. In our kitchen, using a darker gray on the island created contrast while still coordinating with the rest of the space.
Hardware adds personality and polish. Mixing finishes can work beautifully when done with intention. The ceramic pulls on our island bring in subtle pattern and color without overwhelming the space, and they complement the brushed nickel hardware used elsewhere in the kitchen.
Panels and trim are what make a repurposed island look truly built-in. The raised panel we added to the back of the island and the trim wrapped around the base give it structure and presence. These elements hide any raw cabinet edges and help the entire piece feel custom.
Storage features can also elevate the design. Our wine rack extension was a small addition, but it added both function and visual interest. Simple touches like baskets, open shelves, or decorative end panels can offer personality while keeping the island purposeful.
When you start with a repurposed cabinet, these finishing details are what transform it from a "found piece" into a functional and fully integrated part of your kitchen's layout.
Frequently asked questions
Yes, base cabinets are commonly used for kitchen islands, and they work very well when properly secured to the floor. In a repurposed build like ours, even cabinets that were not originally intended for the kitchen, such as bathroom vanities, can function successfully as long as height, depth, and anchoring are carefully planned.
In most cases, building a kitchen island is more affordable than purchasing a custom or prefabricated island, especially when repurposed materials are used. Salvaged cabinets, secondhand pieces, and flexible countertop options can significantly reduce overall costs compared to buying a brand-new island.
Yes, you can absolutely make a kitchen island out of cabinets. Many DIY islands are built using one or more base cabinets secured together and anchored to the floor. In our case, we used a repurposed bathroom vanity as the base, which worked just as well with a little extra planning.
A standard kitchen island is typically 36 inches tall, which matches most counter-height surfaces. When building an island from repurposed cabinets or vanities, you may need to adjust the base height or countertop thickness to reach this finished height comfortably.
You generally want enough clearance around a kitchen island to allow for comfortable movement, appliance access, and workflow. Adequate spacing ensures drawers, dishwashers, and oven doors can open fully and that the kitchen does not feel cramped, especially in smaller layouts.


Looking back, building a kitchen island from repurposed cabinets was one of the best decisions we made for our 1980s kitchen. What started as a simple idea to reuse something that would have been thrown away turned into the hardest-working feature in our home. That one bathroom vanity changed how our kitchen functions every single day, from extra prep space to added storage and gathering room.
This project reminded me that you do not always need brand-new materials or a full renovation to make meaningful, lasting changes. With a little creativity, careful planning, and the willingness to see potential where others might see landfill, you can create something both beautiful and incredibly functional.
If you are considering a kitchen island from cabinets, I hope our experience gives you the confidence to look at what you already have in a new way. Sometimes the best solutions are the ones hiding in plain sight.
Keep creating, friends.


How much space is between your island and cupboards on each side ? I know ideally is 45-48” but is yours that far?
Hi Ang,
Ours is 38" which has worked out fine. Dishwasher and oven doors opens easily. Thanks for visiting the blog!
Hi Stephanie,
I love the color of your butcher block island top. What wood / Finish did you use? Also, what is the thickness?
Thanks,
Nan
Hi Nan, Sorry for the delay! The butcher block was unfinished so we stained it using Minwax premium oil, wood finish penetrating stain in the color of weathered oak. The weather oak helped the butcher block pull towards a more gray finish than orangey.
How many inches is between the island and cabinet? I have plans every similar
Hi Al, We had room for 38" between the counter of the island and our kitchen island and it's worked out great!