

How to Make a DIY Cone Christmas Tree with Yarn (Soft and Sparkly Holiday Decor)
To make a DIY cone Christmas tree, wrap yarn around a cone-shaped form using a hot glue gun to secure it as you go. You can use paper mache or foam cones, and wrapping them in kraft paper first helps with adhesion. Choose yarn in colors and textures that fit your holiday palette. These soft, sparkly cone trees are perfect for mantels, shelves, or even gift toppers. In this post, I'll show you how to make your own yarn-wrapped cone Christmas trees step by step.

Content may contain affiliate links. When you shop the links, we receive a small commission at no cost to you. Thanks for supporting my small business.
When it comes to Christmas decorating, I love adding handmade touches that feel soft, cozy, and personal. These DIY cone Christmas trees made with yarn have become one of my favorite holiday crafts. I first shared them on Instagram, and after receiving so many questions, I decided to put together a full step-by-step guide here on the blog.
Whether you use them on a mantel, as part of your table centerpiece, or scattered throughout your home, these cone-shaped trees are a fun and affordable way to create a magical, blush-toned holiday look.
Jump to:
Why you'll love this project
Step-by-Step instructions that are easy to follow
This tutorial is beginner-friendly and designed to help you enjoy the process. With clear steps and helpful tips, you'll be able to create something beautiful - no crafting experience required.
Budget-friendly creativity
All you need are some yarn, cone tree forms, and a glue gun. These everyday supplies come together to make charming holiday decor without spending a fortune.
Fun for families or a girl's night in
This is a great project to share with kids, friends, or anyone who loves getting crafty. Set up a holiday playlist and turn it into a cozy evening of creativity.
Completely customizable
Choose yarn colors and textures that match your home and holiday style. Mix sizes, vary placements, and make it your own. These cone trees are easy to personalize and even easier to love.
Your color palette, your style
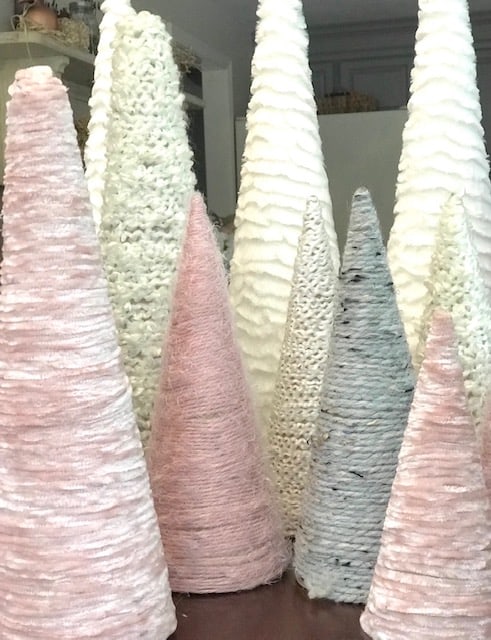
Pick the yarn shades that make you happy. This was my favorite part - choosing colors that fit the soft, cozy look I wanted for our living room. Whether you go blush, bold, or traditional, these trees reflect your unique holiday vibe.

Making the yarn Christmas trees
I'll be sharing more about the full mantel design soon, but for now, let's focus on what you're here for: how to make these cozy DIY yarn Christmas trees. Grab your glue gun, pick out your favorite yarn, and let's get crafting. With just a few simple steps, you'll have your own set of handmade cone trees ready to display.
Supplies and tools
- A variety of balls/skeins of yarn - (you can't go wrong here, simply choose the colors and styles you like)
- Tree forms - (if you can find the paper mache ones, they are easier to use. Otherwise you can use styrofoam ones - they typically come in different sizes)
- Kraft paper (if you go with styrofoam tree forms, you may need the paper to cover the styrofoam cones)
- Glue gun
- Scissors
Instructions
- Prepping the Tree Forms
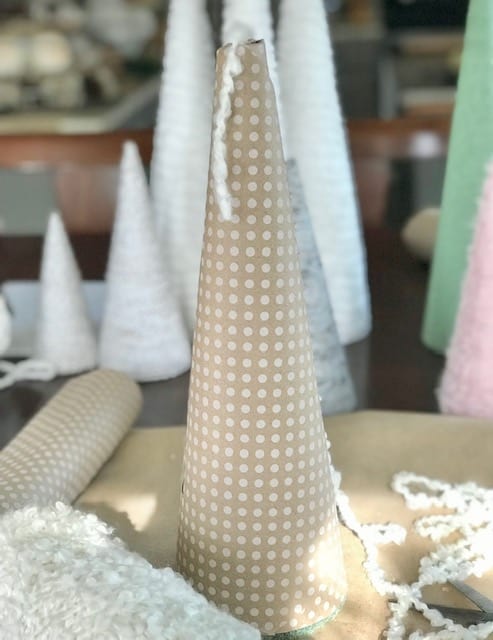
Let's start by getting the tree forms ready. If you're using paper mache cones, you can skip this step since they're ready to go as-is. But if you're working with styrofoam forms, here's a helpful tip: wrap them in kraft paper first.
Simply roll the kraft paper around the cone and secure it with hot glue. Trim any extra paper so the edges are clean. This step helps the hot glue stick better and prevents the white styrofoam from showing through the yarn. The kraft paper blends in beautifully and gives your trees a more polished look.
- Yarn Wrapping Technique
Start at the top of the cone by placing the end of the yarn over the opening and securing it with a dot of hot glue. Then, working down one side of the cone, apply a line of glue in small sections, about 3 to 4 inches at a time, and begin wrapping the yarn around the form.
This method gives you control and keeps the glue from drying before the yarn is in place. As you wrap, keep the yarn close together to reduce any gaps and prevent the kraft paper from showing through. A steady hand and consistent spacing will give your tree a smooth, finished look.
- Yarn Wrapping Process: From Top to Bottom
Once the top section is secure, continue wrapping the yarn around the cone, working slowly from top to bottom. Apply glue in small sections as you go to keep the yarn in place and evenly spaced.
When you reach the base of the cone, make sure the final row of yarn is snug and neatly secured for a clean, polished edge. This gradual wrapping process gives your tree a soft, textured look that feels both cozy and handcrafted.

Make it yours: Simple or styled
One of the things I love most about these DIY cone Christmas trees is how flexible they are. You can leave them just as they are for a clean, minimalist look, or you can dress them up with a little extra holiday charm.
Here are a few ideas to make them your own:
- Add twinkle lights: Mini battery-operated fairy lights wrap beautifully around larger yarn trees and bring a soft, magical glow to your mantel or tabletop.
- Tie on a ribbon or bow: A velvet or satin bow at the top of a tree adds a sweet, festive touch. Use one tree as a focal point or add bows to all for a coordinated look.
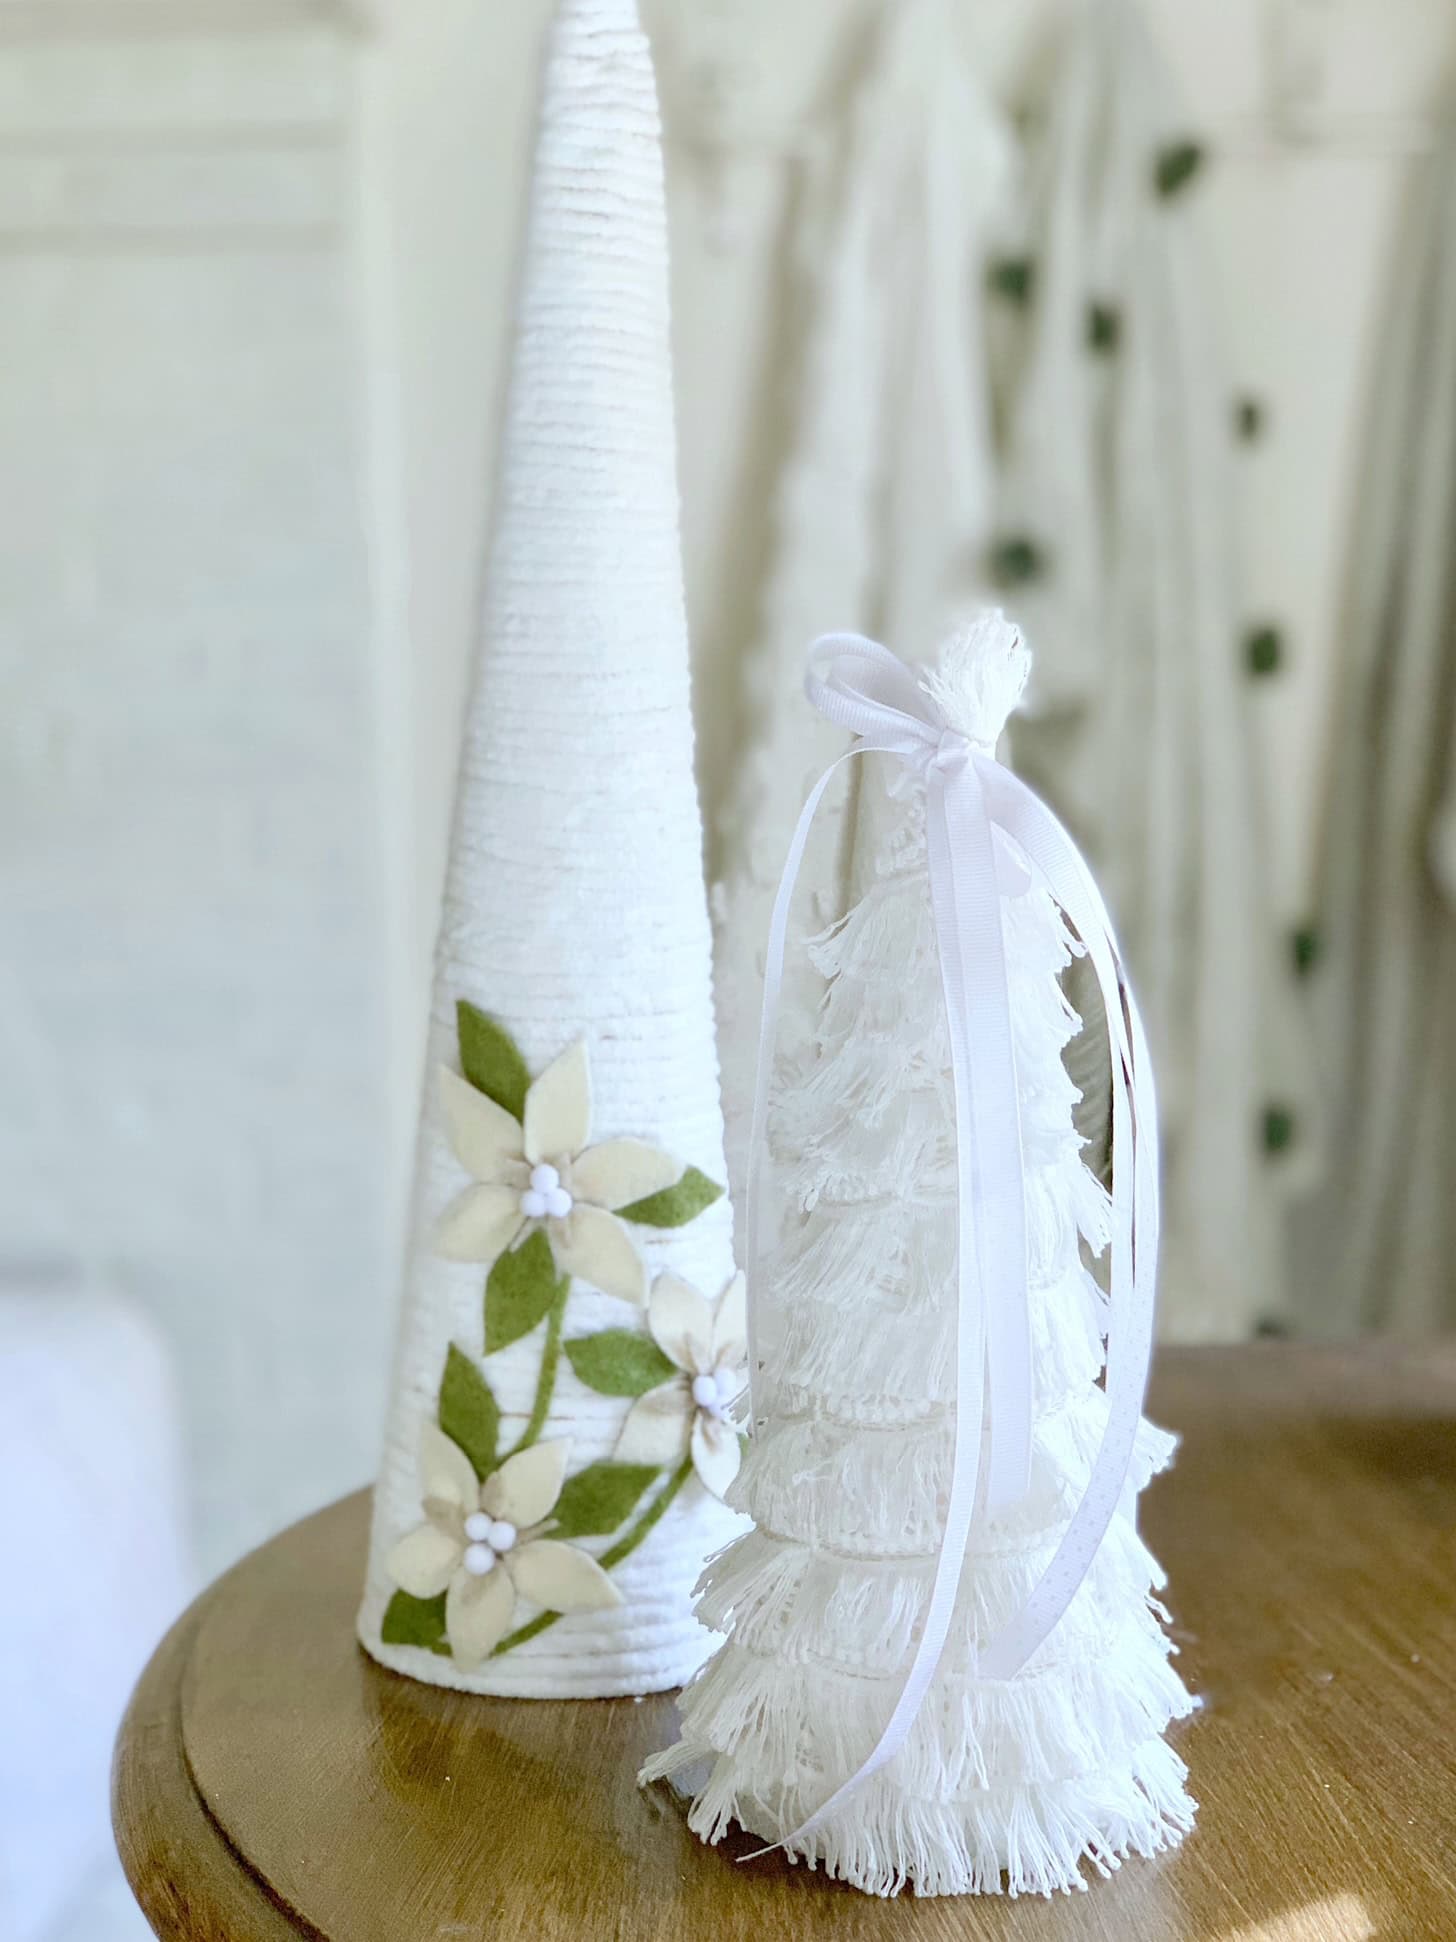
- DIY felt poinsettias: In one version of this display, I added soft felt poinsettias I made by hand. They layered beautifully over the yarn and brought in a lovely hint of texture and color. This is a great option if you want your trees to blend with other handmade elements in your holiday decor.
- Vary the height with candle holders: To create dimension in your display, try perching some of the smaller cone trees on top of chunky candle holders. This gives the arrangement lift and adds interest without needing additional materials.
Whether you keep them simple or dress them up, these cone trees are such a fun way to express your holiday style. You really can't go wrong.
Creating a cozy living room
Decorating with the yarn trees
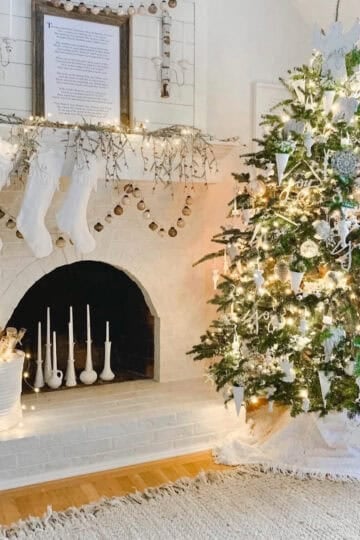
For this display, I chose soft, muted hues like white, blush pink, taupe, and gray to create a gentle, shimmering effect. Above the mantel, a birch log star wrapped in twinkle lights adds a natural focal point, while below, a rose gold Fa la la la la garland from Pottery Barn Kids brings in just the right amount of festive sparkle.
Mantel Magic
I arranged the DIY yarn cone trees in a soft, layered line across the mantel. The larger trees, made with chunky yarn, sit toward the back to add height, while the smaller ones are layered in front for depth. Faux antler picks and light, snowy filler from Pottery Barn help tie everything together.
To complete the look, I added battery-operated fairy lights throughout the arrangement. The glow from the lights winds between the trees and reflects off the yarn textures, creating a cozy, magical holiday feel that's both handmade and elevated.

Handmade stockings
I made Chenille stockings which were fashioned from a vintage polka dot chenille bedspread. Embracing the yarn theme further, I adorned the stockings with whimsical tassels. If you're new to tassel-making or simply need a quick reminder, I've got you covered with a step-by-step tutorial here.

The Christmas tree
As December approaches, I always look forward to decorating our Christmas tree. We have a tradition of choosing a fresh tree each year, usually starting our living room decorating shortly after Thanksgiving and saving the tree for mid-December.
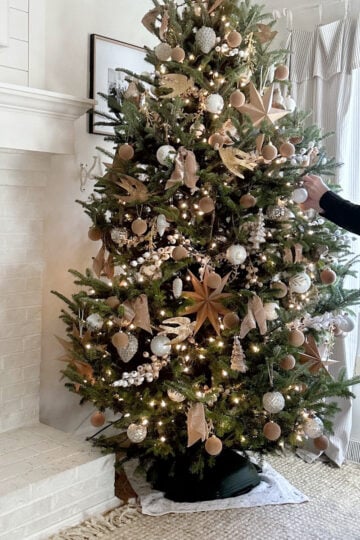
This year, I went with an all-white theme. I decorated the tree with paper stars, glittery ornaments, a delicate paper dot garland, and a large star at the top. The result was a festive tree that sparkled with layers of soft white texture and light.
For the tree skirt, I repurposed the remaining fabric from the vintage polka dot chenille bedspread I used to make our stockings. To finish the space, I tucked a few twinkle lights in with the birch logs in the fireplace, adding one more layer of cozy glow to the room.
For more Christmas tree base ideas, check out how I made a tree basket to nestle a tree in, or learn how to place your tree in any pot, basket, or planter.

Creative uses for yarn trees
Frequently asked questions
To make a Christmas tree with a cone, start with a cone-shaped base like foam or paper mache. If you're using a foam cone, wrap it in kraft paper to help the glue stick and hide the white surface underneath. Beginning at the top, use a hot glue gun to attach yarn, ribbon, or other materials, wrapping tightly in sections as you work your way down. Finish by securing the end neatly at the base and adding any decorative accents like lights or small bows.
The easiest way to make a cone for crafts is to use ready-made foam or paper mache cones, which are available at most craft stores and online. If you want to DIY the cone itself, roll a piece of poster board or cardstock into a cone shape, trim the bottom to sit flat, and secure the edge with hot glue or tape. This method works well for lightweight decorations like yarn trees.
Start at the bottom of your cone with a dab of hot glue. Attach the end of your yarn and begin wrapping, working your way up. Add a line of glue every few rows to secure the yarn. For a different look, try using chunky yarn or various sizes of yarn. Continue until you reach the tip of the tree, ensuring the last yarn wrap is neatly secured for a polished finish.
The best part of this yarn tree ornament DIY is customization! Try different yarn colors or textures for various looks. Add wooden beads, wood stars, or pine cones for decoration. You can make trees in various sizes and use different types of yarn. For a festive touch, incorporate a string of fairy lights. Feel free to add a tree trunk using a wooden dowel or a wood slice for the base. This versatility makes it a great craft for the holiday season.
More holiday inspiration


Thank you for joining me for this, DIY Yarn Christmas Trees for a Soft and Sparkly Blush Holiday blog post. I hope you enjoyed exploring this delightful twist on Christmas decor - a soft, sparkly blush design that's refreshingly unique, free from the traditional reds. The response on Instagram has been heartwarming, with many of you curious about crafting these charming DIY yarn Christmas trees.
After Christmas don't forget to use your leftover yard to make DIY yarn wrapped hearts for Valentines Day!
A special thanks to the Family Handyman for featuring this mantel display in their 10 ways to decorate your fireplace for Christmas article.
Happy Decorating!


You are so clever! Love this idea and easy. Thank you !!
Thank you so much!