Pumpkin Centerpiece DIY: Easy Neutral Fall Decor with a Tiered Tray
Hi friends! Fall is the perfect time to bring a little cozy charm to your home, and this pumpkin centerpiece DIY is as simple as it gets. With stacked wooden trays, white mini pumpkins, a touch of raffia, and a few faux greens, you can create a stylish neutral centerpiece in minutes. No floral design skills required. Just a few easy steps to pull together this Pinterest favorite. Follow along to see how to make this effortless kitchen island or dining table centerpiece in just 10 minutes.

*This post includes affiliate links, for more info on affiliate links visit here!
Jump to:
- About this design
- Stacking the cake stands
- Neutral fall floral arrangement on a tiered tray
- Supplies for this project
- Step by step instructions
- Make an Easy Kitchen Island Centerpiece For Fall in 10 Minutes
- Design 2 - DIY dusty tone fall floral arrangement on a tiered tray
- Creating a cozy fall corner
- Frequently asked questions
- More fall inspiration
About this design
Ah, the joy of giving unused items a fresh purpose! Those footed trays (or "wooden cake stands") were tucked away in my storage, waiting for their moment. Last autumn, I had an aha moment - why store them when I can flaunt their beauty? So, I stacked them up, one on top of the other, envisioning a unique fall-themed kitchen island centerpiece. Using this stair-step effect with the trays works like magic, adding that perfect touch of fall.
It's like inviting the autumn season right into your home, effortlessly claiming a corner of your island for this delightful seasonal centerpiece. Who says decorating can't be easy?

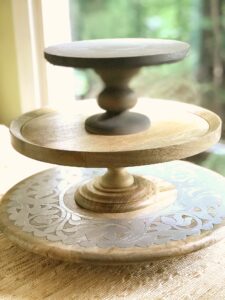
Stacking the cake stands
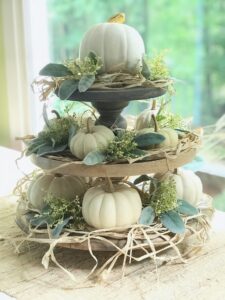
As I mentioned earlier, I might have a bit of a cake stand and wooden tray obsession - just a tad! So, here's the deal: I gathered a bunch of them, a mix of shapes and sizes. Now, for these arrangements, I went all in and stacked three or four of them to create a charming faux tiered tray look.
Starting with the largest stand at the bottom and working my way up to the smaller ones, it's like creating a tiered tower of autumn goodness. Once they were snugly stacked, it was playtime with faux flowers, white pumpkins, and some lovely fillers. And guess what? I decided to whip up two different fall tiered tray designs because, why settle for one when you can have double the fun? Stick around, and I'll walk you through both of these creative setups!

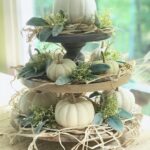
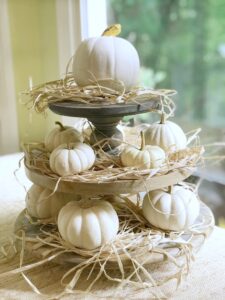
Neutral fall floral arrangement on a tiered tray
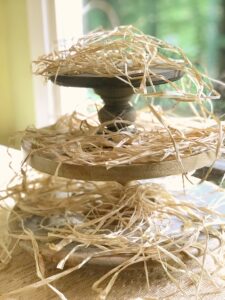
Now, let's dive into the first arrangement! I took three of my beloved trays and gathered some supplies: a mix of faux and real mini white pumpkins, a bunch of raffia, faux lamb ears, and some faux heather. It's like a fall harvest festival right there on your trays! I just placed the trays on top of one another, starting with the largest and working my way up to the smallest.
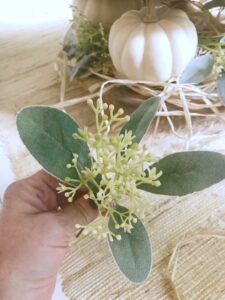
Then, I introduced the raffia, letting it cascade gracefully over the edges of the cake stands. I'm all about those natural elements, and raffia adds incredible texture and serves as a fantastic foundation for the rest of the goodies. The pumpkins took their places, followed by the soft, velvety lambs' ears and the dainty heather. Voilà! You've got yourself a simple yet striking centerpiece, perfect for adorning your kitchen island. With its vibrant green accents, this setup is bound to steal the show in your fall decor lineup!
You can watch me make this design on Pinterest.
Designer Tip: It is often less expensive to buy your faux greenery as a bush. Simply take the bush (cluster of greens shared on one stem) and with wire cutters cut them into small usable pieces.

Supplies for this project
- 3 Round footed trays of varying sizes ( I used 9", 13" and 16") or a 3 tiered tray
- 10-12 Mini white pumpkins (use real or faux)
- 1 Package of Raffia
- Lamb's ears bush
- Dainty green berry stems (Linking similar)
Step by step instructions
Make an Easy Kitchen Island Centerpiece For Fall in 10 Minutes
Materials
- 3 piece Footed trays in varying sizes
- 10-12 pieces Mini white pumpkins (real or faux)
- 1 pkg Raffia
- 1 bunch Lamb's ear
- 2 stems Small green berries
Instructions
- Stack 3 footed trays going from largest to smallest.

- Loosely lay raffia on each layer. Let the raffia overflow on each tier.
- Next place the pumpkins on each tier. Allow space in between each pumpkin for the lambs ears and berries.
- Take the lamb's ears and berries and make a small cluster in your hand.
- Place the clusters through the centerpiece. Place on your kitchen island and enjoy!
Design 2 - DIY dusty tone fall floral arrangement on a tiered tray
Onto the next design! This time, I went all out with four wooden trays, and boy, did it turn out fabulous! Each layer got its own special treatment with faux fall flowers, a touch of excelsior, some pine cones, and charming burlap leaves. The stacking process was the same: I started by arranging the trays from largest to smallest. Then, I went for a rustic look with fine excelsior as my filler.
The show-stealers, aka the flowers, took their positions next. Some were trimmed short with wire cutters, while others simply separated from their stems. Finally, the pine cones and those adorable burlap leaves sealed the deal. This arrangement found its perfect spot on our kitchen counter, right beneath the antique mantel we use as open shelving but would also work on a large kitchen island. Love these more earthy tones!

Creating a cozy fall corner
I'm thrilled to share how I styled this design! I decided to create a cozy fall corner by combining this beautiful centerpiece with some other seasonal decor pieces. First, I hung a rustic wooden cutting board on the wall because it just screams farmhouse charm. Then, I added a few vintage items to evoke that nostalgic fall feeling. To tie everything together and create a warm base, I laid down my favorite natural woven table runner.
Now, let's talk about the star of the show - the centerpiece itself! It features a lovely dusty mauve dahlia that instantly gives off those cozy fall vibes. I also included some classic favorites like sunflowers, hydrangea, and chrysanthemums. The whole setup just screams autumn, and it's become the heart of my fall decor.

Frequently asked questions
If you use faux pumpkins and greenery, your centerpiece will last for years. If you use fresh pumpkins, they should stay looking good for 2 to 4 weeks depending on the temperature inside your home.
If you do not have cake stands or trays you can use this same design on an actual tiered tray like this one!
Yes. Fresh flowers look beautiful tucked in with pumpkins, but keep in mind they will wilt quickly without water. For longer-lasting results, consider dried flowers or faux stems.
Go with what strikes you whether it be muted neutral tones or warm fall colors. A collection of orange pumpkins mixed with bright leaves are always fun as are decorative elements that include golden yellows.
Absolutely. Swap out the pumpkins for ornaments at Christmas, pastel eggs for spring, or seashells in the summer. A tiered tray centerpiece can be styled year-round.


Thank you for visiting the blog today, be sure to see this year's list of Fall Garlands!
Whether it's a holiday wreath or a permanent mantel display, you'll find tons of faux floral inspiration in my Floral Design Hub.