How to Make Beautiful Decoupage Pumpkins: 3 Easy DIY Designs
Decoupage pumpkins are made by adhering decorative paper, most commonly paper napkins, to a real or faux pumpkin using Mod Podge. Because paper napkins are thin and flexible, they conform easily to the pumpkin's curves, creating a smooth, painted-on finish. Once sealed with a final coat of Mod Podge, the pumpkins can be displayed throughout the fall season.
Content may contain affiliate links. When you shop the links, we receive a small commission at no cost to you. Thanks for supporting my small business.
Decoupage pumpkins are one of my favorite ways to create custom fall decor. With just a few decorative paper napkins, some Mod Podge, and a plain pumpkin, you can transform an ordinary pumpkin into a one-of-a-kind centerpiece that looks far more expensive than it is.
In this tutorial, I'll show you three of my favorite decoupage techniques using both real and faux pumpkins. From a simple statement wreath to botanical cut-outs and an elegant chinoiserie-inspired design, each style creates a completely different look while using the same easy process. Whether you're decorating a coffee table, dining table, or entryway, these pumpkins are a beautiful way to welcome the fall season.
At a Glance: Decoupage Pumpkins
_______________________
- Learn three beautiful ways to decorate pumpkins with decoupage
- Tips for choosing the best pumpkins and paper napkins
- Step-by-step tutorials for three unique design styles
- Create elegant wreath, botanical, and chinoiserie-inspired pumpkins
- Works with real or faux pumpkins
- Perfect for fall centerpieces and seasonal home decor
Summarize and Save this content on:
Jump to:
- At a Glance: Decoupage Pumpkins
- What is decoupage?
- Choosing the best pumpkin for decoupage
- Supplies you'll need
- Style 1: Statement wreath decoupage pumpkin
- Step-by-step photos - style 1
- Style 2: Botanical cut-out decoupage pumpkin
- Step-by-step photos - style 2
- Style 3: Full-coverage chinoiserie pumpkin
- Step-by-step photos - style 3
- Tips for beautiful decoupage pumpkins
- How to display decoupage pumpkins
- Frequently asked questions
- More fun pumpkin crafts to explore
What is decoupage?
Decoupage is the technique of decorating an object by adhering paper to its surface with a decoupage medium such as Mod Podge. Once the paper is in place, additional coats are applied over the top to seal the design and create a smooth, durable finish.
For this project, I use decorative paper napkins because they're thin enough to conform to the curves of a pumpkin, giving the finished design a soft, almost hand-painted appearance.
First time using Mod Podge? Don't worry - I've got you covered. Check out my easy laser printer transfer post for more tips on working with this versatile medium.
Choosing the best pumpkin for decoupage
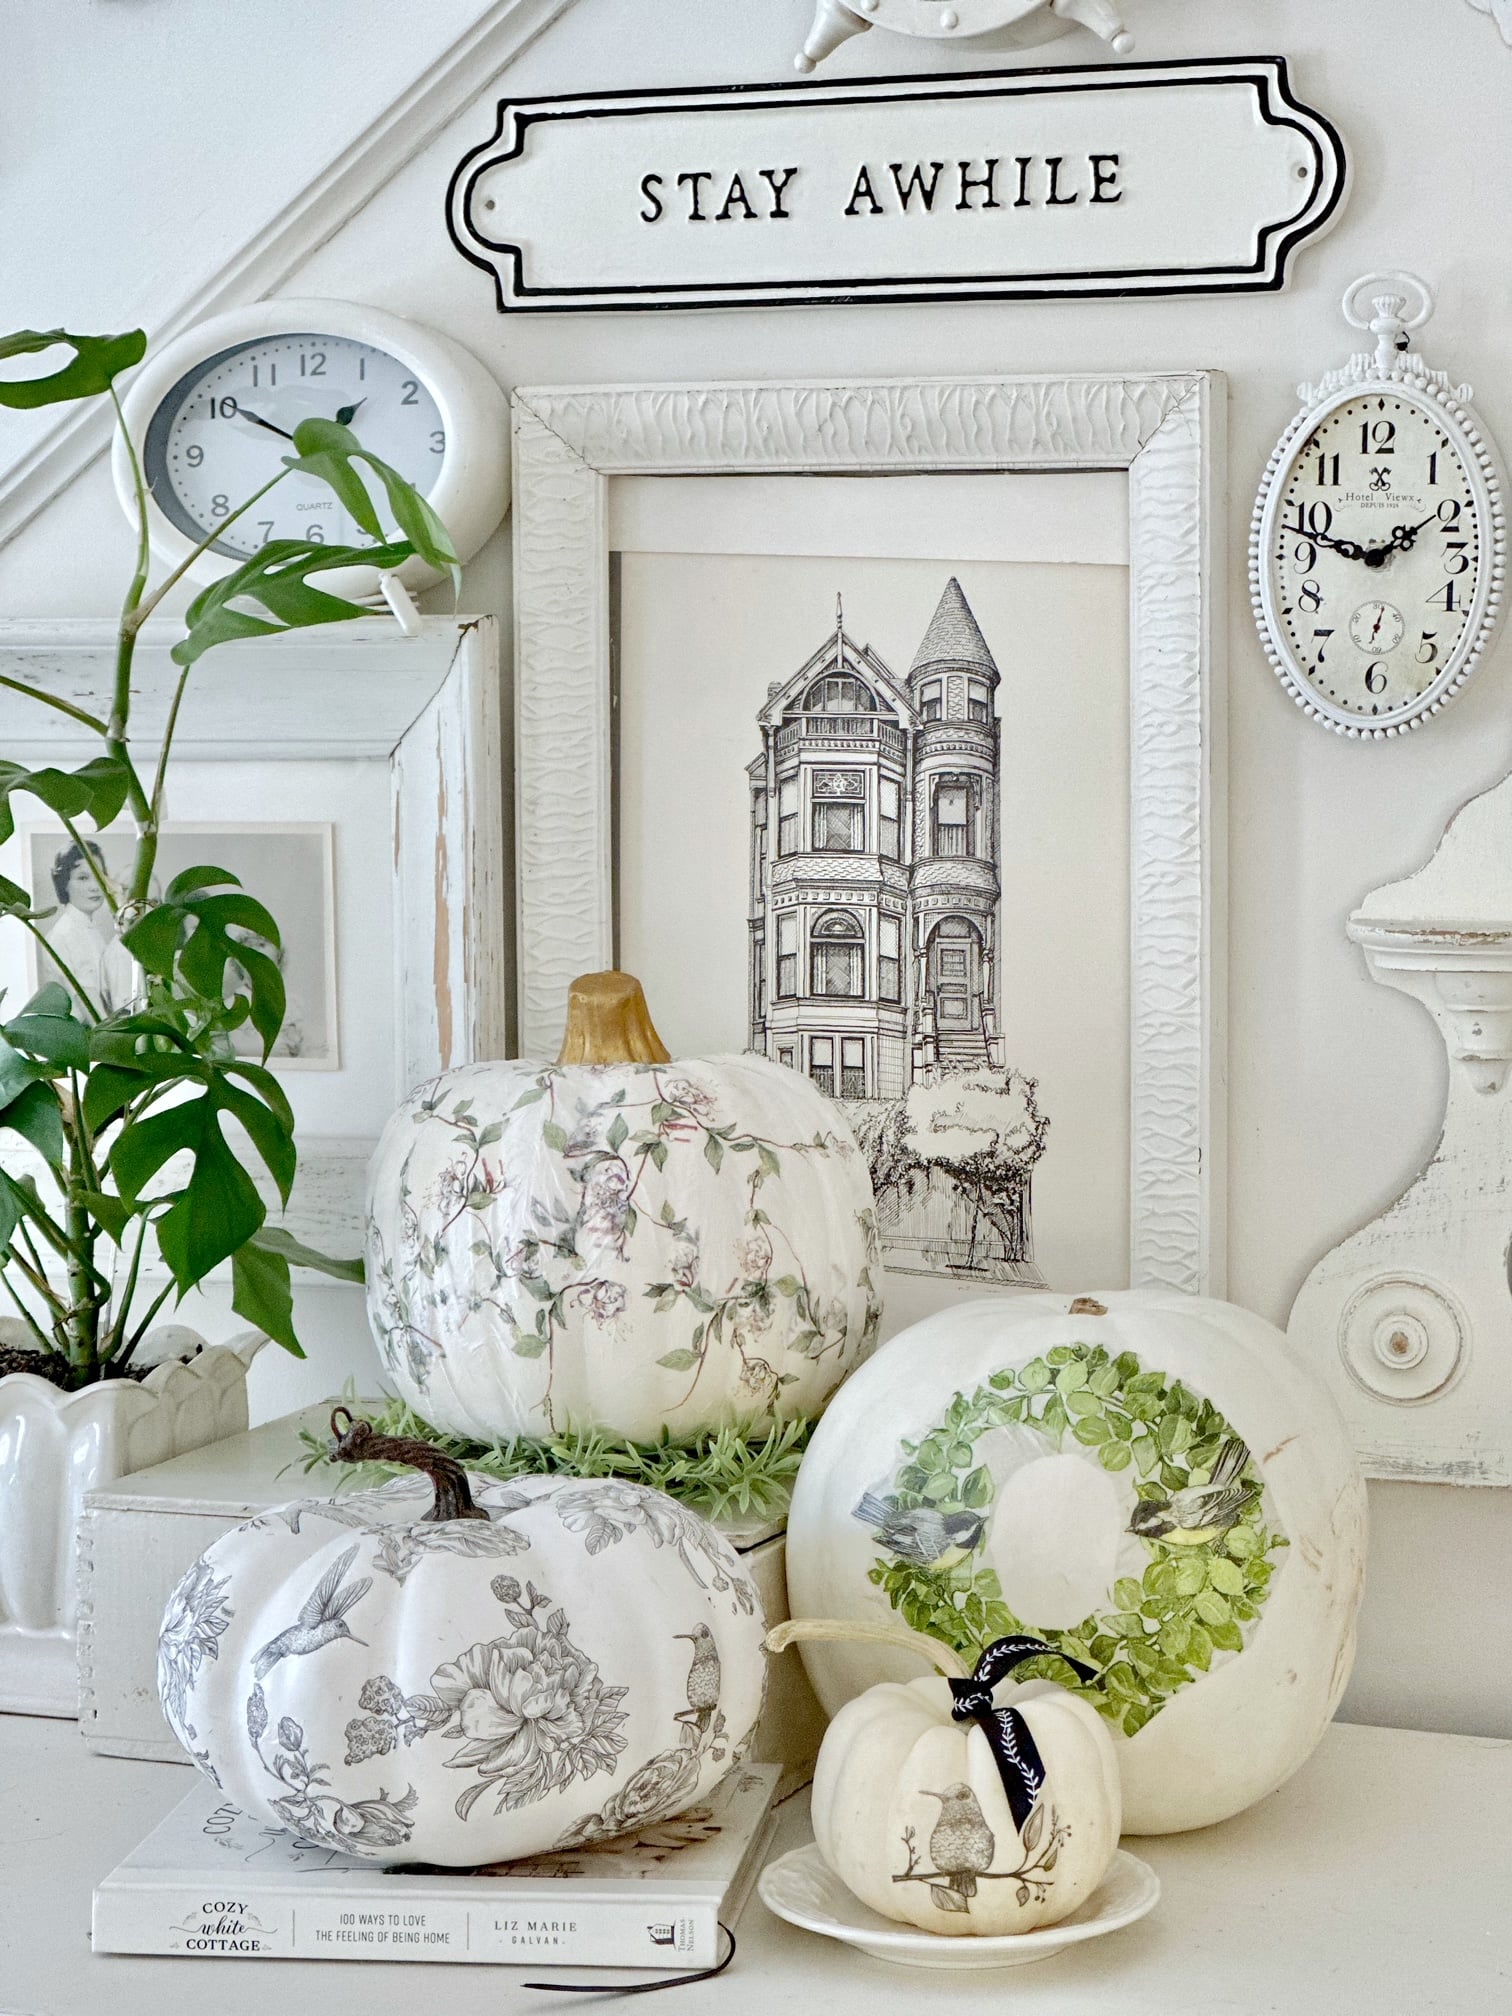
Choosing the right pumpkin will make the entire project easier. I almost always reach for white pumpkins because they allow the colors and details of the napkins to really stand out. Whether you're creating a simple wreath design or covering the entire pumpkin in a chinoiserie pattern, a light background gives the finished project a clean, elegant look.
Look for a pumpkin with smooth, unblemished skin. Deep ridges, bumps, or rough spots can make it more difficult for the paper to conform to the surface without wrinkles. I also recommend choosing a pumpkin that's large enough for your design. Larger napkin patterns need a little more room, while smaller pumpkins work beautifully for simple focal designs.
Both real and faux pumpkins work well for decoupage. Fresh pumpkins are perfect for seasonal decorating, while faux pumpkins can be enjoyed year after year.
One tip I've learned after decorating with pumpkins for years is to make sure the pumpkin sits flat before bringing it home. I always set it on a flat surface at the farm stand or garden center to make sure it doesn't wobble. A stable pumpkin is much easier to decorate and creates a more polished display once it's finished.
Why I reach for paper napkins: While you can decoupage pumpkins with scrapbook paper, tissue paper, or fabric, I almost always reach for decorative paper napkins. Because they're so thin, they conform beautifully to the pumpkin's curves and the edges almost disappear once sealed with Mod Podge. The result is a softer, more elegant finish that looks almost hand painted.
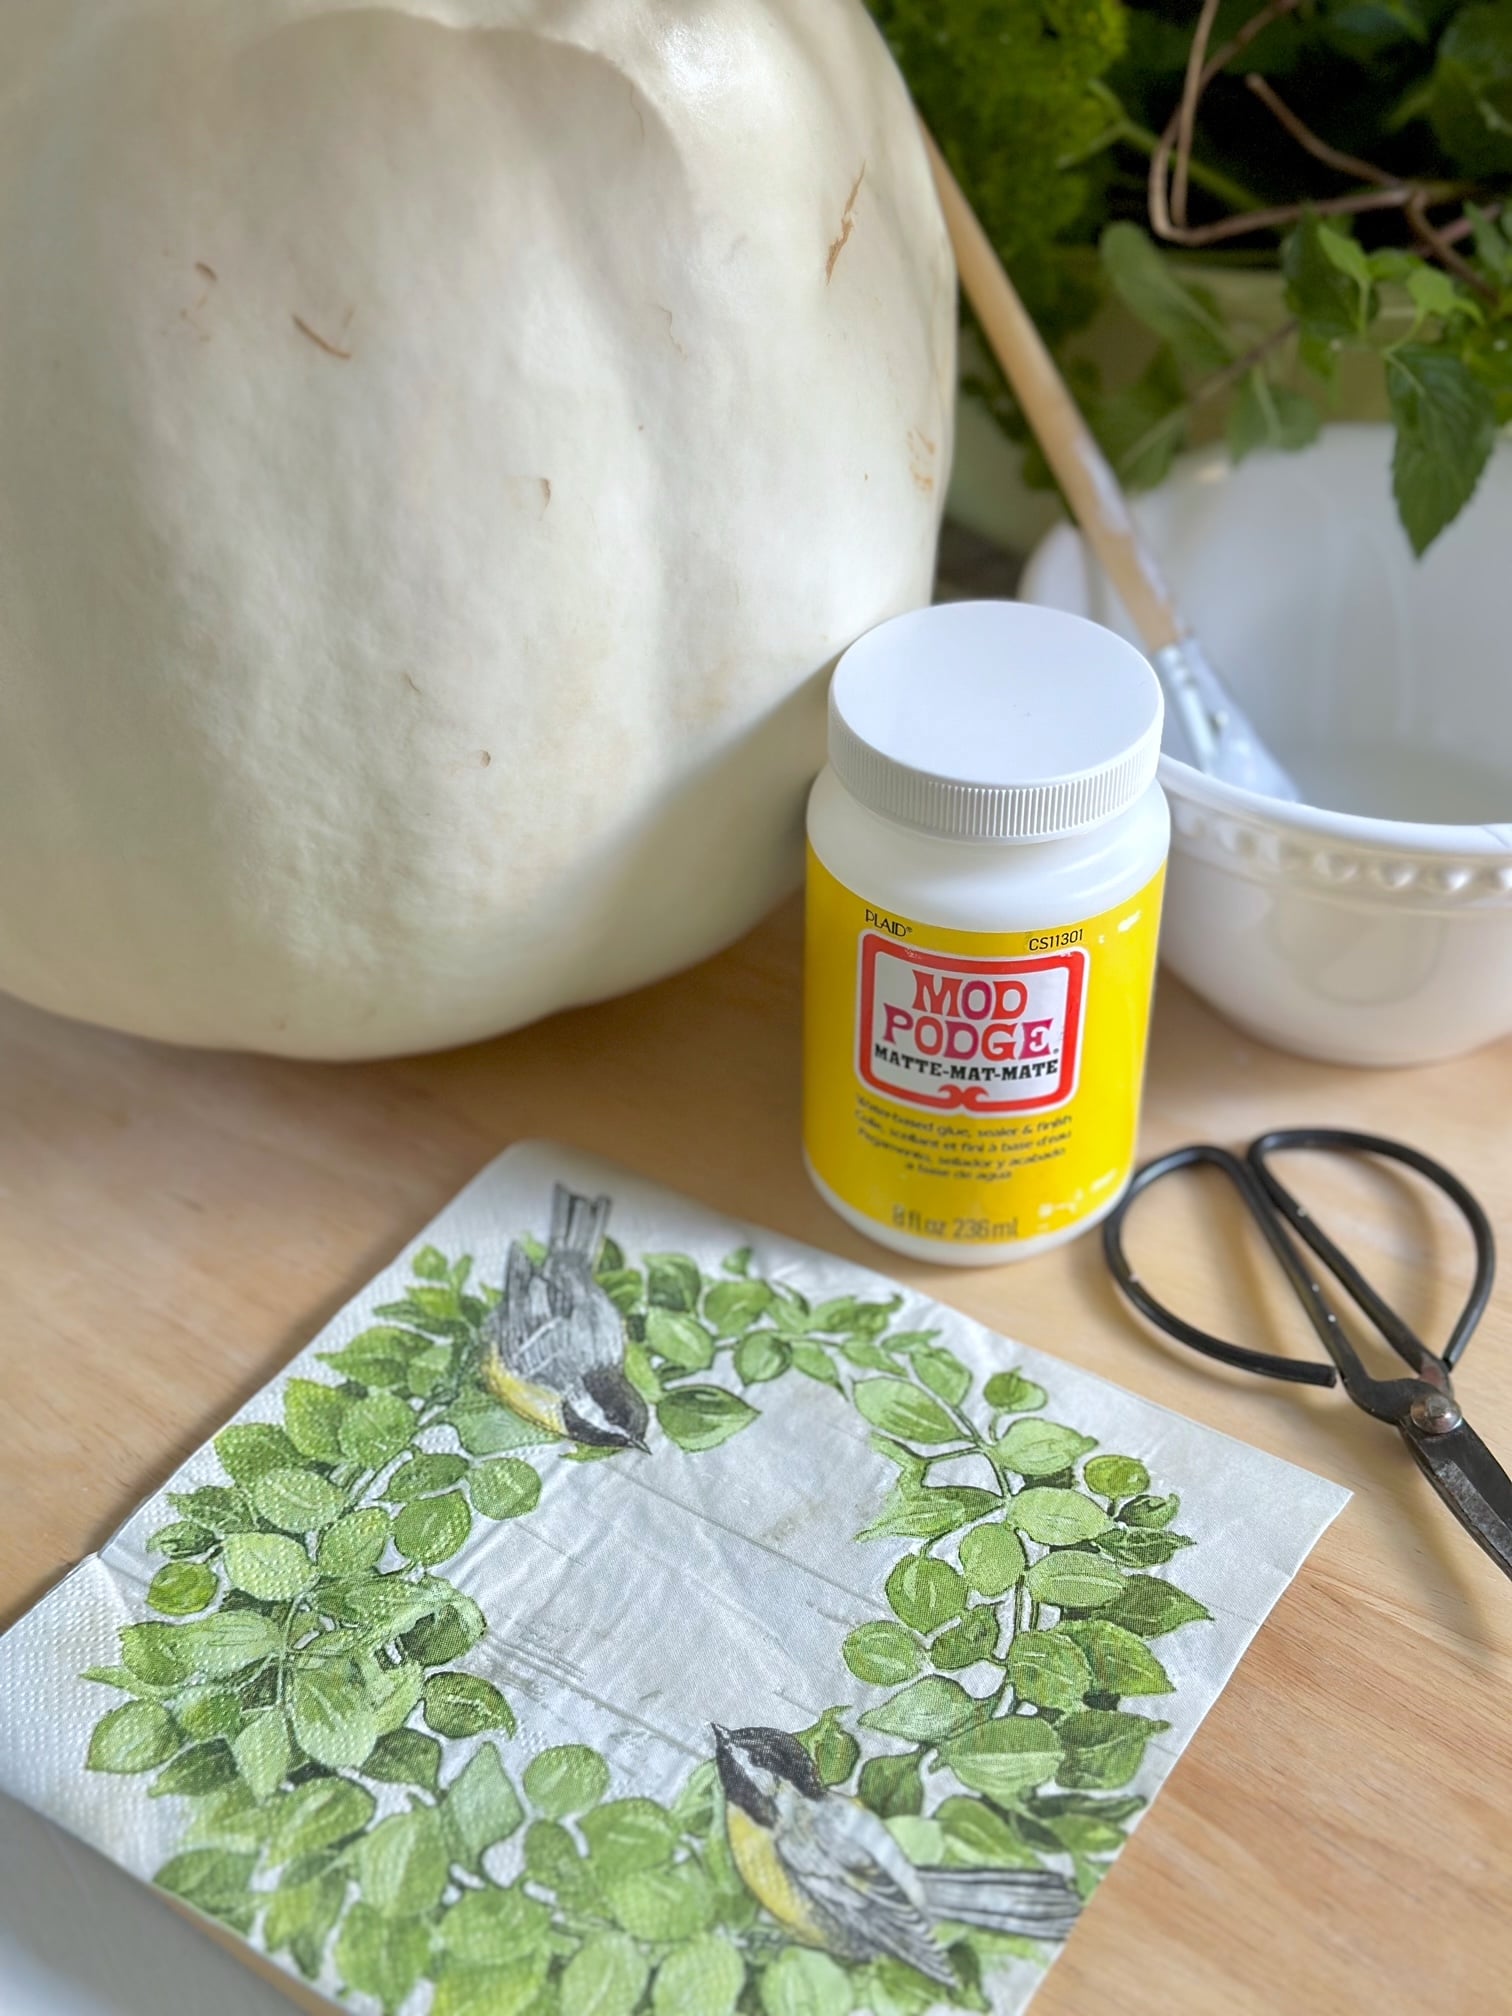
Supplies you'll need
For these decoupage pumpkin designs, you'll need:
- White pumpkins (I used one real and two faux - approximately 8" across)
- Mod Podge - Matte finish
- Foam brush or paint brush
- Scissors
- Paper Napkins (Style 1: Wreath design , Style 2: floral/bird pattern or Style 3: Retro vine pattern)
- Rub n buff (optional for the stem)
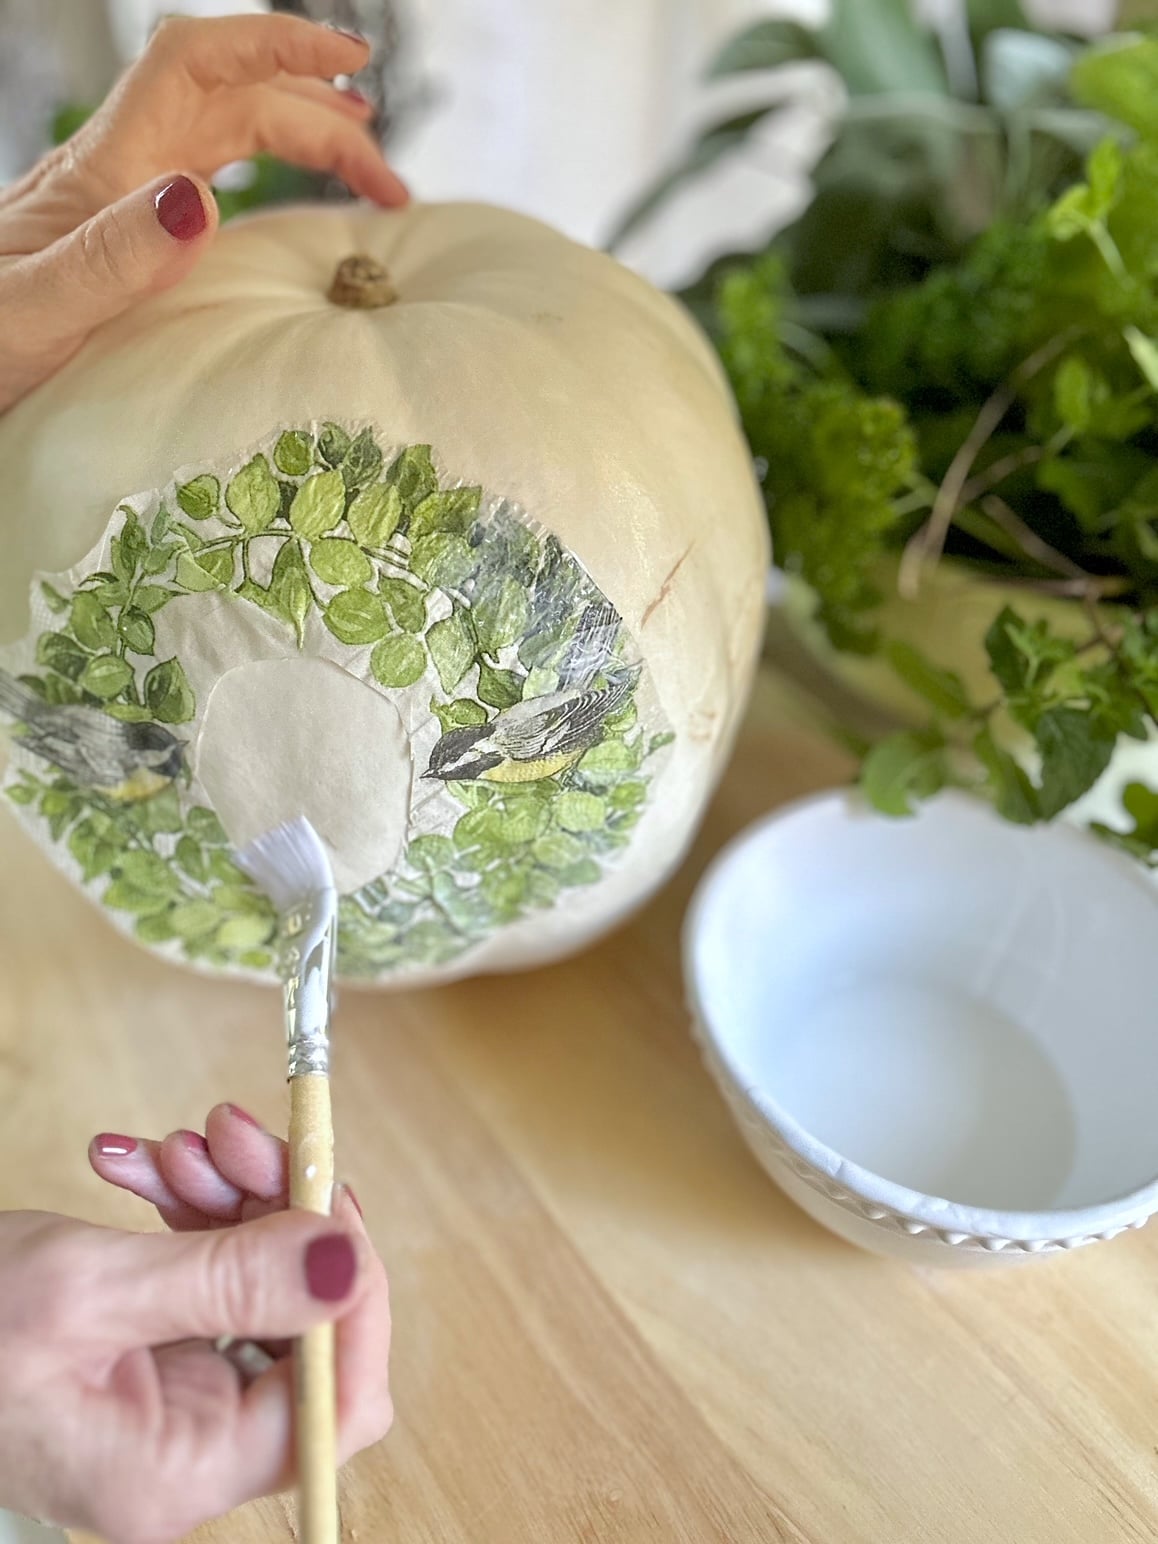
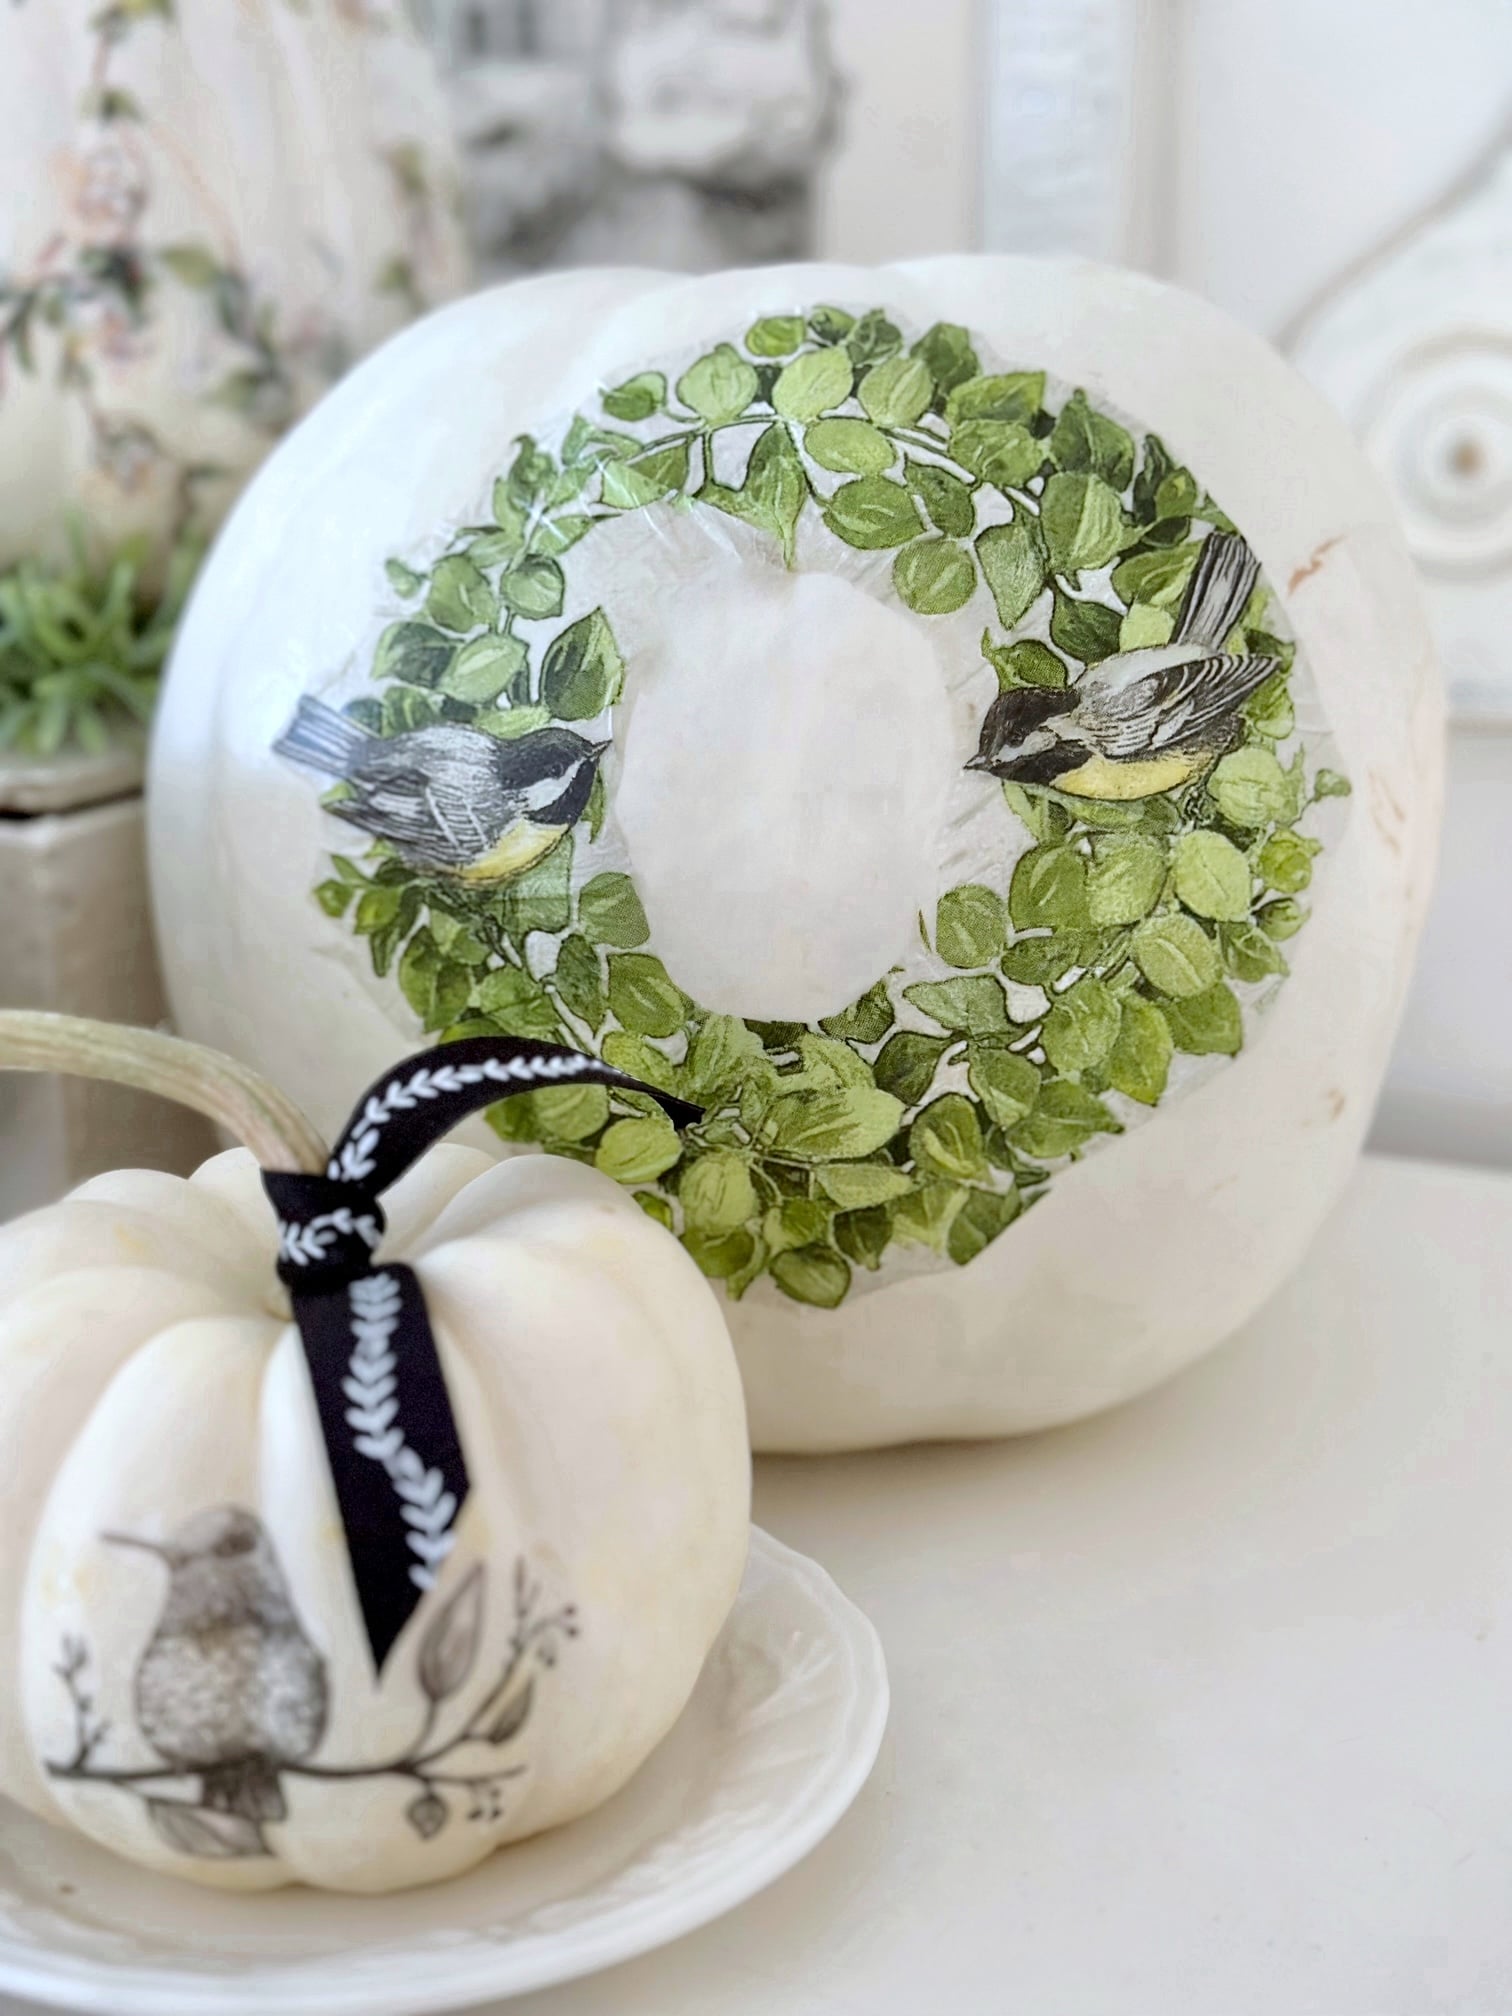
Style 1: Statement wreath decoupage pumpkin
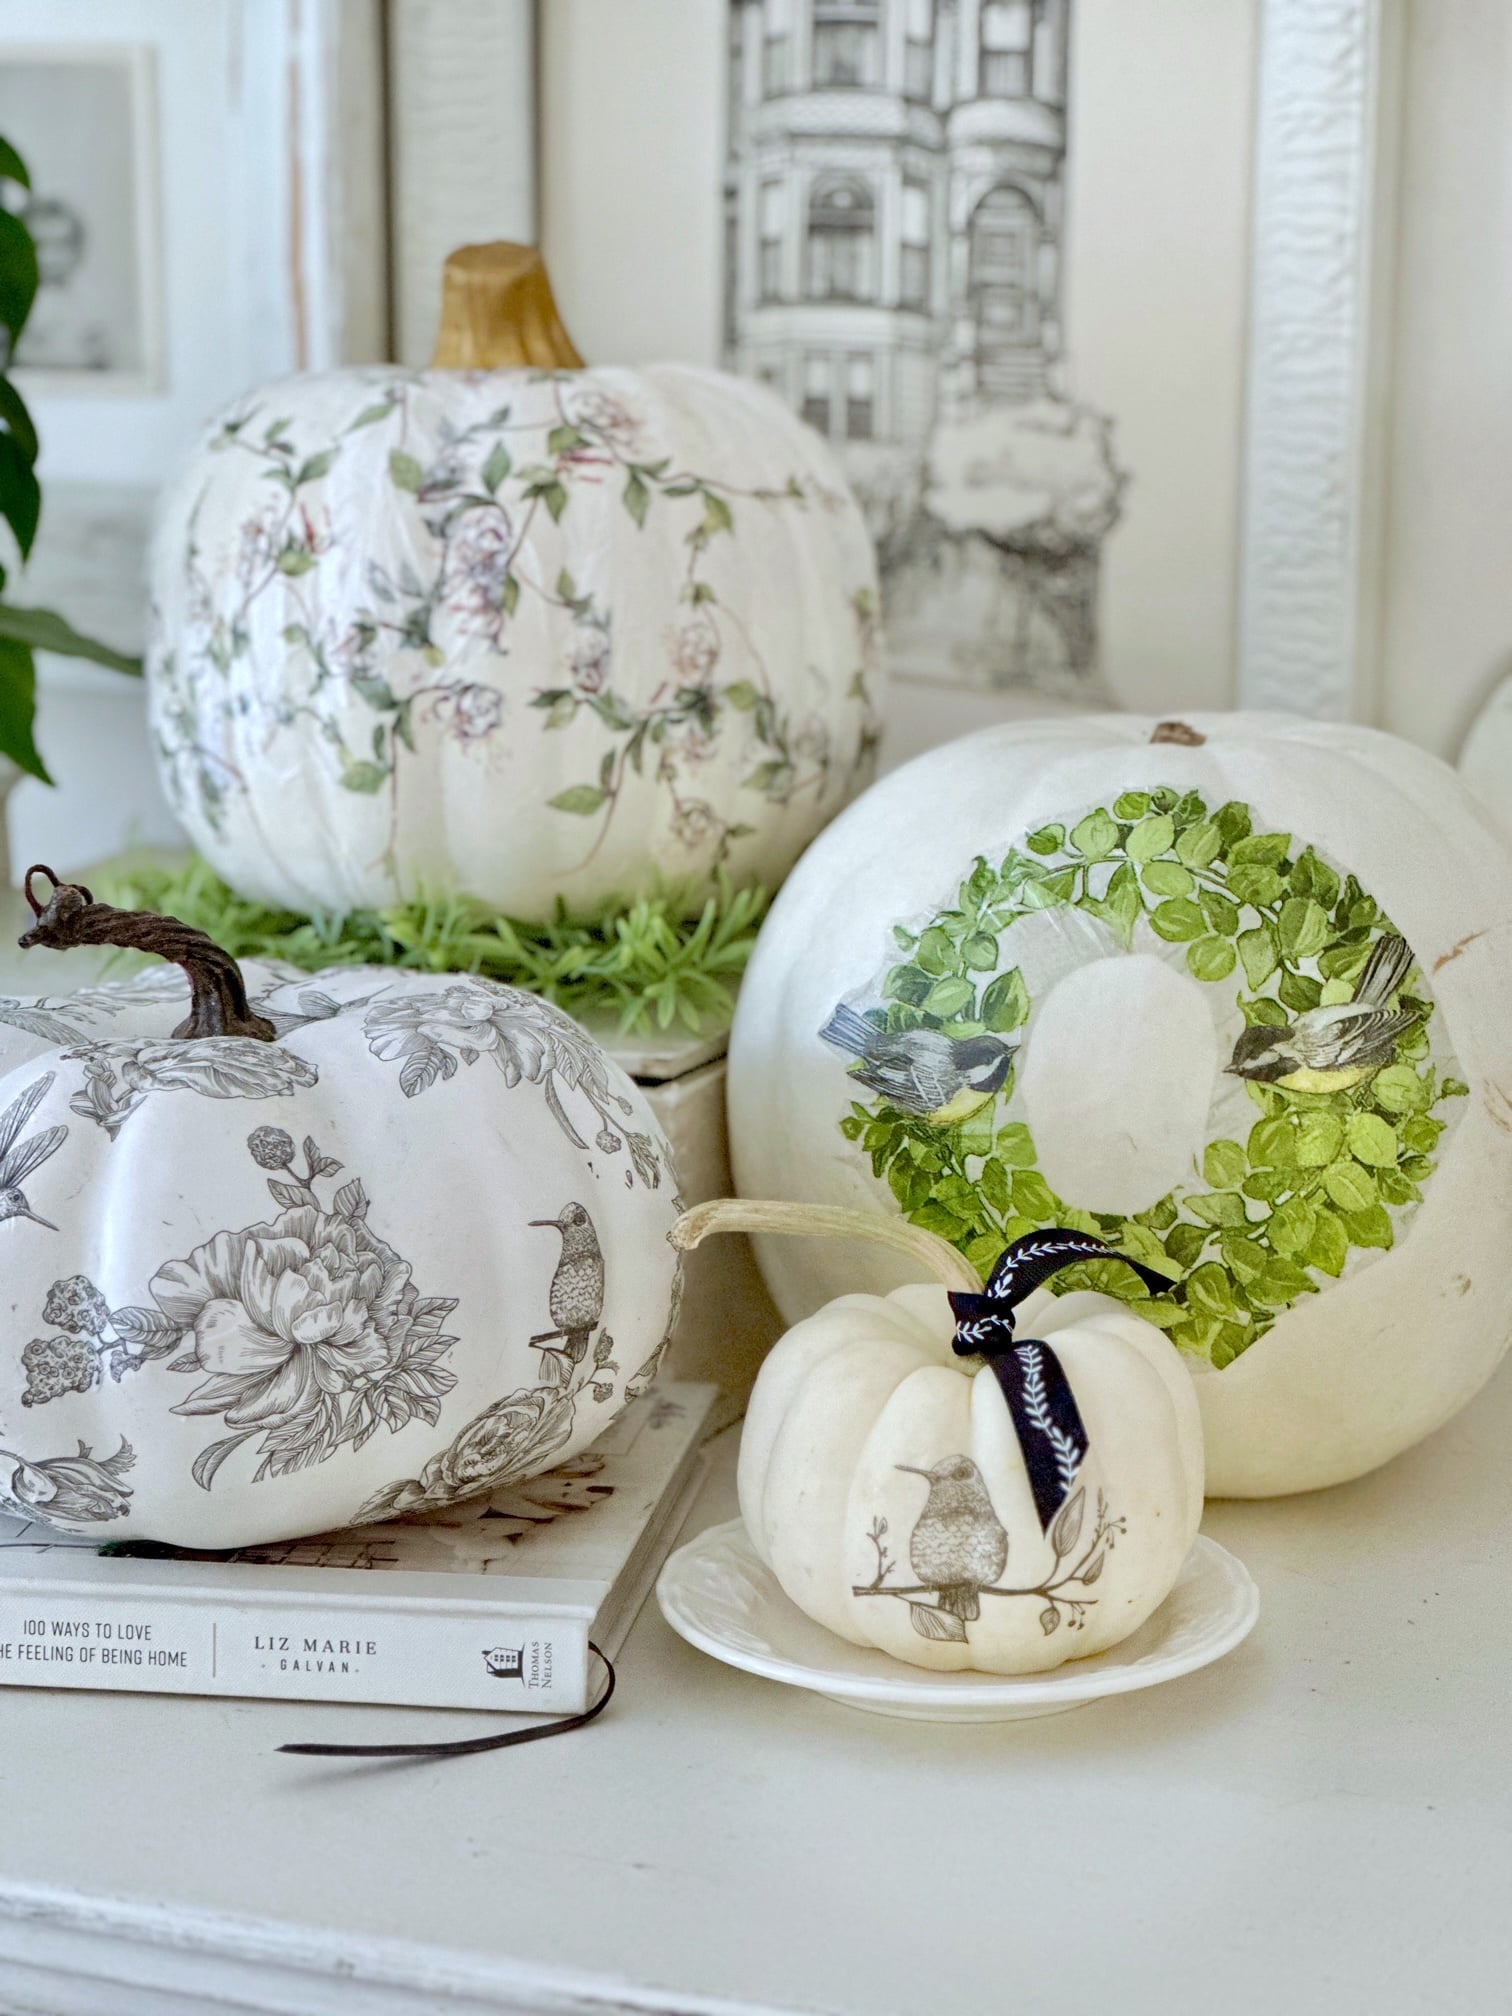
For this design, choose a napkin with one large focal image, such as a wreath, oversized floral, monogram, bird, or seasonal motif. The key is to select a design that fits comfortably on the front of your pumpkin without wrapping too far around the sides.
This is the easiest of the three decoupage pumpkin techniques because you're only applying one main image. It creates a beautiful statement piece while still allowing the shape and color of the pumpkin to show through.
How to make it
- Clean the pumpkin and let it dry completely.
- Cut out the wreath or focal image from the napkin, removing most of the background.
- Separate the napkin layers, keeping only the top printed layer.
- Brush a thin layer of Mod Podge onto the front of the pumpkin where you want the design.
- Gently place the napkin image onto the wet Mod Podge.
- Use your fingers to smooth the napkin into the pumpkin's ridges and curves.
- Let it dry, then seal the design with another thin layer of Mod Podge.
Quick tip: If the napkin doesn't lay flat around the edges, make a few tiny cuts so the paper can conform to the pumpkin's curve. This helps prevent wrinkles and gives the finished design a smoother, more polished look.
Step-by-step photos - style 1


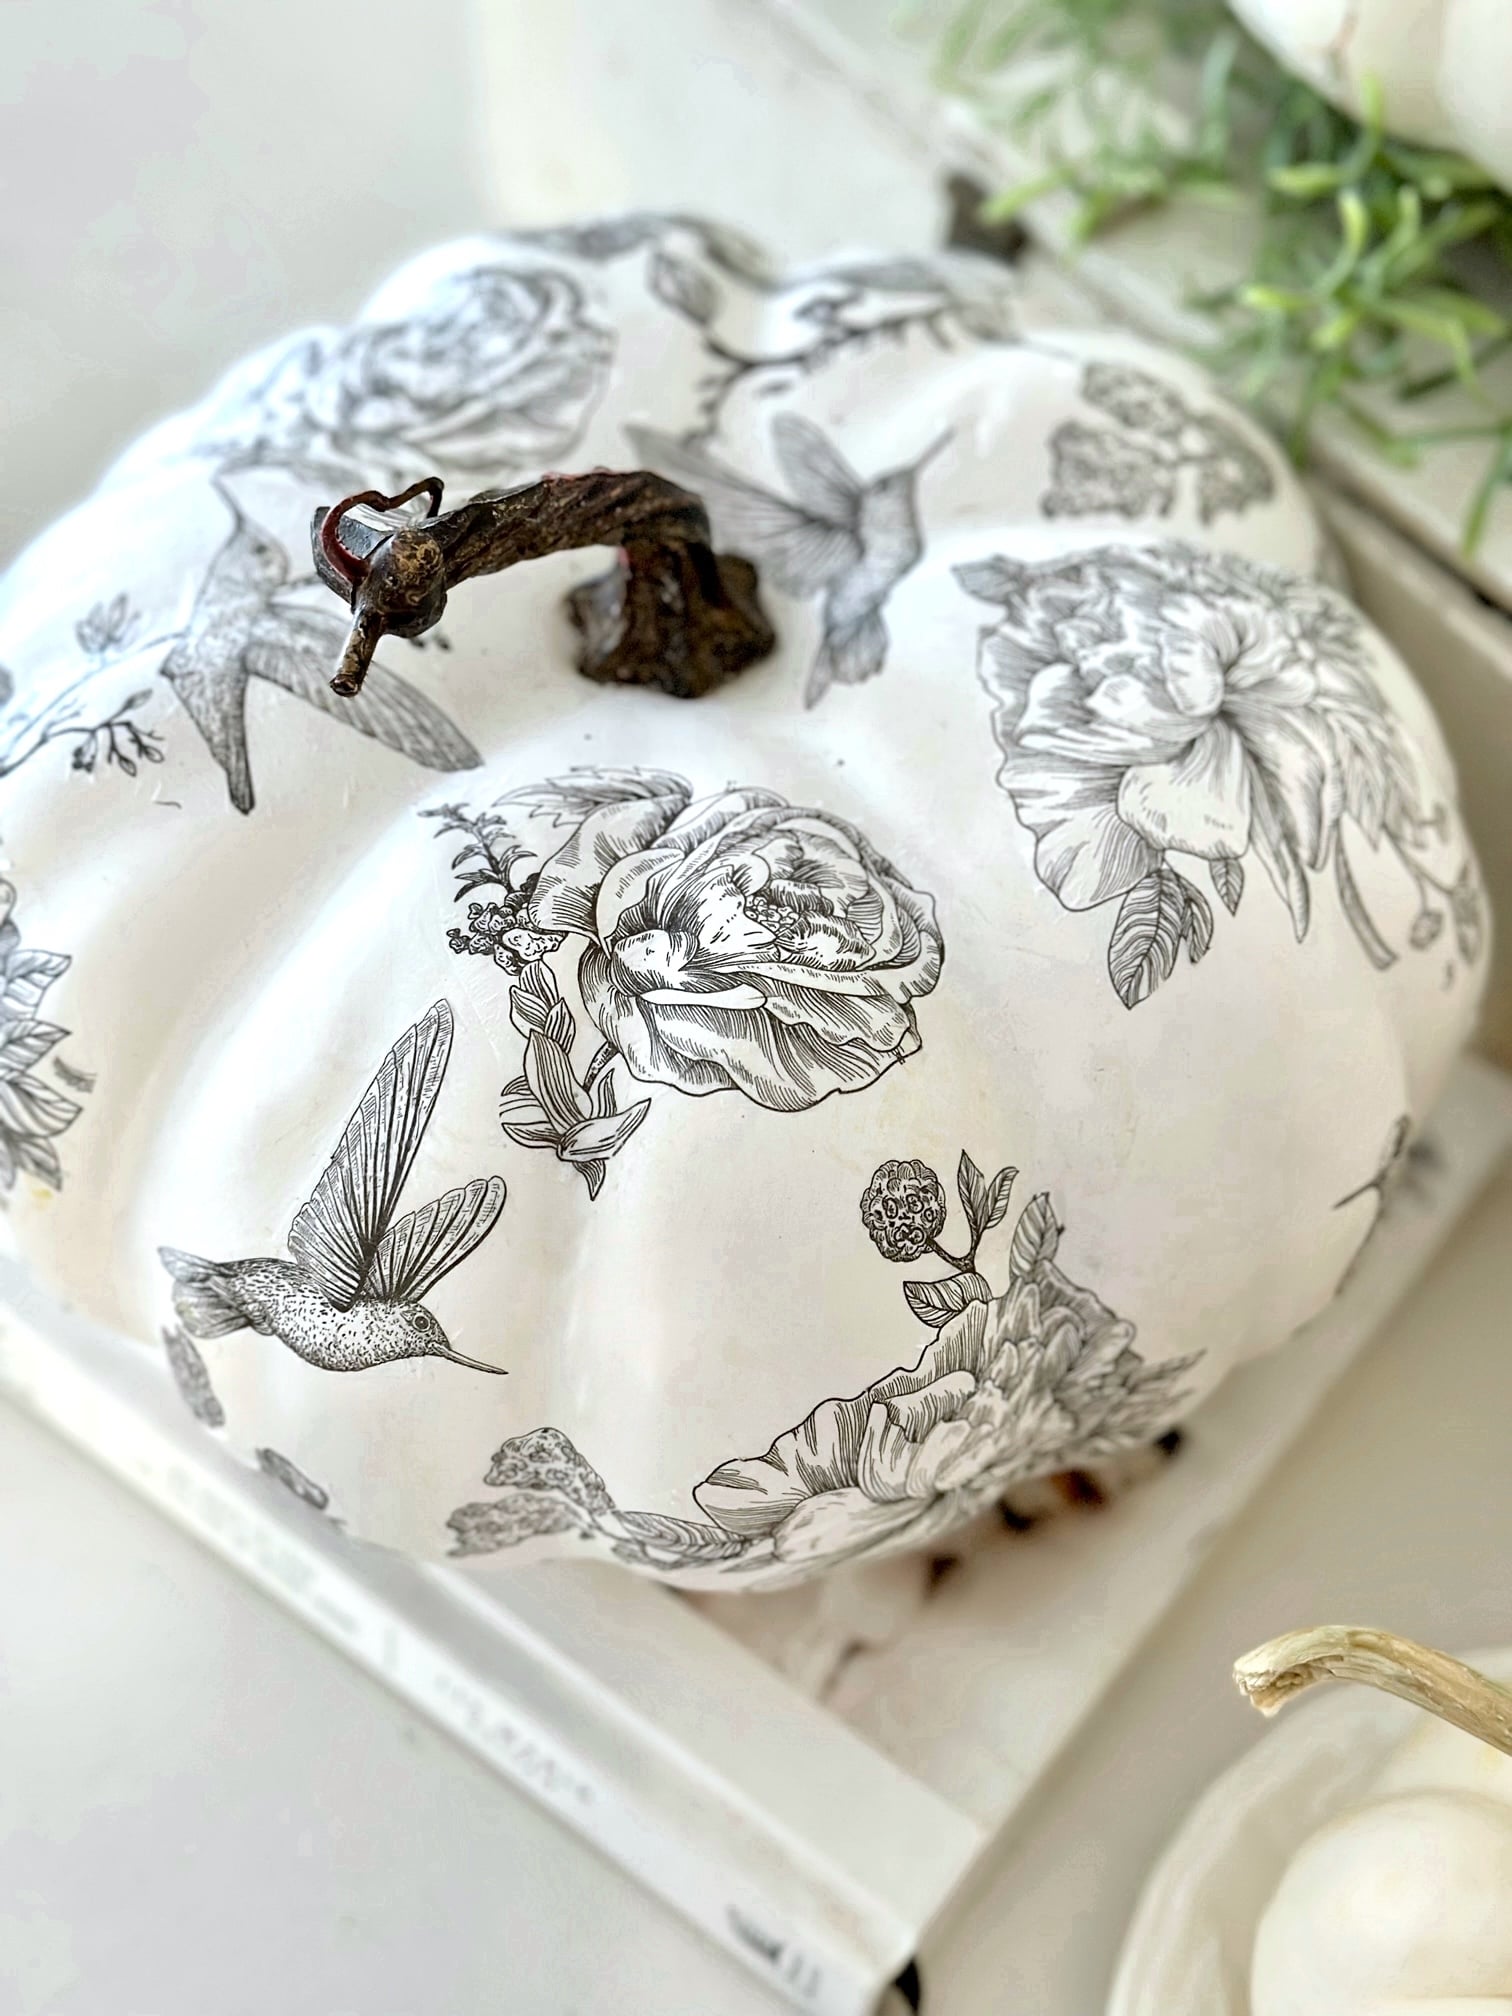
Style 2: Botanical cut-out decoupage pumpkin
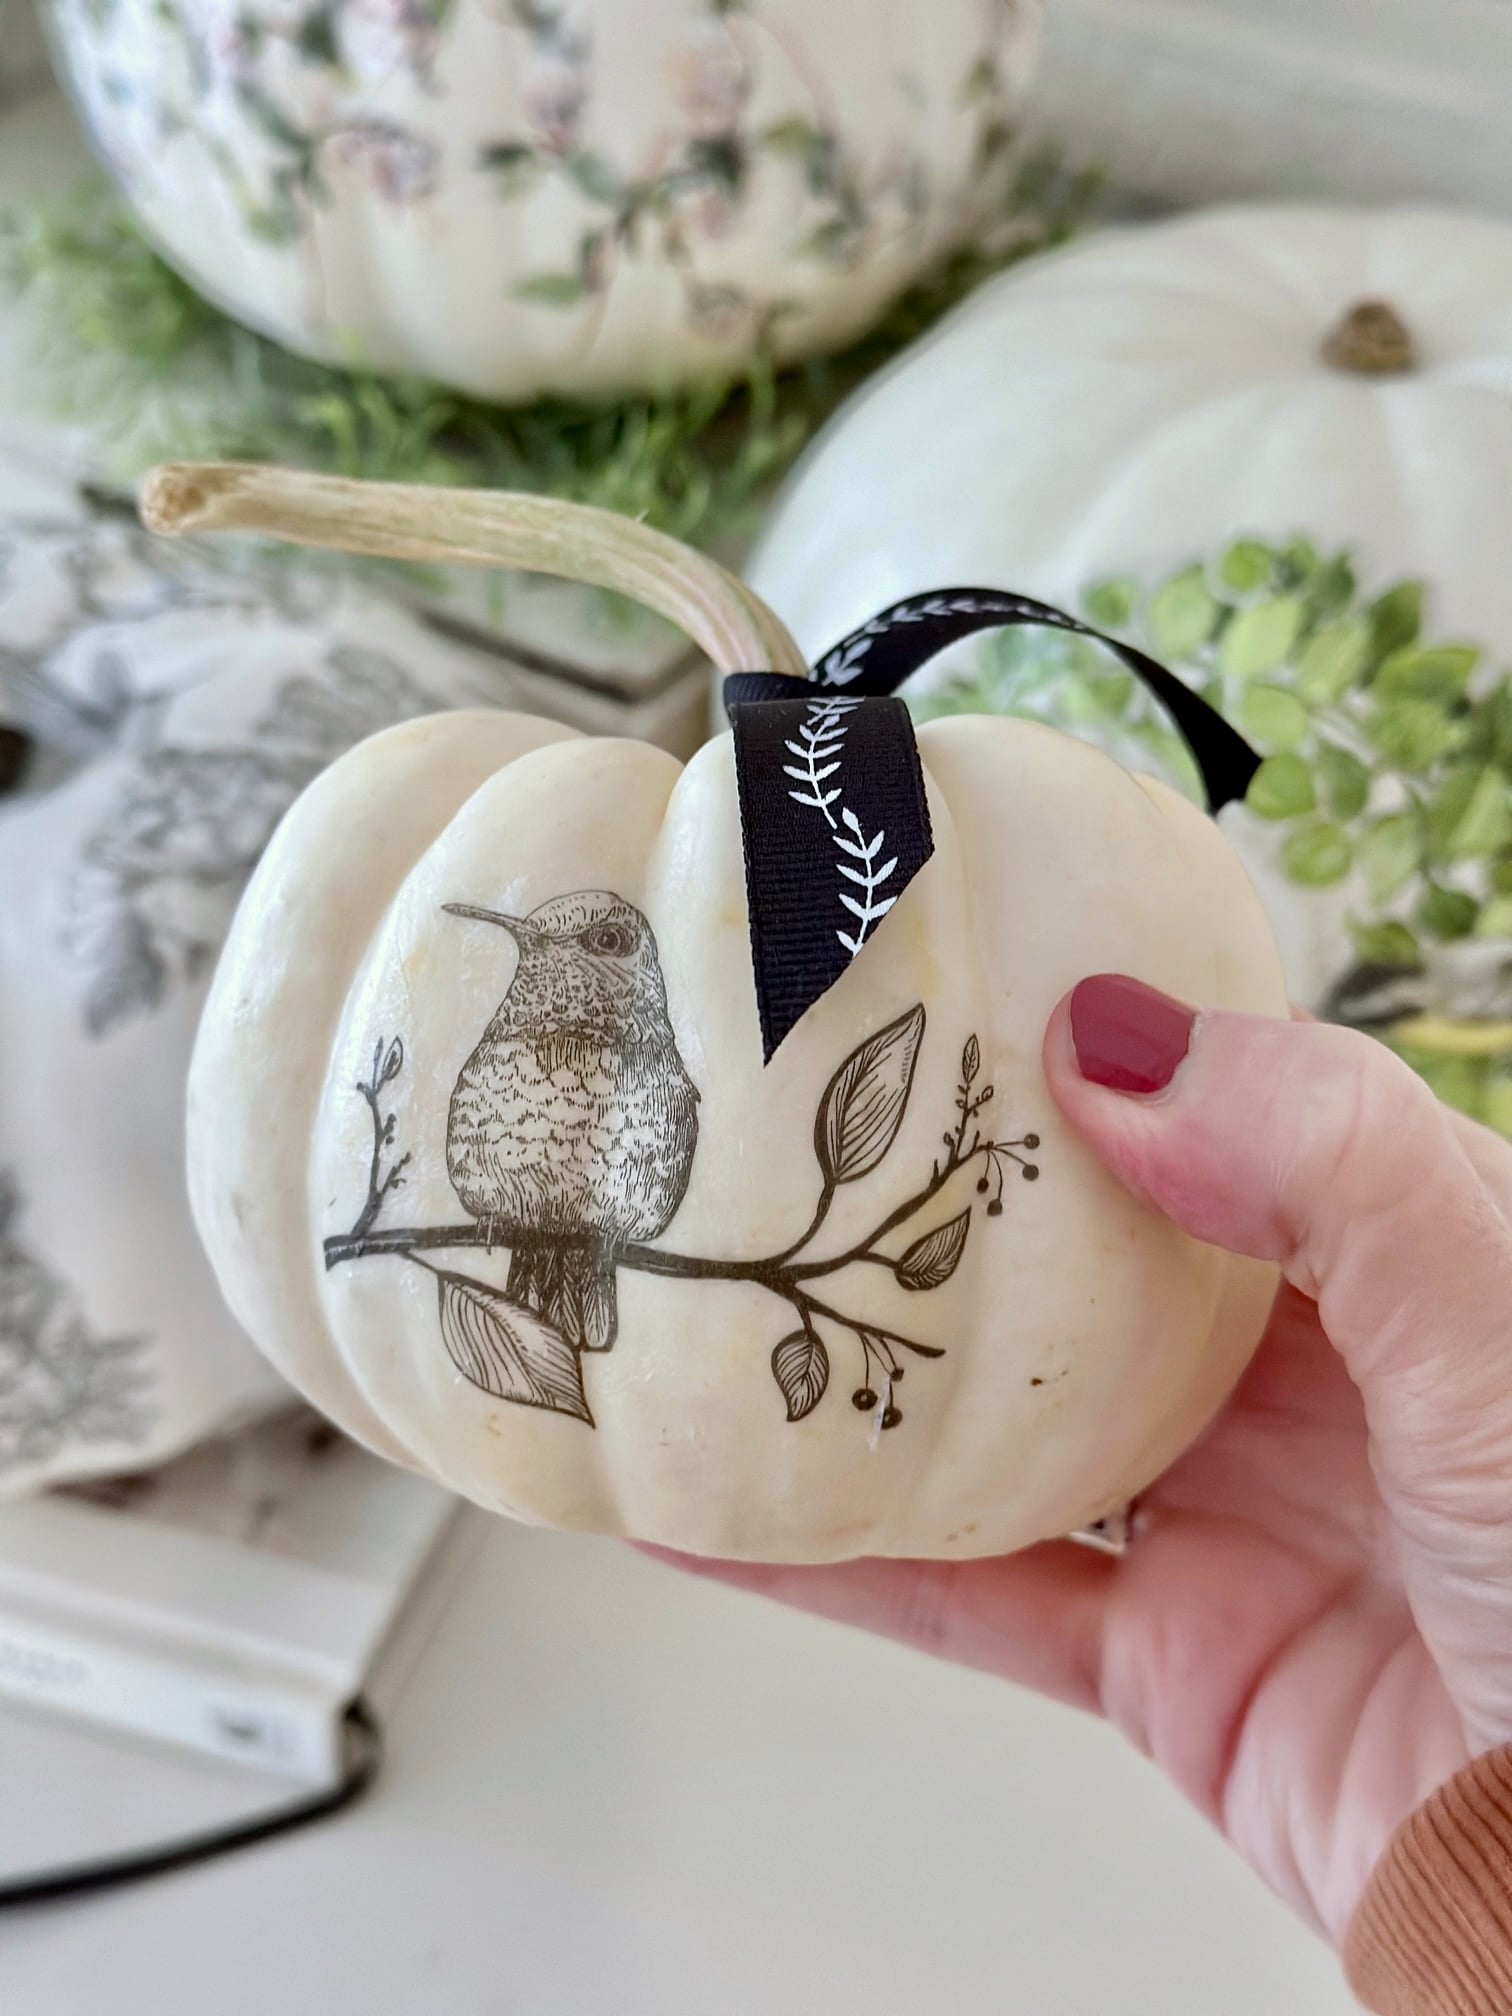
For this design, choose napkins with distinct flowers, birds, leaves, or botanical details that can be cut out individually. This style takes a little more time than the statement wreath pumpkin, but it gives you much more control over the final design.
Because you're working with smaller pieces, it's easier to place each element exactly where you want it and create a balanced composition around the pumpkin.
How to make it
- Cut out the individual flowers, birds, leaves, or motifs from the napkin.
- Separate the napkin layers, keeping only the top printed layer.
- Arrange the cut-outs on the pumpkin before gluing so you can experiment with placement.
- Brush a thin layer of Mod Podge onto a small section of the pumpkin.
- Place one cut-out onto the wet Mod Podge and gently smooth it into the pumpkin's ridges.
- Continue working around the pumpkin, slightly overlapping pieces where needed for a cohesive look.
- Once all the pieces are dry, seal the entire design with a final thin layer of Mod Podge.
Tip for balance: Start with the largest elements first, then fill in with smaller flowers, leaves, or birds. I also like to add a few details near the stem so the top of the pumpkin feels finished.
Step-by-step photos - style 2


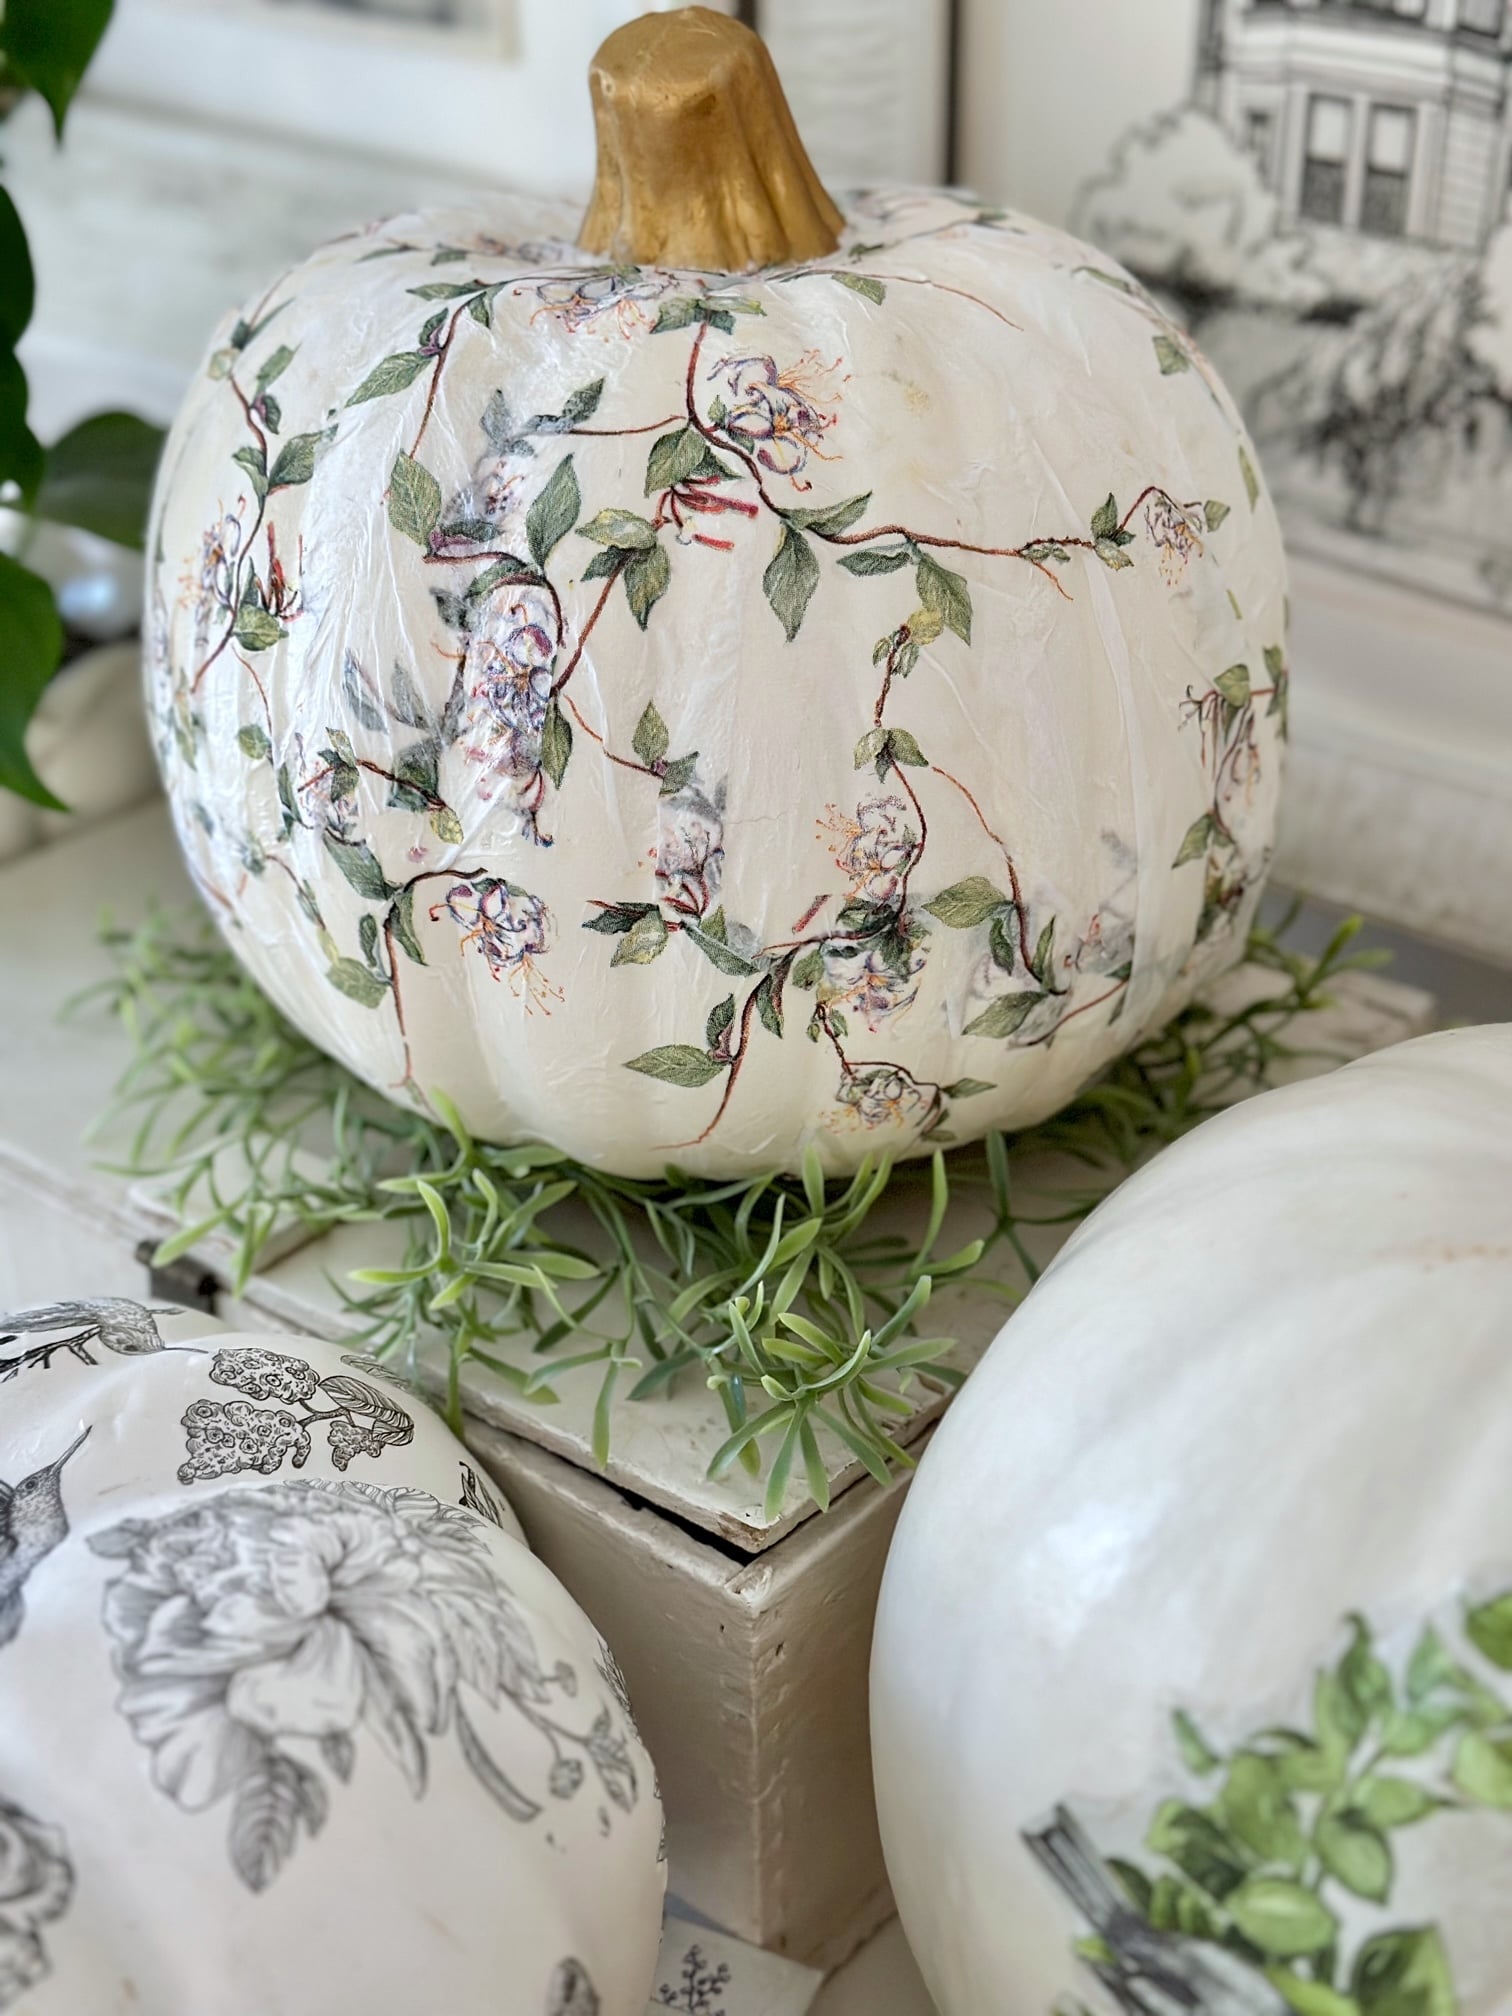
Style 3: Full-coverage chinoiserie pumpkin
If you're looking for a true statement piece, this technique covers the entire pumpkin in a decorative pattern for a seamless, high-end look. I used a green and white chinoiserie napkin, but this method works beautifully with any repeating floral or botanical print.
Because you're covering the entire pumpkin, this is the most detailed of the three techniques. Take your time and work in small sections for the smoothest finish.
How to make it
- Paint the pumpkin stem with Rub 'n Buff or gold paint, if desired, and let it dry.
- Separate the napkin layers, keeping only the top printed layer.
- Begin at the bottom of the pumpkin by applying a thin layer of Mod Podge and carefully adhering the napkin. Trim away excess paper as needed.
- Cut a small half-circle in the center of two napkins so they fit neatly around the stem.
- To make the curves easier to manage, cut the remaining napkins into strips about 2 to 3 inches wide.
- Working in small sections, brush on Mod Podge and apply each strip, slightly overlapping the edges for complete coverage. Smooth the paper into the pumpkin's ridges with your fingers as you go.
- If a wrinkle won't flatten, make a small slit in the napkin so it conforms to the curve of the pumpkin.
- Once the pumpkin is completely dry, apply a final thin coat of Mod Podge to seal the entire design.
Designer tip: Repeating patterns, like chinoiserie, vintage florals, and trailing vines, work especially well for full-coverage pumpkins because the overlaps blend naturally into the design, creating an elegant, almost hand-painted finish.
Step-by-step photos - style 3


Tips for beautiful decoupage pumpkins
A few simple techniques can make the difference between a good decoupage pumpkin and one that looks professionally finished.
- Handle napkins gently. Decorative paper napkins are very thin, so carefully separate the printed top layer and use a light touch when applying it to the pumpkin.
- Work in small sections. Brush on Mod Podge a little at a time so it doesn't begin drying before you place the napkin.
- Smooth as you go. Use your fingers or a soft brush to gently press the napkin into the pumpkin's natural ridges, working from the center outward to remove air bubbles.
- Allow each coat to dry completely. Give the Mod Podge about 15 to 20 minutes to dry before applying another coat or moving on to the next section.
- Finish every angle. Decorating around the stem and adding a little detail near the bottom gives the pumpkin a polished look from every side.
Choosing the right napkins
The napkin you choose has the biggest impact on the finished design. I love chinoiserie patterns for elegant statement pumpkins, while botanical prints, florals, birds, and vintage-inspired designs work beautifully for cut-out and wreath techniques.
Look for napkins with crisp details, rich color, and motifs that fit the size of your pumpkin. Taking a little extra time to choose the right pattern will make your finished pumpkin look even more custom and refined.
While you've got your Mod Podge out, why not try making pressed flower pumpkins? Check out my Easy Pressed Flower Pumpkins tutorial for the step-by-step guide!
How to display decoupage pumpkins
One of my favorite things about decoupage pumpkins is how easily they mix with other fall decor. A single statement pumpkin can become the focal point of a coffee table or entryway, while a grouping of different styles creates a collected, designer-inspired display.
I love arranging them on a dining table with candles, layering them into a mantel display with fall foliage, or styling them in a dough bowl with pinecones, acorns, and moss. For a softer look, pair them with plain white pumpkins so the decoupage designs become the focal point.
Because these pumpkins are works of art on their own, they don't need much else. A few natural elements and varying heights are often all it takes to create an elegant fall vignette.
Frequently asked questions
Yes! Real pumpkins work beautifully for decoupage as long as they're clean and completely dry before you begin. Keep in mind that, like any fresh pumpkin, they'll eventually break down. If you'd like to display your design year after year, use a faux pumpkin instead.
While scrapbook paper, tissue paper, and fabric can all be used for decoupage, I prefer decorative paper napkins. They're much thinner, making them easier to smooth over the pumpkin's curves. Once sealed with Mod Podge, the edges almost disappear, giving the finished pumpkin a soft, hand-painted appearance.
Mod Podge is my favorite because it acts as both the adhesive and the protective topcoat. Apply a thin coat to the pumpkin, gently place the napkin on top, then seal it with another light coat once it's in position. Thin layers produce the smoothest finish.
It depends on the type of pumpkin you use. Fresh pumpkins usually last several weeks when displayed indoors or on a covered porch away from moisture and direct sunlight. Faux pumpkins can be stored and enjoyed for many fall seasons.


Decoupage pumpkins are one of my favorite ways to create custom fall decor because every design is completely unique. Whether you're drawn to a simple wreath, delicate botanical cut-outs, or a full chinoiserie pattern, this easy technique transforms an ordinary pumpkin into a beautiful seasonal accent.
Don't be afraid to experiment with different napkin patterns, colors, and arrangements. Some of my favorite pumpkins have come from trying a new design or combining unexpected botanical elements. That's the beauty of decoupage, every pumpkin becomes its own one-of-a-kind piece.
I hope these ideas inspire you to create a few decoupage pumpkins of your own this fall. If you make one, I'd love to hear which technique you tried or see how you made it your own. Leave a comment below and let me know your favorite design.
Happy decorating, friends!